¶ TOOCAA L2 2W Infrared Laser Module
¶ Get to know your TOOCAA L2 2W Infrared Laser Module
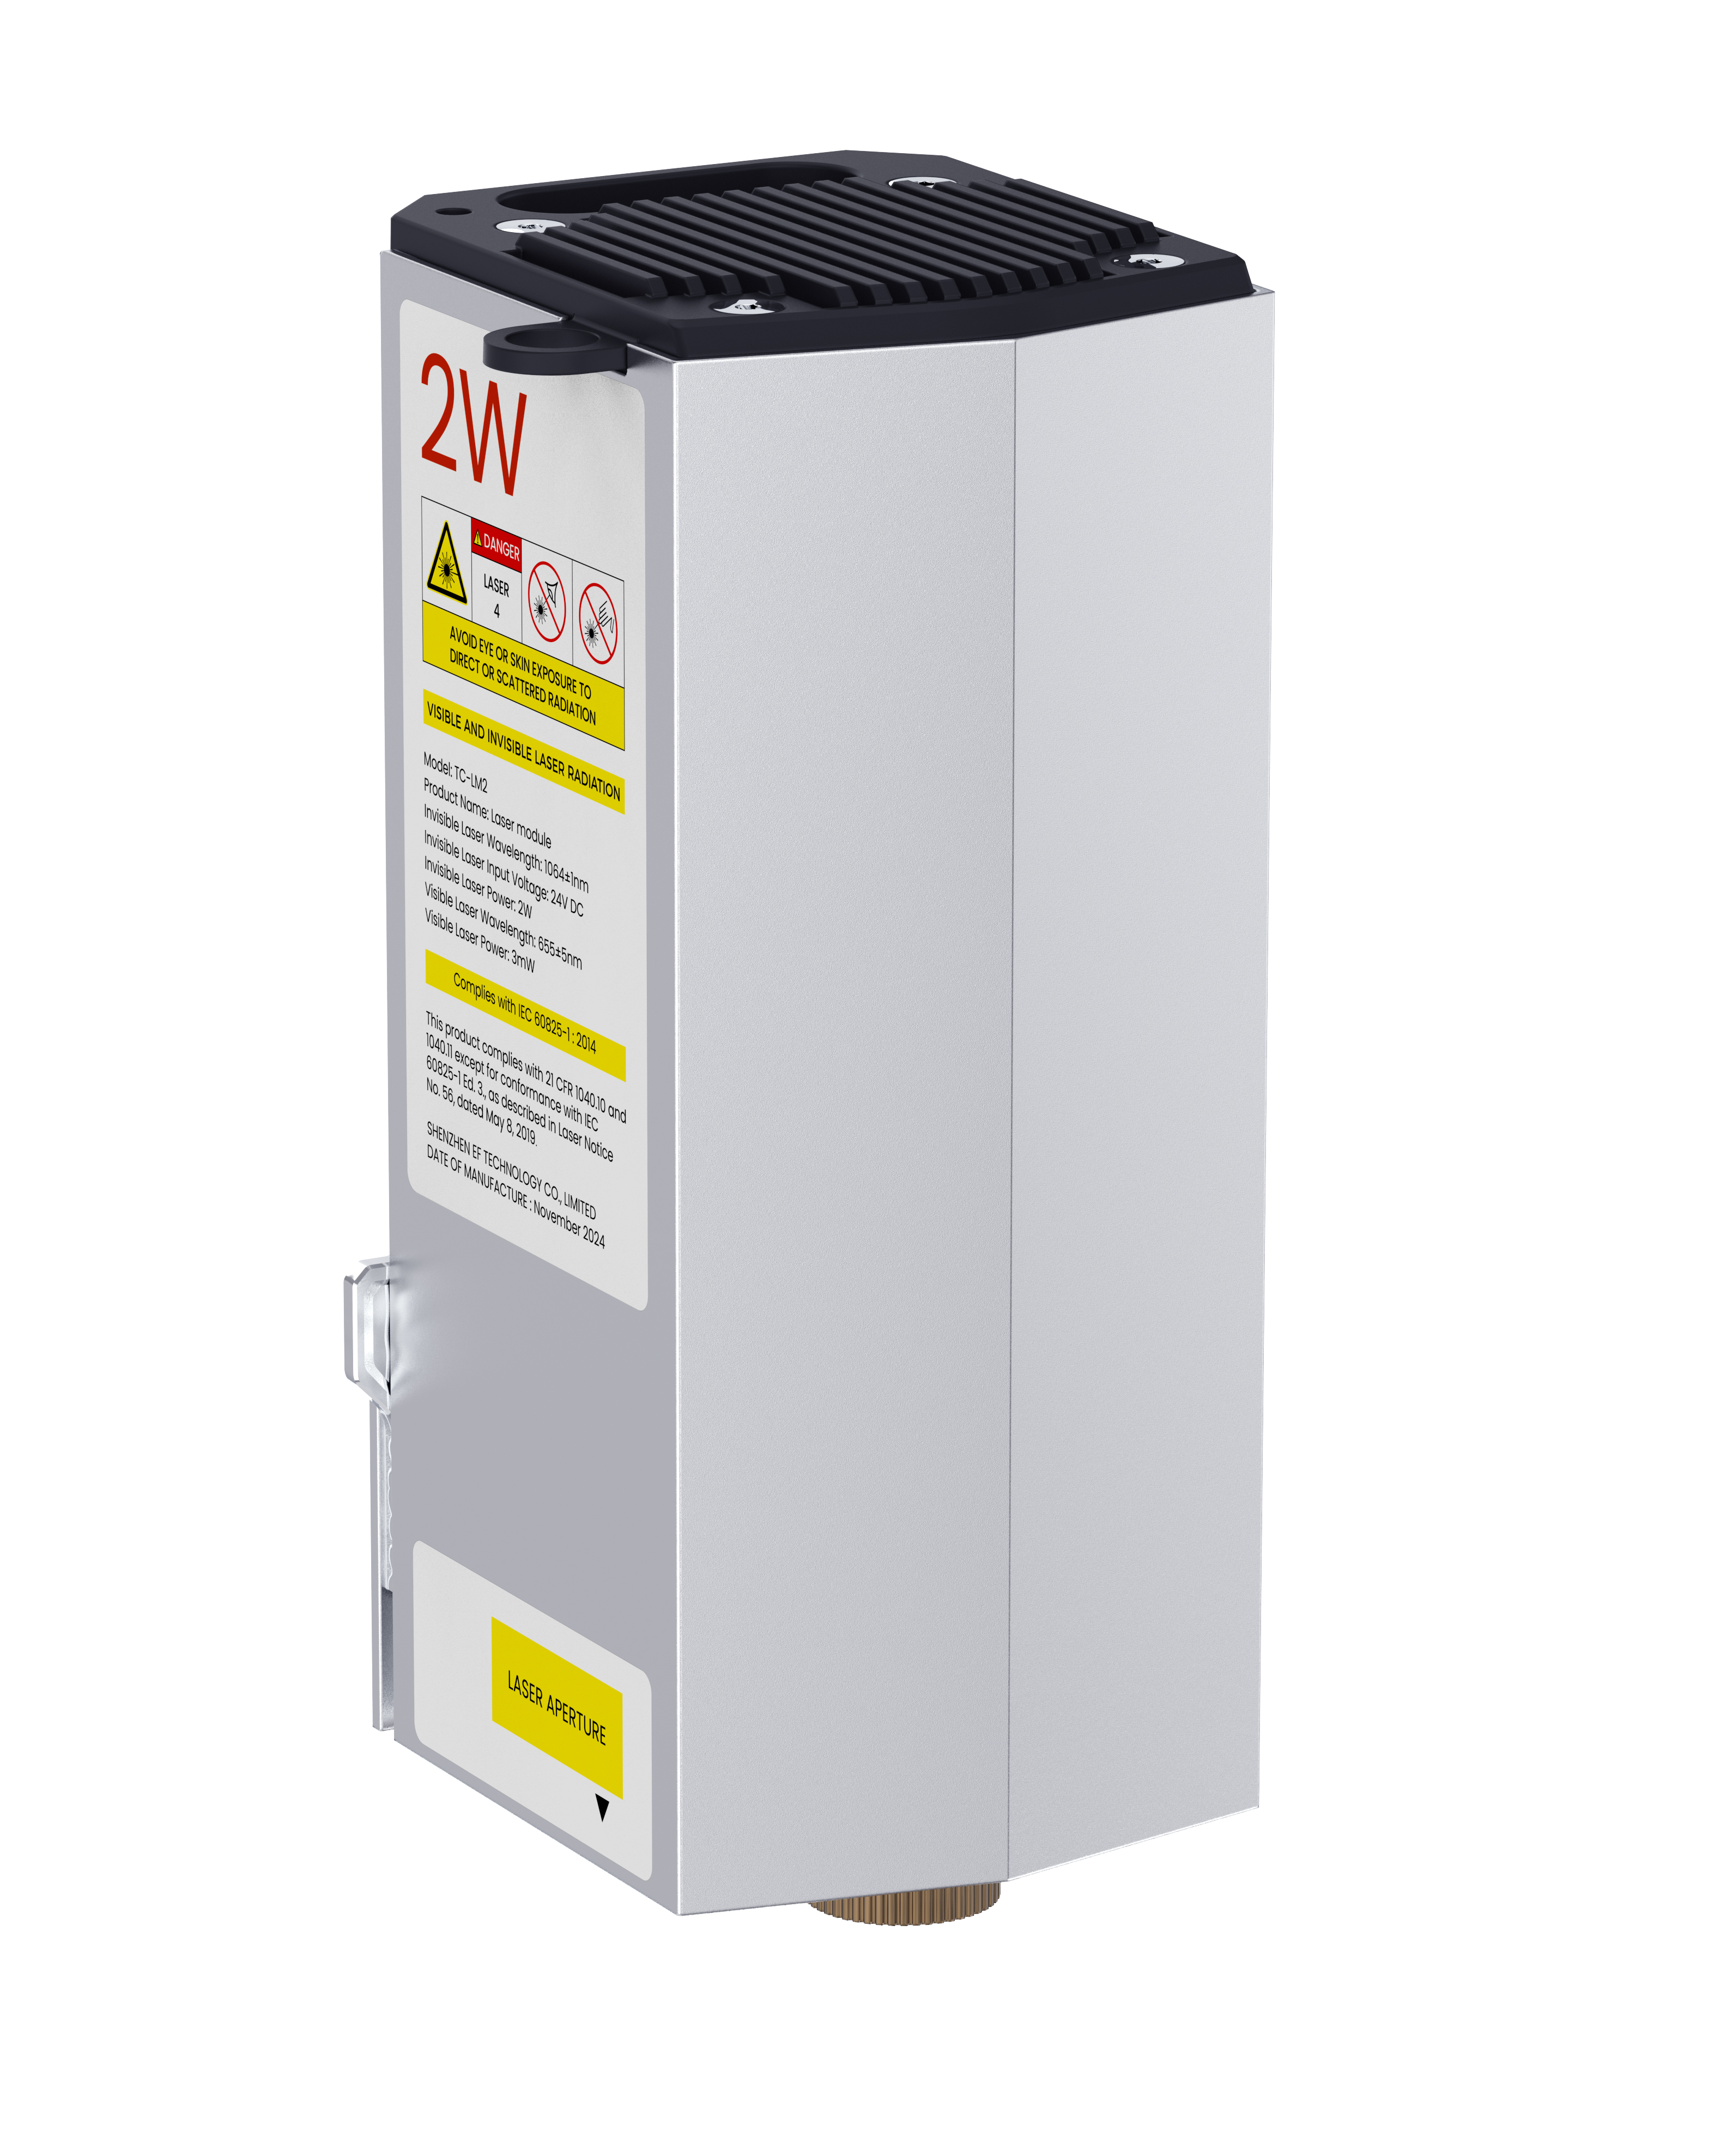
TOOCAA L2 2W infrared laser module is suitable for the TOOCAA L2 laser cutting machine. It has an output power of 2W and is very suitable for engraving on various metals, plastics, acrylic, jewelry, leather, and other materials. The spot size of this infrared laser module is 0.03mm*0.03mm, which can capture every detail in the creation and ensure that each work can be performed with unparalleled precision.
¶ Product Design
¶ Product Specifications
| Product Model | TC-LM2 |
|---|---|
| Power | 2W |
| Visible Light Wavelength | 655±5nm |
| Invisible Light Wavelength | 1064±1nm |
| Pulse Width | 8ns |
| Frequency | 20kHz-30kHz |
| Powered by | DC24V(80W) |
| Focal Length | 20mm |
| Spot Size | 0.03mm*0.03mm |
| Running Temperature | 20-35°C |
| Storage Temperature | -10℃-50℃ |
| Cooling Method | Air Cooling |
| Service Life | 8000h-10000h |
¶ Safety Warnings and Precautions
- Laser Safety Information
TOOCAA L2 belongs to Class I laser products, and laser modules belong to Class IV laser products.
Under normal circumstances, the laser module is wrapped in a smart protective cover to work. TOOCAA L2 has a tilt detection function. If the device is moved during operation, the laser module will stop running to avoid harm to the user. To ensure your safety, please always wear the goggles provided, which will effectively protect your eyes from potential hazards.
TOOCAA L2 is equipped with a smart protective cover. Please follow the instructions to install and use the smart protective cover correctly. The smart protective cover will effectively filter the scattered laser when operating. After the smart protective cover is correctly installed and connected to the power supply, the opening and closing states of the smart protective cover are linked with the laser emission state through interlocking, that is, this product will automatically suspend the laser operation when the smart protective cover door is opened to prevent laser spillage.
Please follow the following safety regulations:
- Do not operate the device with any parts removed. Please note that any missing part of the device may expose the laser system and increase the risk of damage to the device.
- Do not engrave or cut any material containing PVC or vinyl (machining plastics is not recommended). These materials (and other chlorine/chloride-containing materials) generate corrosive vapors that harm humans and damage equipment. Any damage caused by engraving or cutting any PVC material or vinyl is not covered under warranty.
- Never engrave or cut any unknown material. The vaporization or melting of many materials, including but not limited to PVC and polycarbonate, can release hazardous fumes.
- Reflective materials can cause laser reflections and may harm the user. Therefore, before using TOOCAA L2 2W Infrared Laser Module, please remove all reflective materials in the work area; Please ensure no reflective material is in the working area when using TOOCAA L2 2W Infrared Laser Module.
- Flammable and explosive substances may cause fire. Therefore, please ensure no flammable or explosive substances are in the working area before using TOOCAA L2 2W Infrared Laser Module.
- Please pay close attention to whether the device is properly during operation and never operate the device without supervision.
- Signs of warning and instruction
The signs of warning and instruction on the TOOCAA L2 2W Infrared Laser Module are affixed to places that may cause danger before or during operation. If the icon is damaged or missing, please replace it immediately. You can print the image on the next page to get it.

- Safety icon
| Icon | Meaning | Location |
|---|---|---|
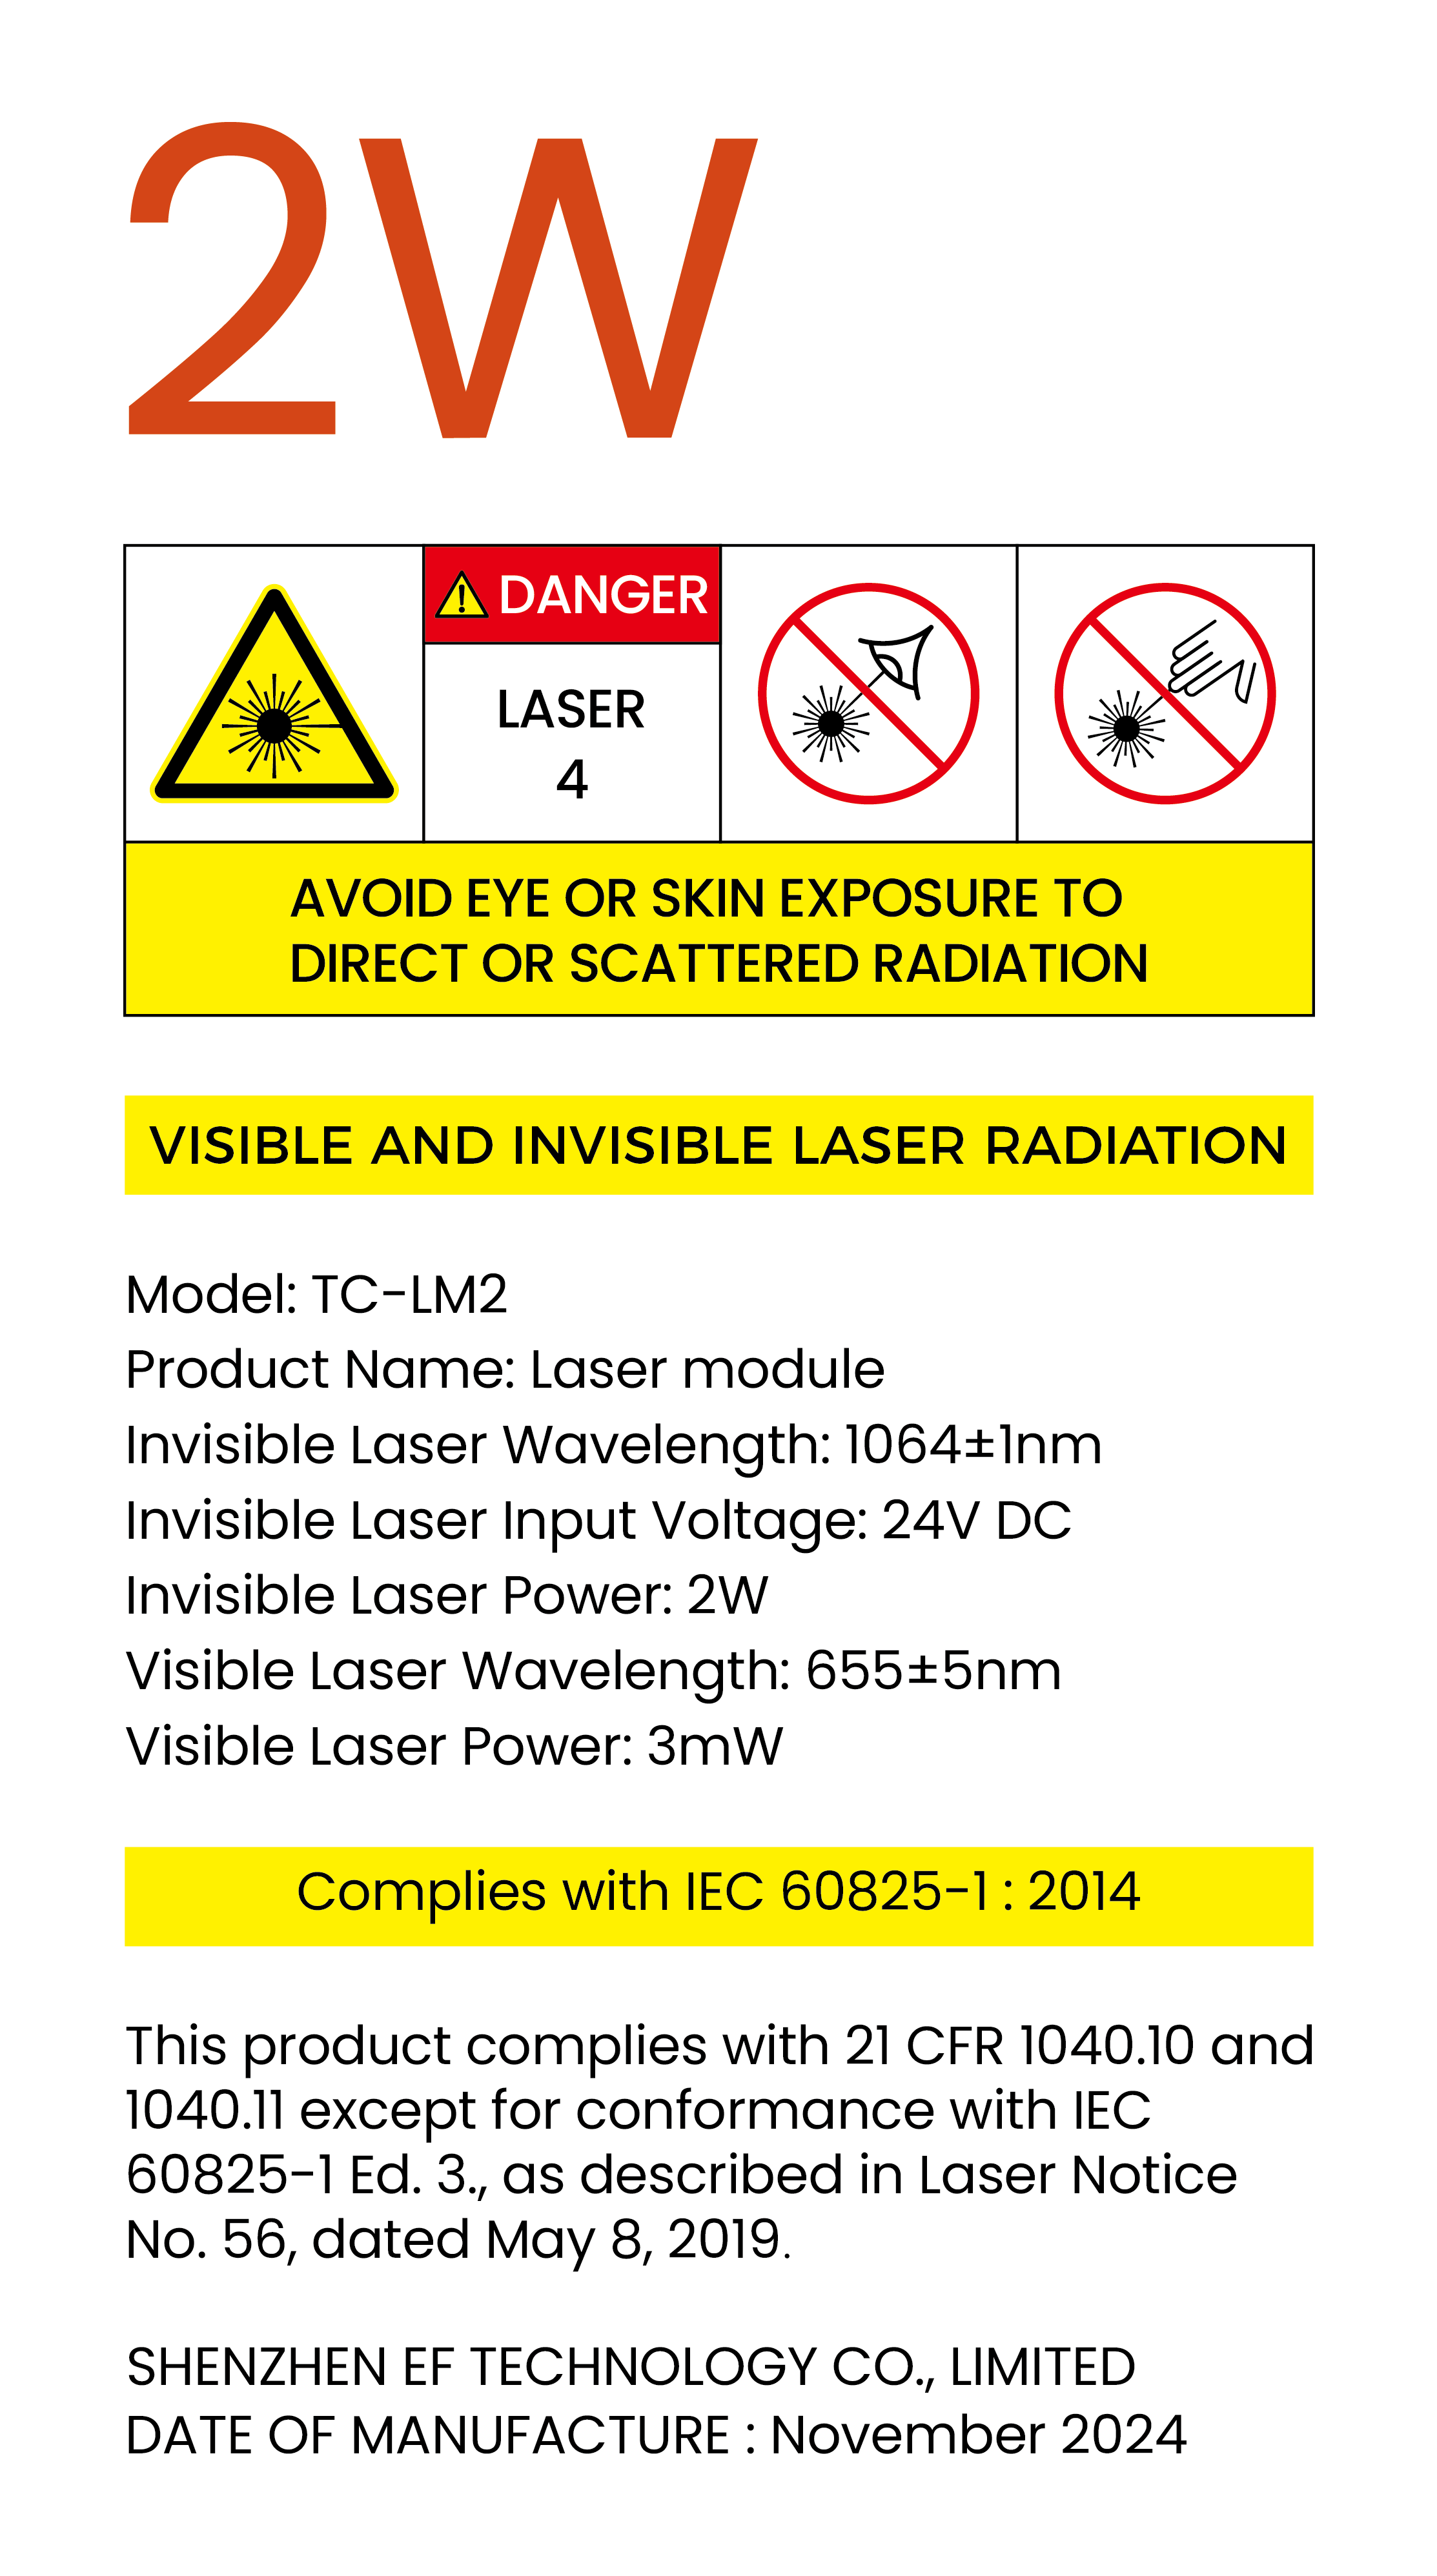 |
The laser product grade is Class IV. Avoid eyes and skin to direct or scattered light. |
On a 2W Infrared Laser Module |
 |
The laser is emitted from here. | On a 2W Infrared Laser Module |
- Adapter specifications
TOOCAA L2 2W Infrared Laser Module adapter needs to be self-assembled, and the adapter reference specifications are as follows.
| Adapter | Input power | 100-240V~50/60Hz 3.5A |
|---|---|---|
| Adapter | Output power | 24.0V ⎓ 5.0A 120.0W |
Since the adapter output power is backward compatible, users can choose the TOOCAA official 20W laser module adapter or 40W laser module adapter for connection.
¶ TOOCAA L2 10W Laser Module
¶ Get to know your TOOCAA L2 10W laser module
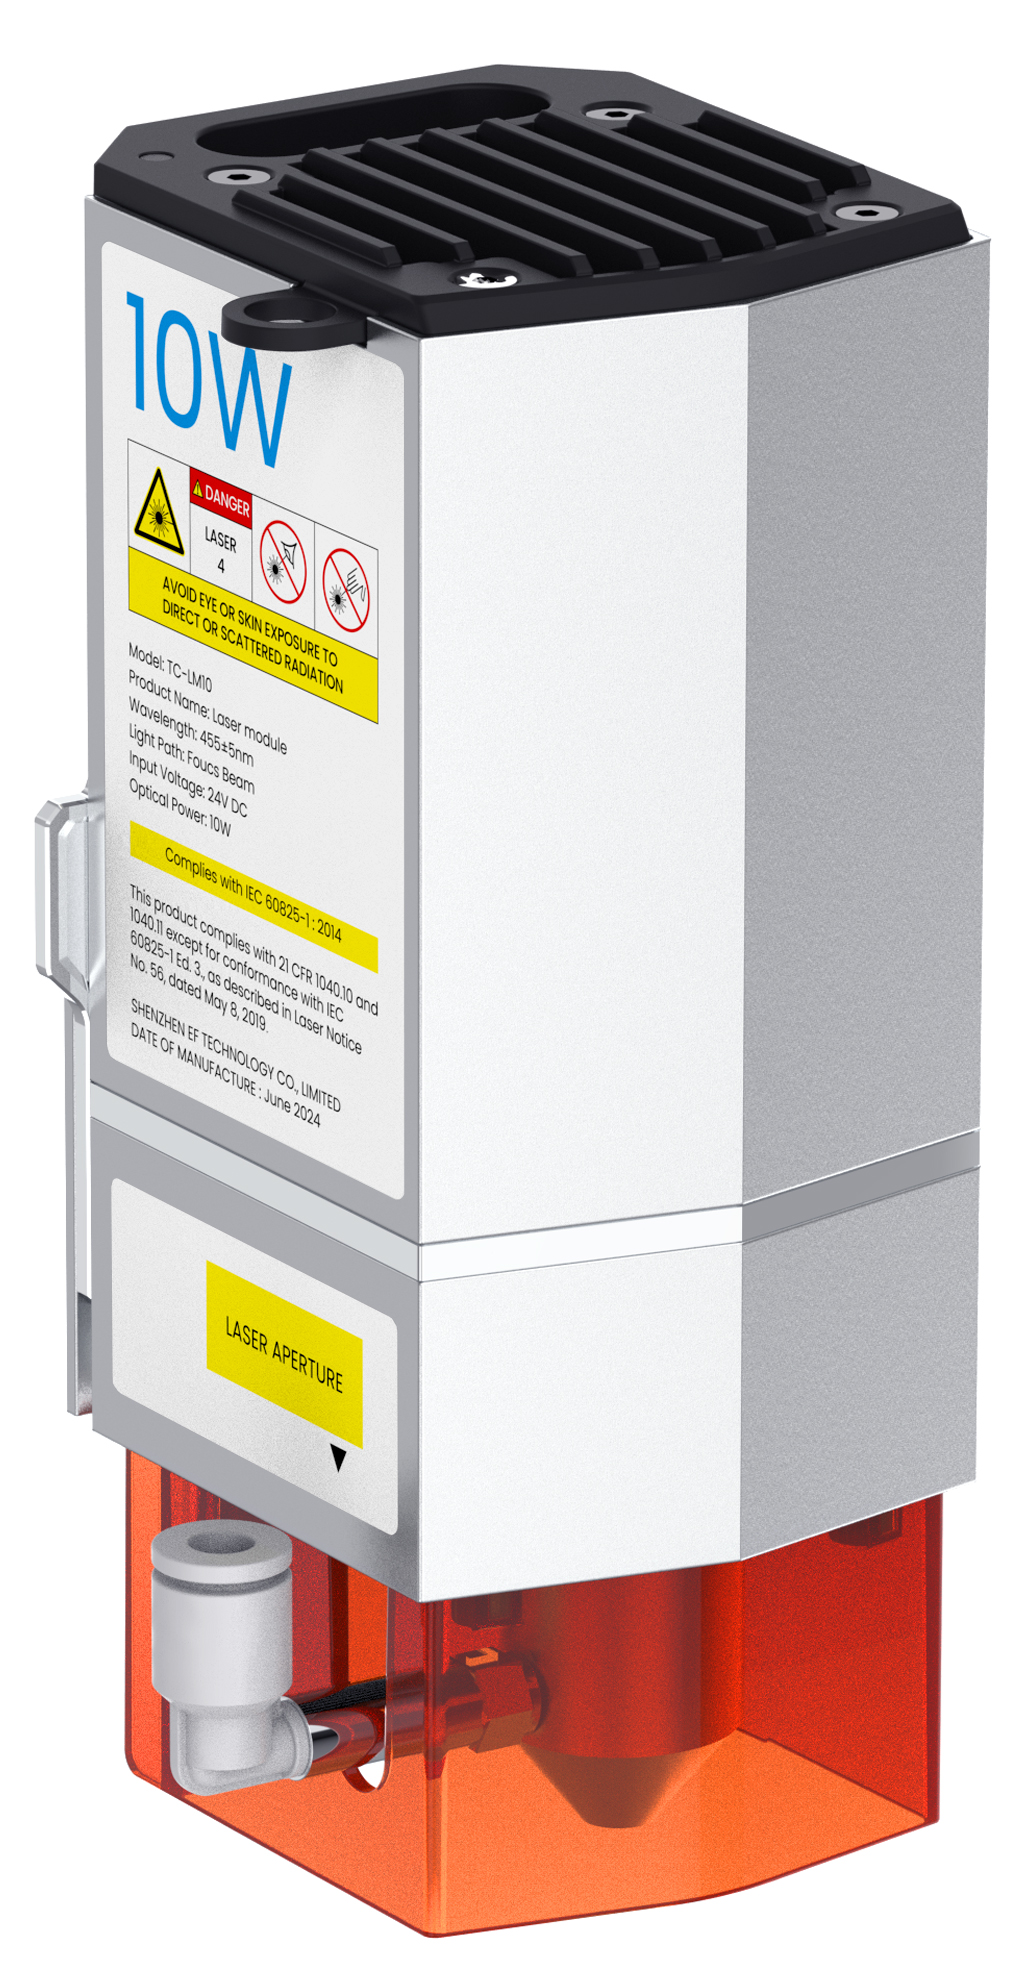
TOOCAA L2 10W laser module is suitable for TOOCAA L2 laser cutting machine, with an output power of 10W. It supports cutting and engraving of more than 100 materials, making it easy to create more creative products.
¶ Product Design
¶ Product Specifications
| Product Model | TC-LM10 |
|---|---|
| Power | 10W |
| Wavelength | 450nm |
| Pulse Width | 8ns |
| Powered by | DC24V(80W) |
| Focal Length | 40mm |
| Spot Size | 0.08mm*0.18mm |
| Running Temperature | 0-35°C |
| Storage Temperature | -40℃-85℃ |
| Cooling Method | Air Cooling |
| Service Life | 8000h-10000h |
¶ Safety Warnings and Precautions
- Laser Safety Information
TOOCAA L2 belongs to Class I laser products, and laser modules belong to Class IV laser products.
Under normal circumstances, the laser module is wrapped in a smart protective cover to work. TOOCAA L2 has a tilt detection function. If the device is moved during operation, the laser module will stop running to avoid harm to the user. To ensure your safety, please always wear the goggles provided, which will effectively protect your eyes from potential hazards.
TOOCAA L2 is equipped with a smart protective cover. Please follow the instructions to install and use the smart protective cover correctly. The smart protective cover will effectively filter the scattered laser when operating. After the smart protective cover is correctly installed and connected to the power supply, the opening and closing states of the smart protective cover are linked with the laser emission state through interlocking, that is, this product will automatically suspend the laser operation when the smart protective cover door is opened to prevent laser spillage.
Please follow the following safety regulations:
- Do not operate the device with any parts removed. Please note that any missing part of the device may expose the laser system and increase the risk of damage to the device.
- Do not engrave or cut any material containing PVC or vinyl (machining plastics is not recommended). These materials (and other chlorine/chloride-containing materials) generate corrosive vapors that harm humans and damage equipment. Any damage caused by engraving or cutting any PVC material or vinyl is not covered under warranty.
- Never engrave or cut any unknown material. The vaporization or melting of many materials, including but not limited to PVC and polycarbonate, can release hazardous fumes.
- Reflective materials can cause laser reflections and may harm the user. Therefore, before using TOOCAA L2, please remove all reflective materials in the work area; Please ensure no reflective material is in the working area when using TOOCAA L2.
- Flammable and explosive substances may cause fire. Therefore, please ensure no flammable or explosive substances are in the working area before using TOOCAA L2.
- Please pay close attention to whether the device is properly during operation and never operate the device without supervision.
- Signs of warning and instruction
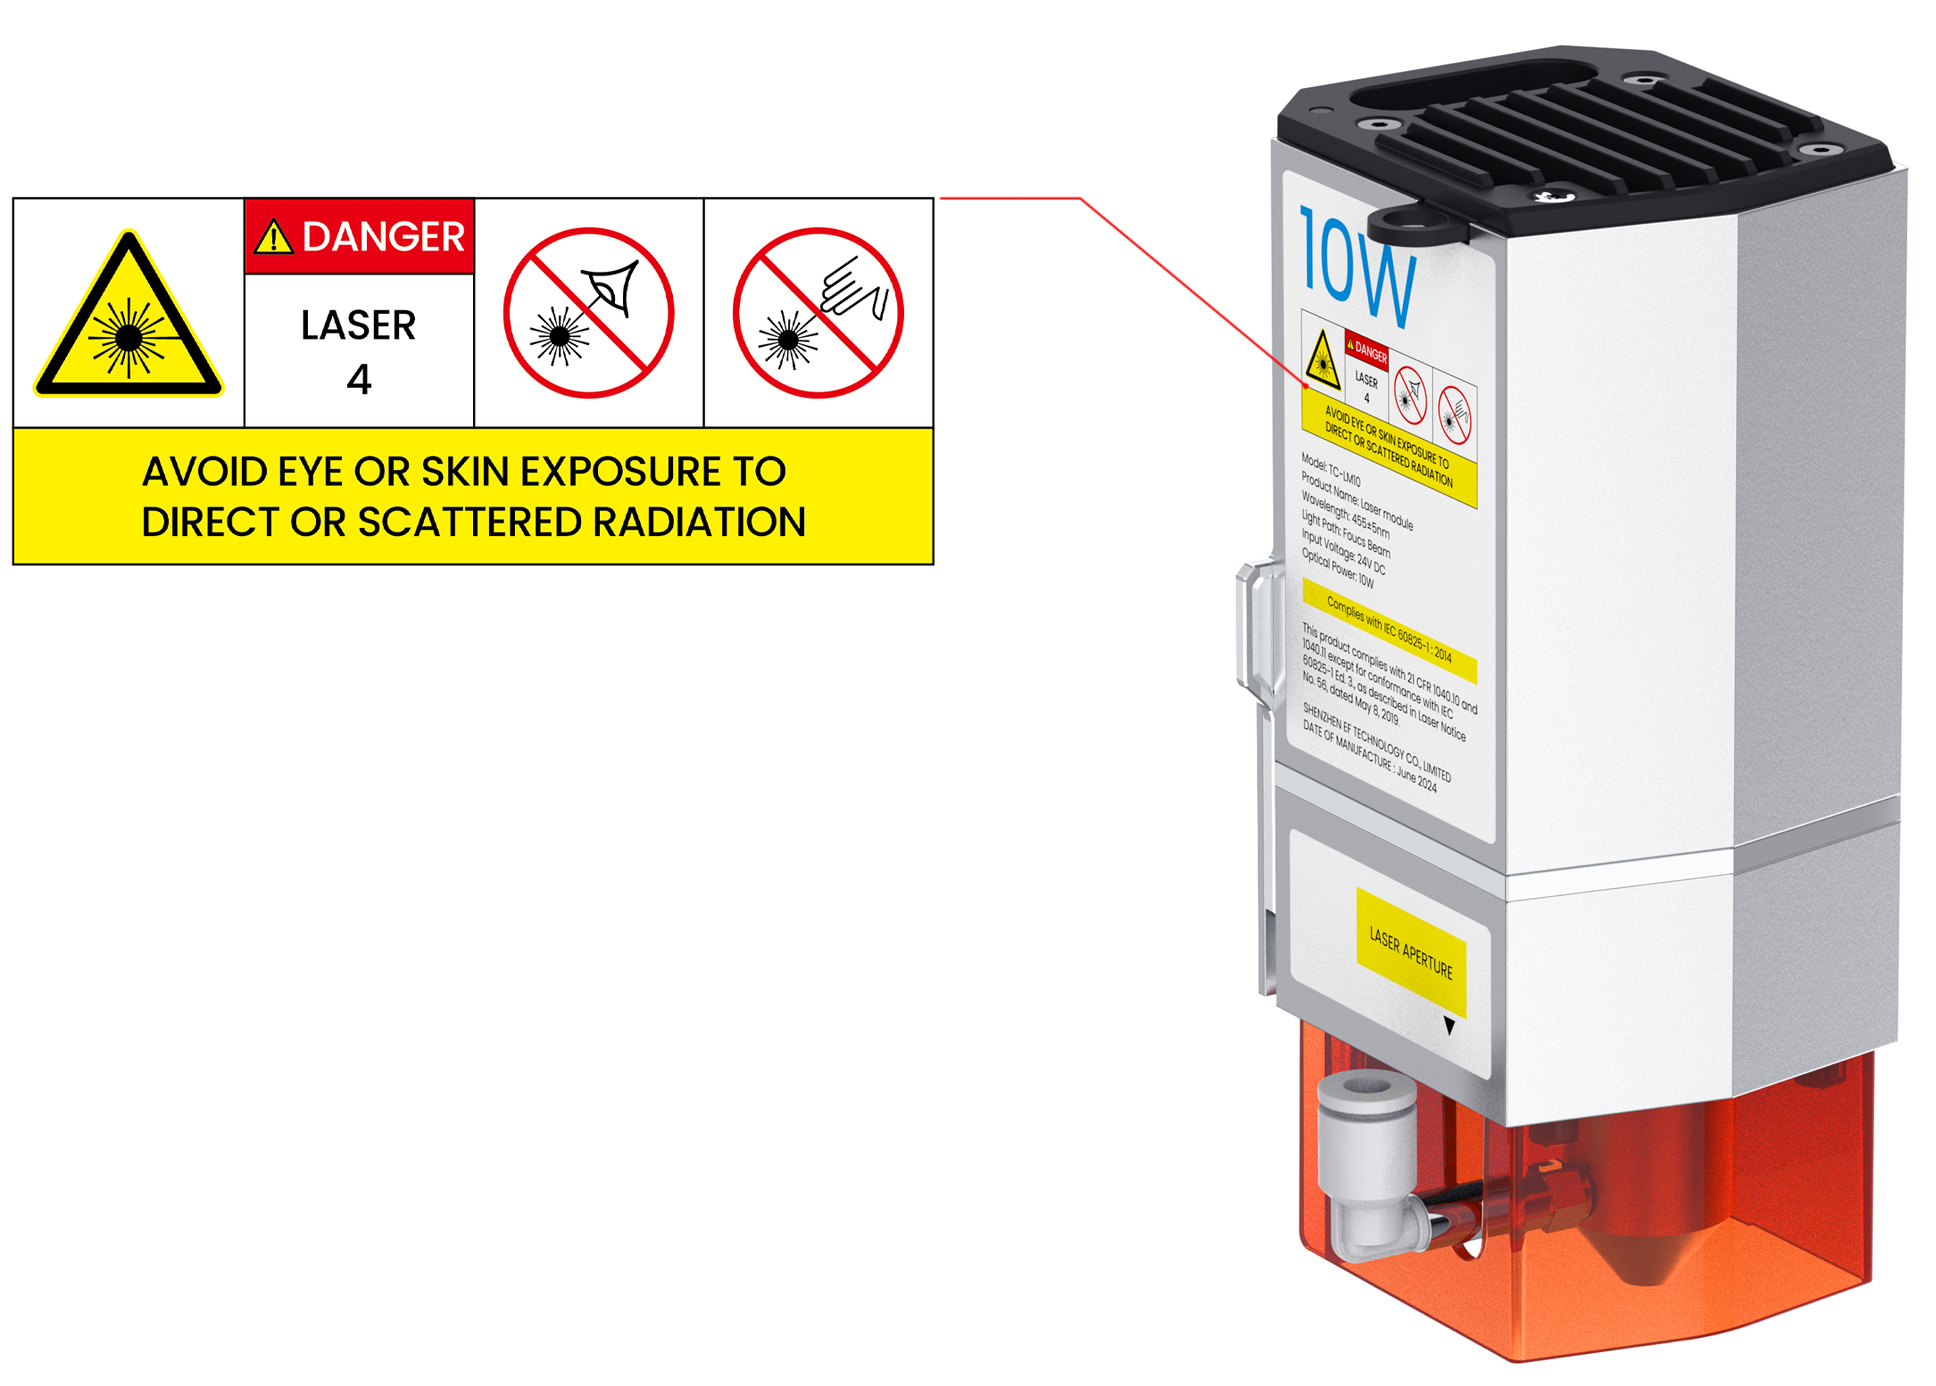
The signs of warning and instruction on TOOCAA L2 are affixed to places that may cause danger before or during operation. If the icon is damaged or missing, please replace it immediately. You can print the image on the next page to get it.
- Safety icon
| Icon | Meaning | Location |
|---|---|---|
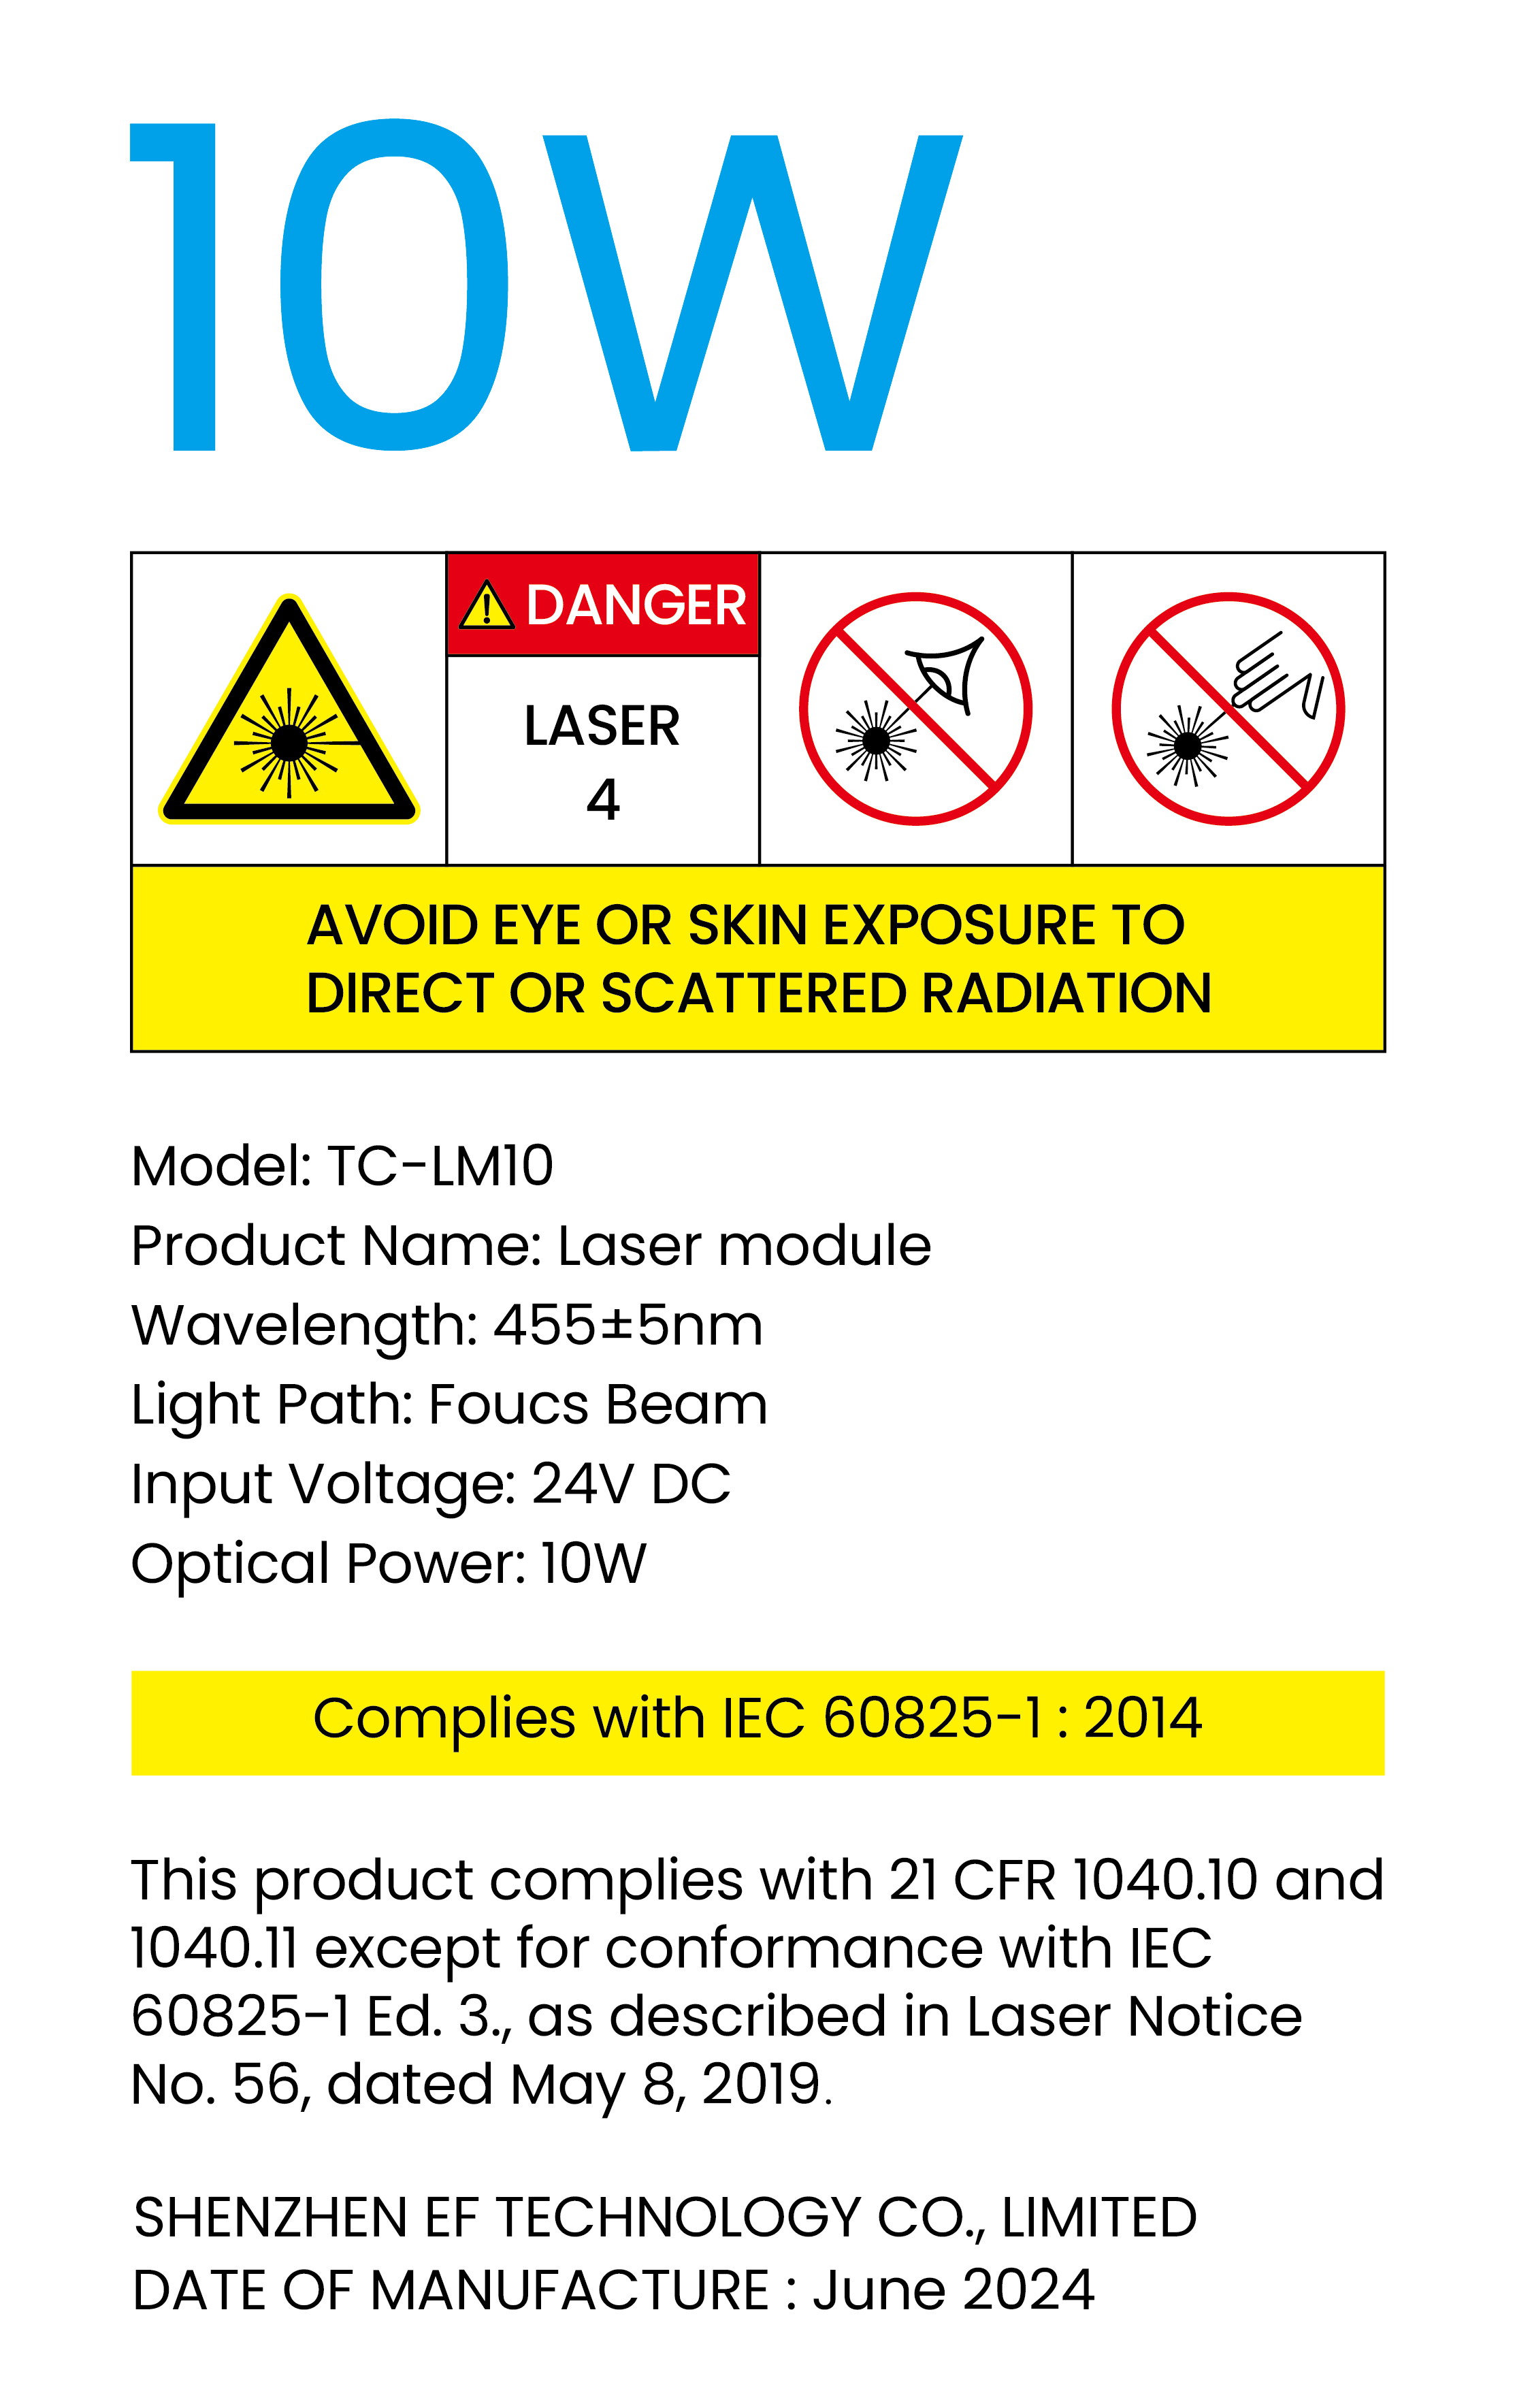 |
The laser product grade is Class IV. Avoid eyes and skin to direct or scattered light |
On a 10W laser module |
|
The laser is emitted from here. | On a 10W laser module |
¶ TOOCAA L2 20W Laser Module
¶ Get to know your TOOCAA L2 20W laser module
TOOCAA L2 20W laser module is suitable for TOOCAA L2 laser cutting machine, with an output power of 20W. It supports cutting and engraving of more than 100 materials, making it easy to create more creative products.
¶ Product Design
¶ Product Specifications
| Product Model | TC-LM20 |
|---|---|
| Power | 20W |
| Wavelength | 450nm |
| Pulse Width | 8ns |
| Powered by | DC24V(80W) |
| Focal Length | 40mm |
| Spot Size | 0.15mm*0.27mm |
| Running Temperature | 0-35°C |
| Storage Temperature | -40℃-85℃ |
| Cooling Method | Air Cooling |
| Service Life | 8000h-10000h |
¶ Safety Warnings and Precautions
- Laser Safety Information
TOOCAA L2 belongs to Class I laser products, and laser modules belong to Class IV laser products.
Under normal circumstances, the laser module is wrapped in a smart protective cover to work. TOOCAA L2 has a tilt detection function. If the device is moved during operation, the laser module will stop running to avoid harm to the user. To ensure your safety, please always wear the goggles provided, which will effectively protect your eyes from potential hazards.
TOOCAA L2 is equipped with a smart protective cover. Please follow the instructions to install and use the smart protective cover correctly. The smart protective cover will effectively filter the scattered laser when operating. After the smart protective cover is correctly installed and connected to the power supply, the opening and closing states of the smart protective cover are linked with the laser emission state through interlocking, that is, this product will automatically suspend the laser operation when the smart protective cover door is opened to prevent laser spillage.
Please follow the following safety regulations:
- Do not operate the device with any parts removed. Please note that any missing part of the device may expose the laser system and increase the risk of damage to the device.
- Do not engrave or cut any material containing PVC or vinyl (machining plastics is not recommended). These materials (and other chlorine/chloride-containing materials) generate corrosive vapors that harm humans and damage equipment. Any damage caused by engraving or cutting any PVC material or vinyl is not covered under warranty.
- Never engrave or cut any unknown material. The vaporization or melting of many materials, including but not limited to PVC and polycarbonate, can release hazardous fumes.
- Reflective materials can cause laser reflections and may harm the user. Therefore, before using TOOCAA L2, please remove all reflective materials in the work area; Please ensure no reflective material is in the working area when using TOOCAA L2.
- Flammable and explosive substances may cause fire. Therefore, please ensure no flammable or explosive substances are in the working area before using TOOCAA L2.
- Please pay close attention to whether the device is properly during operation and never operate the device without supervision.
- Signs of warning and instruction
The signs of warning and instruction on TOOCAA L2 are affixed to places that may cause danger before or during operation. If the icon is damaged or missing, please replace it immediately. You can print the image on the next page to get it.
- Safety icon
| Icon | Meaning | Location |
|---|---|---|
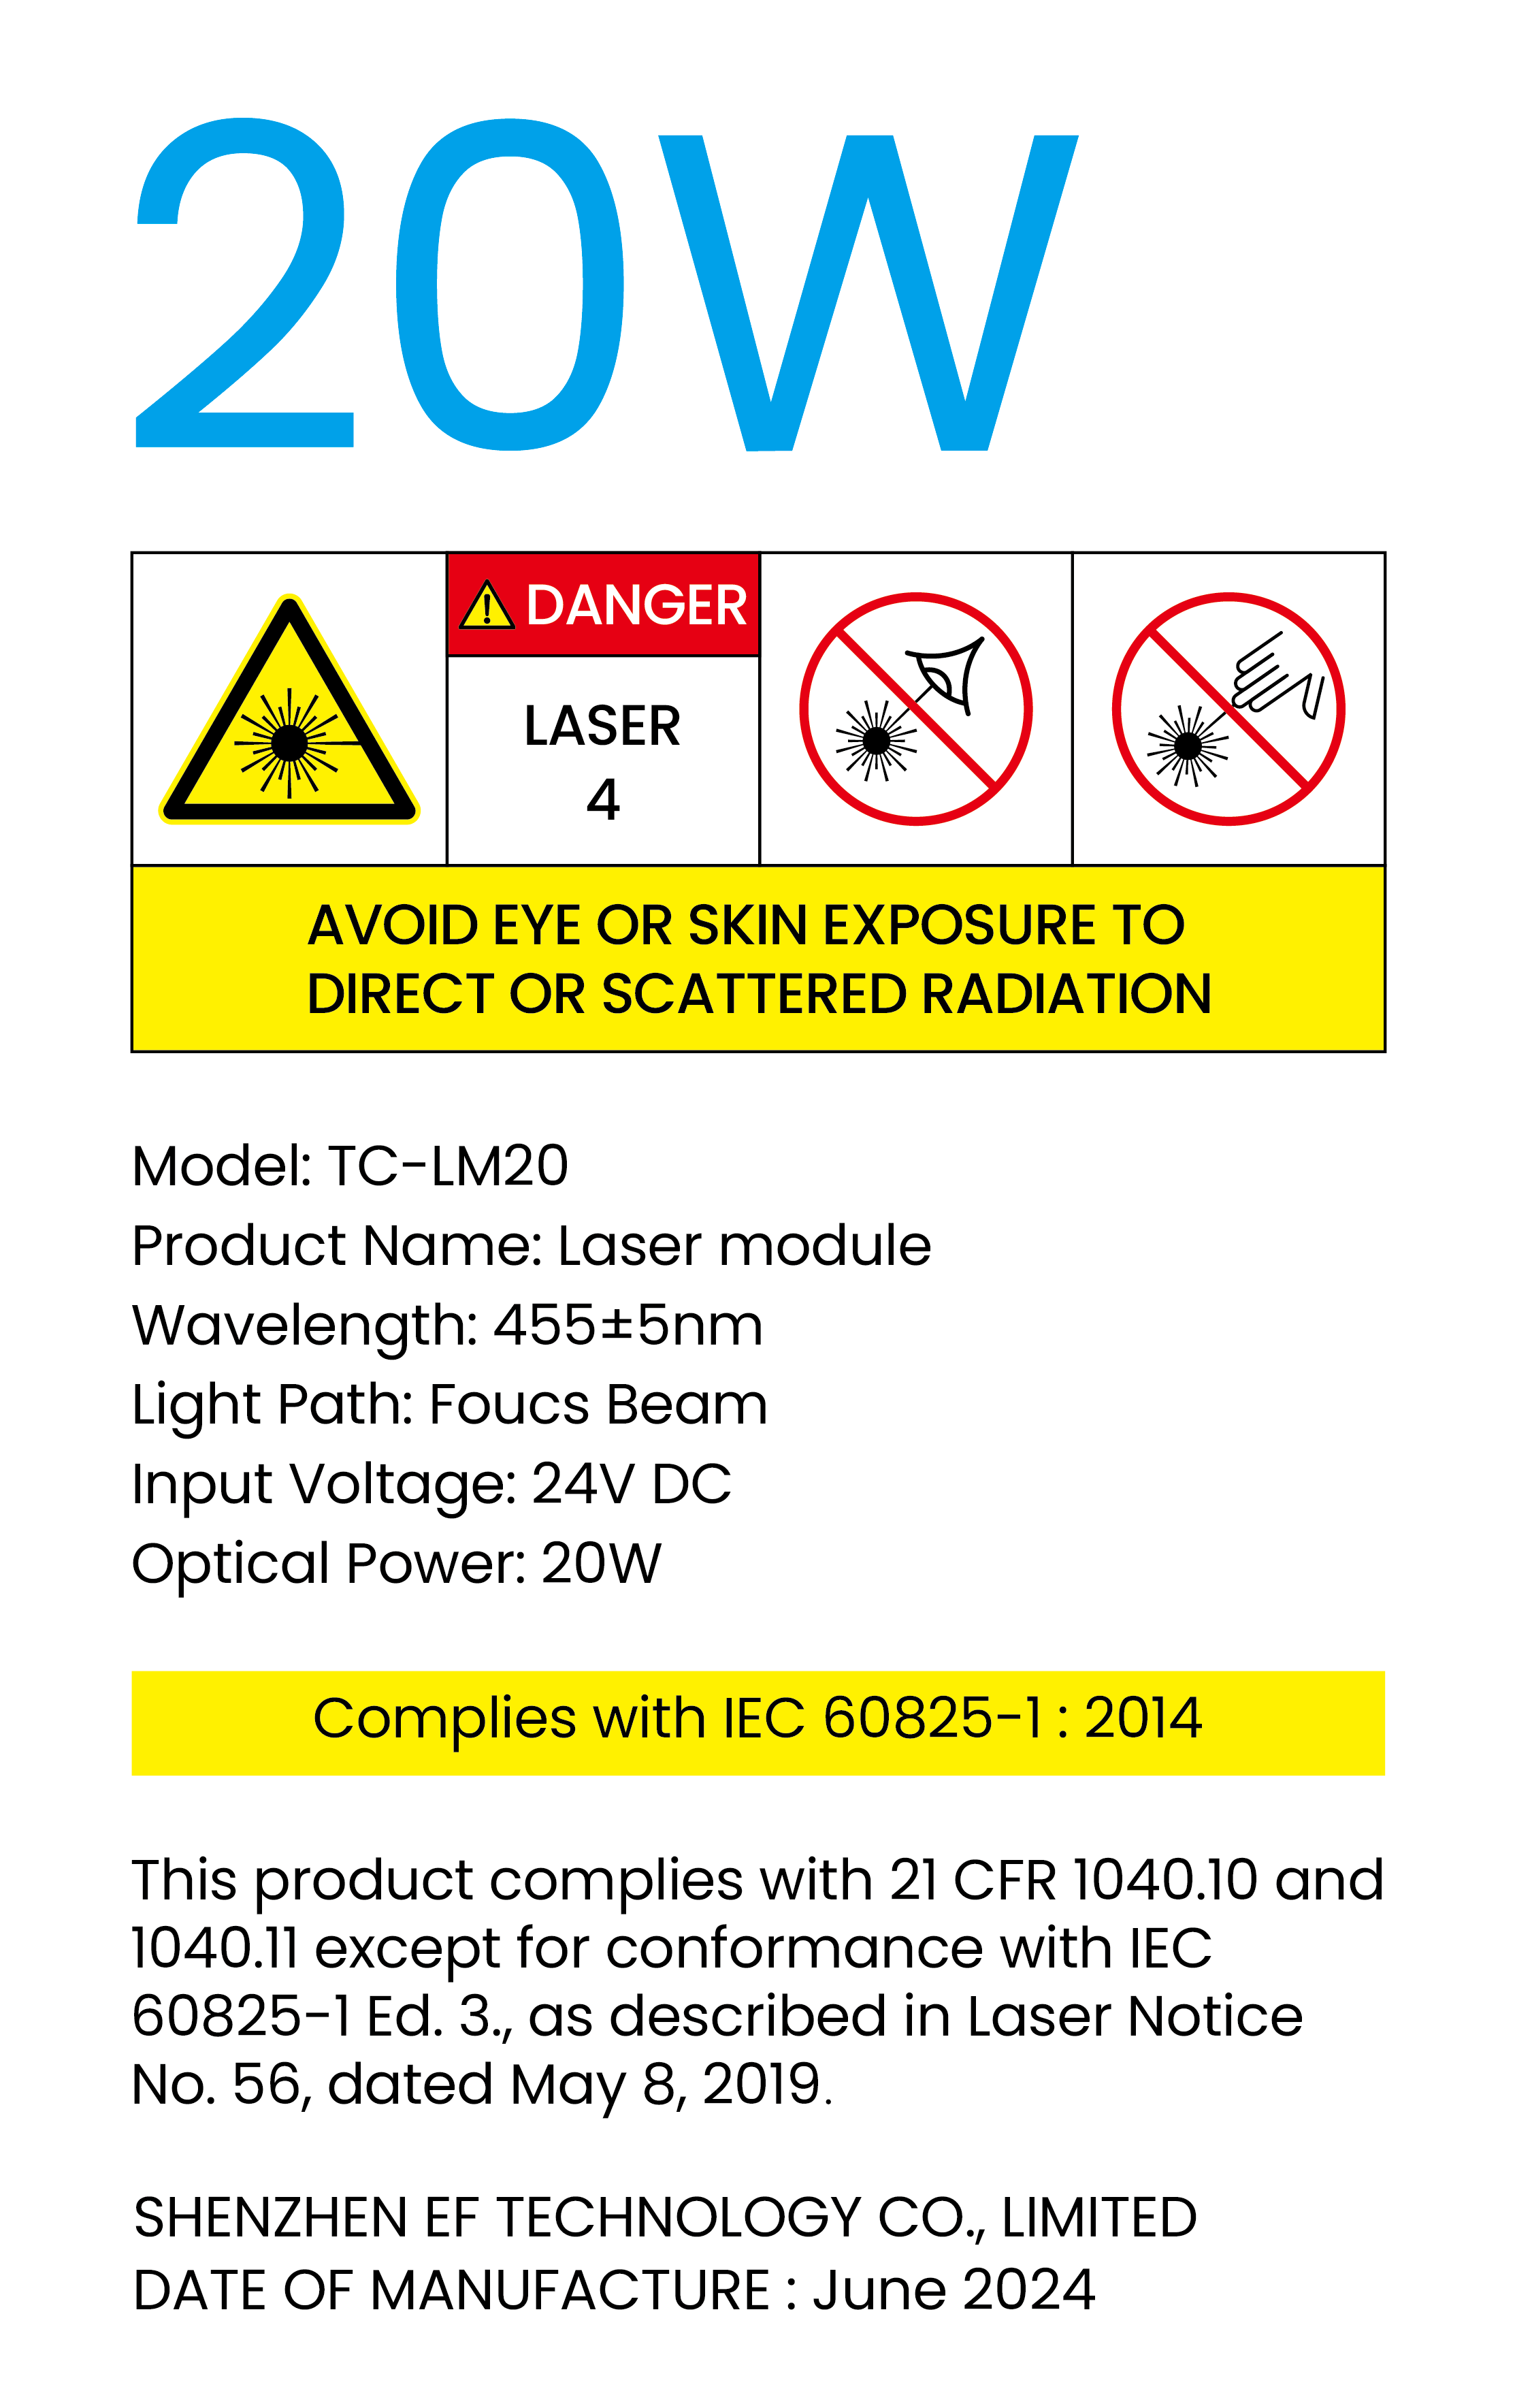 |
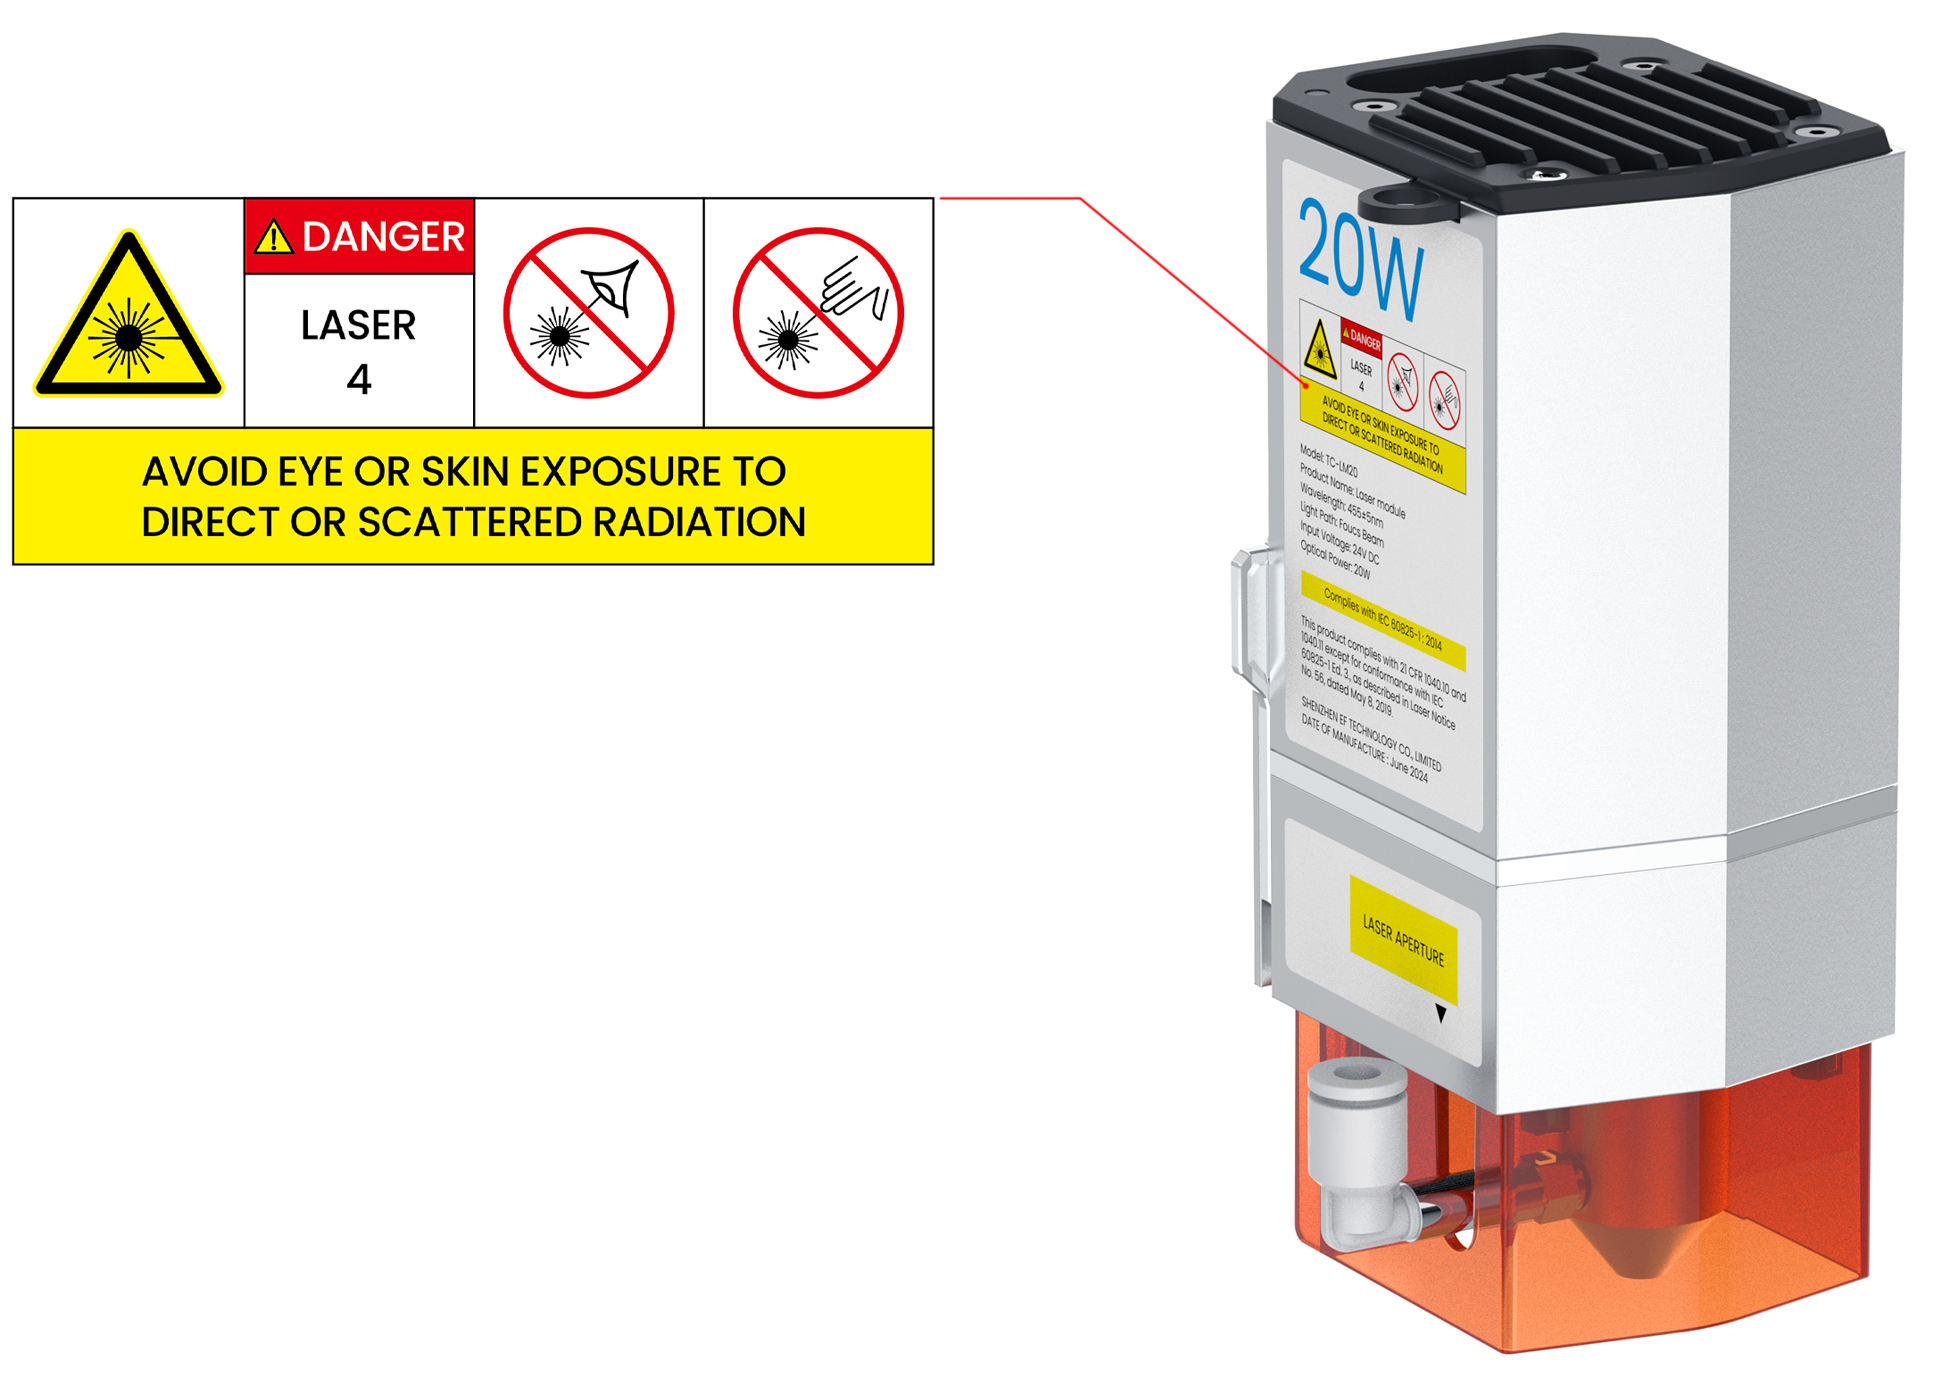
The laser product grade is Class IV. Avoid eyes and skin to direct or scattered light |
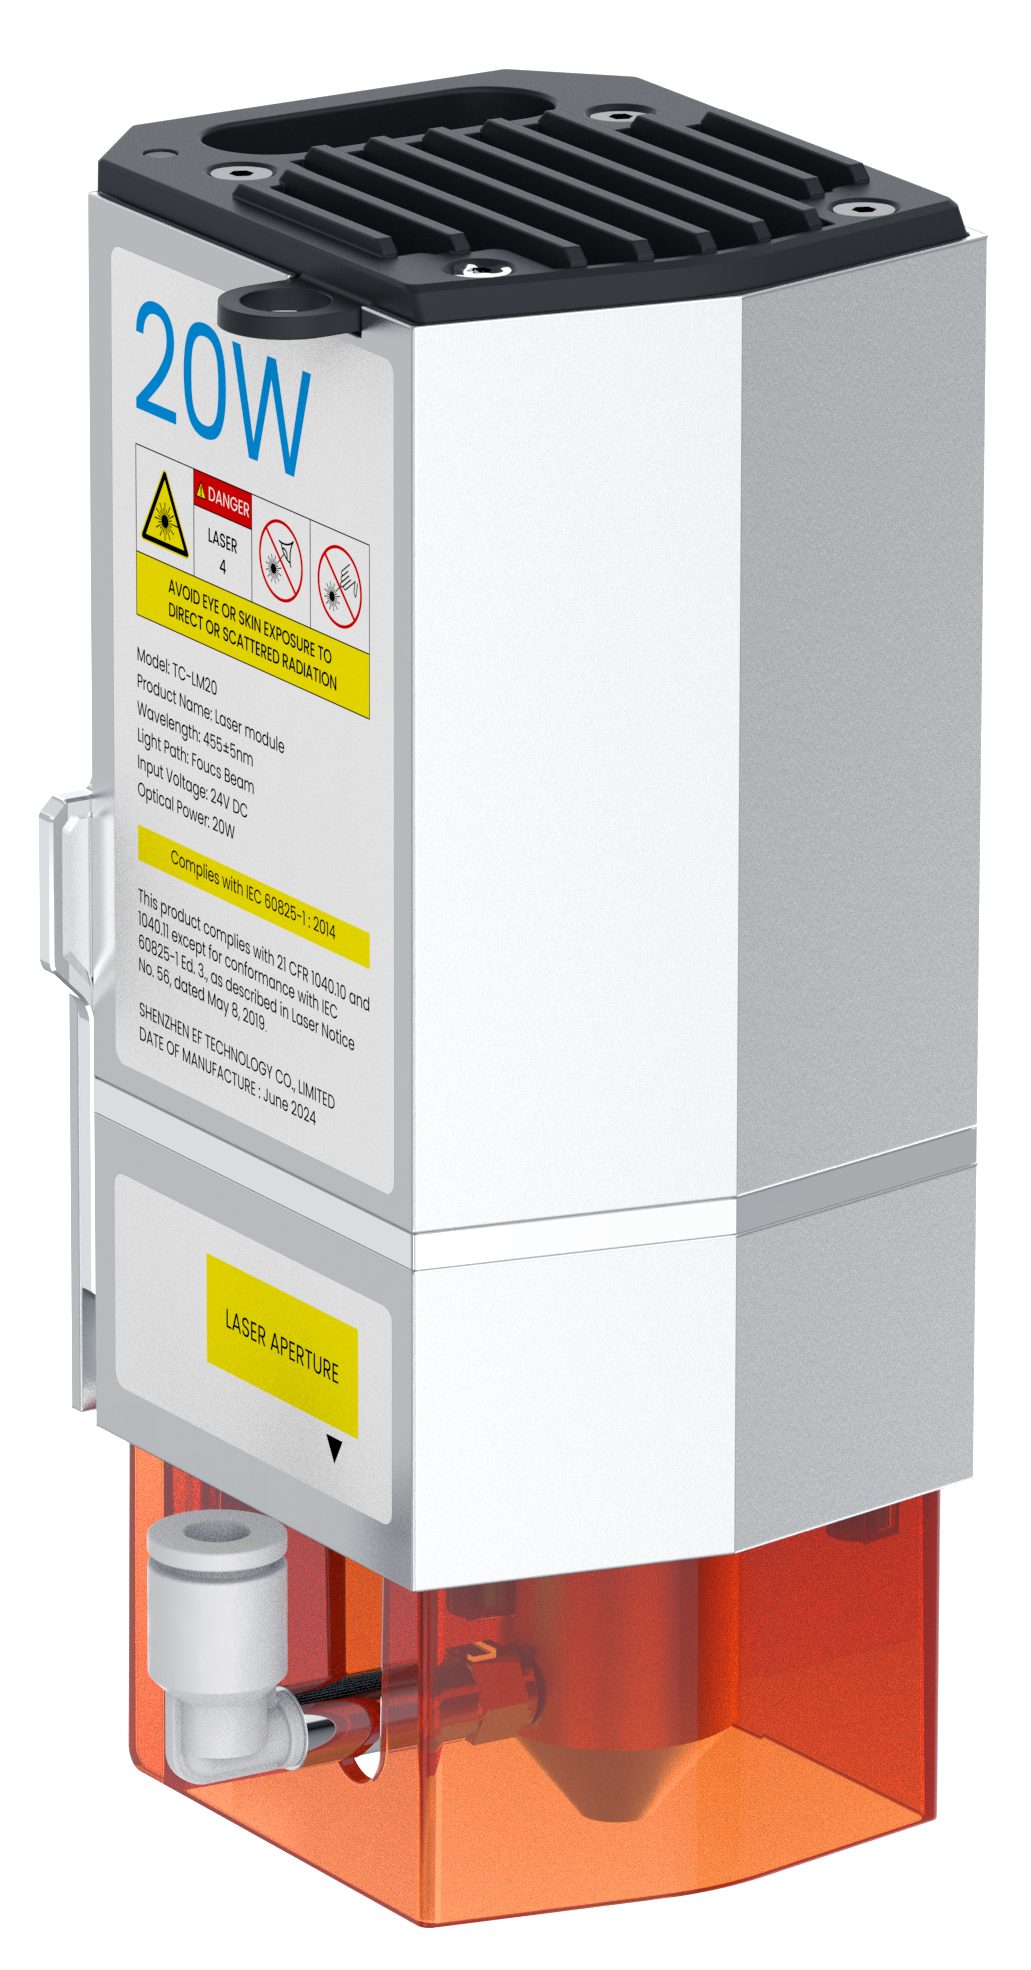
On a 20W laser module |
|
The laser is emitted from here. | On a 20W laser module |
¶ TOOCAA L2 40W Laser Module
¶ Get to know your TOOCAA L2 40W Laser Module
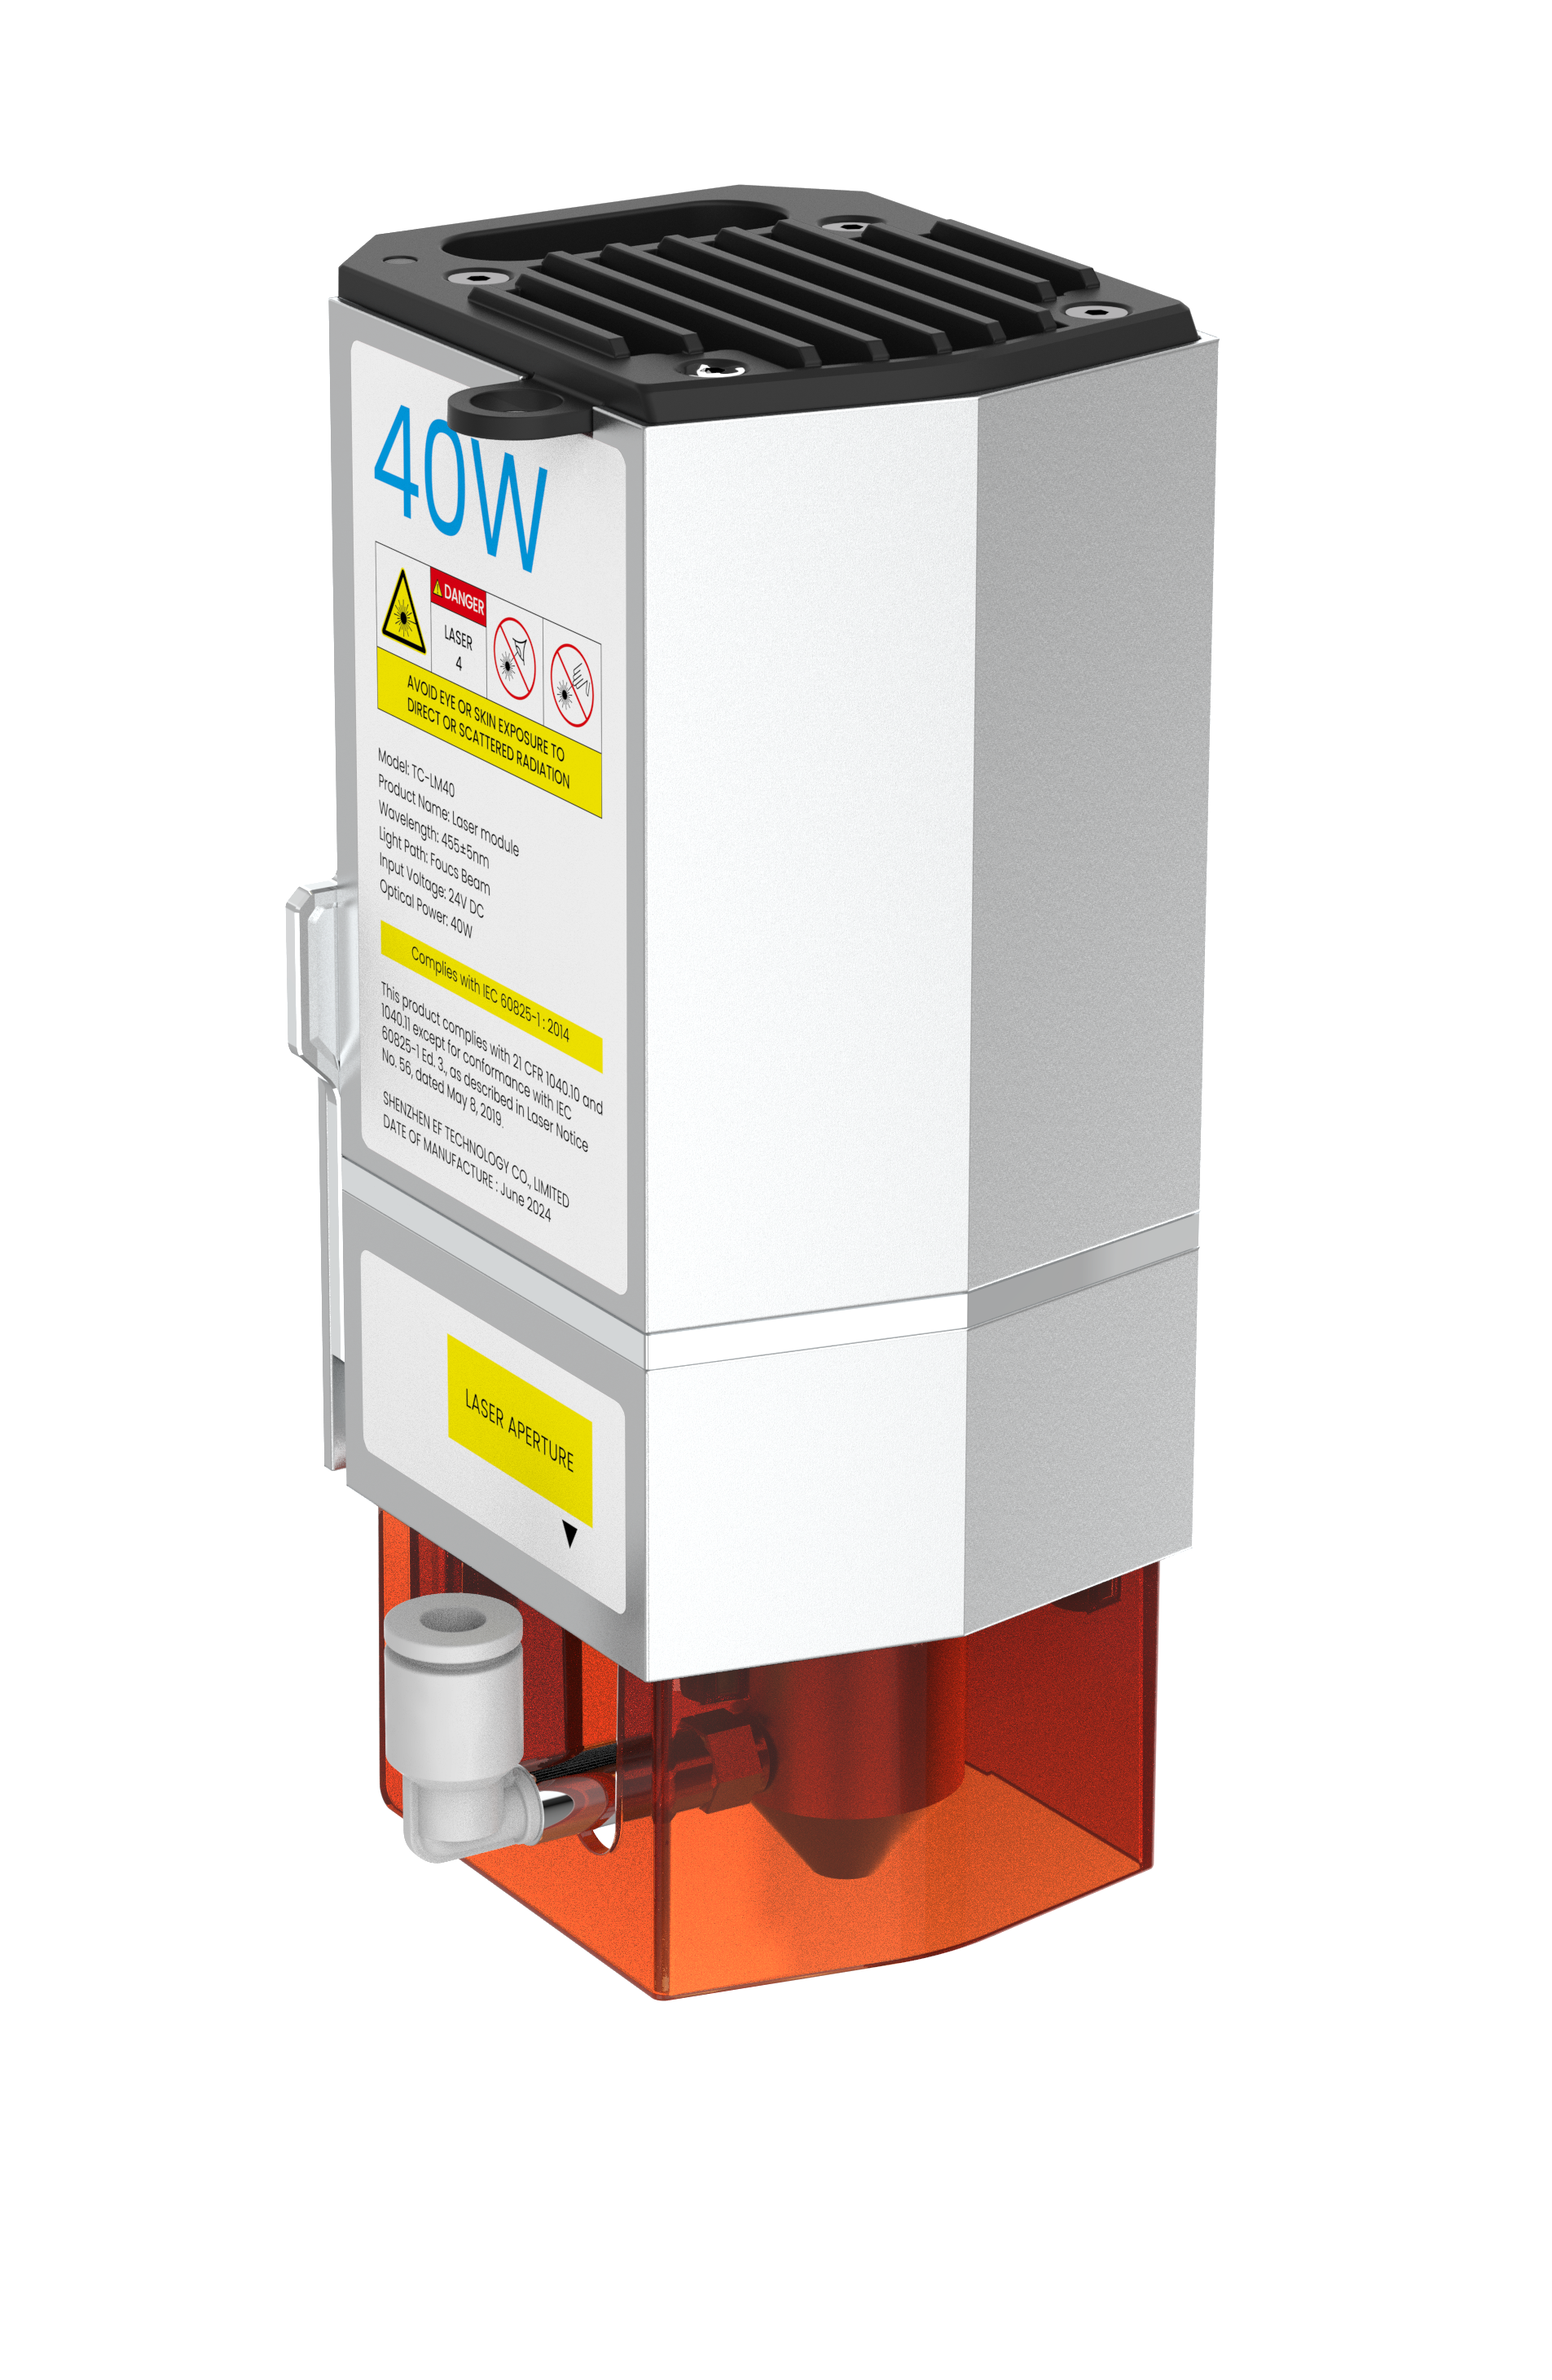
TOOCAA L2 40W laser module is suitable for TOOCAA L2 laser cutting machine, with an output power of 40W. It is designed to support high-power cutting and engraving work and can easily cut very thick materials. Using advanced laser compression technology, the 0.13mm*0.15mm ultra-large spot achieves high-power cutting efficiency comparable to CO2 machines.
¶ Product Design
¶ Product Specifications
| Product Model | TC-LM40 |
|---|---|
| Power | 40W |
| Wavelength | 455±5nm |
| Pulse Width | 8ns |
| Optical Path Compression Method | COS Beam Shaping |
| Powered by | DC24V(8A) |
| Focal Length | 40mm |
| Spot Size | 0.13mm*0.15mm |
| Running Temperature | Below 40°C |
| Storage Temperature | -10℃-40℃ |
| Cooling Method | Air Cooling |
| Service Life | 6000h-8000h |
¶ Safety Warnings and Precautions
- Laser Safety Information
TOOCAA L2 belongs to Class I laser products, and laser modules belong to Class IV laser products.
Under normal circumstances, the laser module is wrapped in a smart protective cover to work. TOOCAA L2 has a tilt detection function. If the device is moved during operation, the laser module will stop running to avoid harm to the user. To ensure your safety, please always wear the goggles provided, which will effectively protect your eyes from potential hazards.
TOOCAA L2 is equipped with a smart protective cover. Please follow the instructions to install and use the smart protective cover correctly. The smart protective cover will effectively filter the scattered laser when operating. After the smart protective cover is correctly installed and connected to the power supply, the opening and closing states of the smart protective cover are linked with the laser emission state through interlocking, that is, this product will automatically suspend the laser operation when the smart protective cover door is opened to prevent laser spillage.
Please follow the following safety regulations:
- Do not operate the device with any parts removed. Please note that any missing part of the device may expose the laser system and increase the risk of damage to the device.
- Do not engrave or cut any material containing PVC or vinyl (machining plastics is not recommended). These materials (and other chlorine/chloride-containing materials) generate corrosive vapors that harm humans and damage equipment. Any damage caused by engraving or cutting any PVC material or vinyl is not covered under warranty.
- Never engrave or cut any unknown material. The vaporization or melting of many materials, including but not limited to PVC and polycarbonate, can release hazardous fumes.
- Reflective materials can cause laser reflections and may harm the user. Therefore, before using TOOCAA L2 40W Laser Module, please remove all reflective materials in the work area; Please ensure no reflective material is in the working area when using TOOCAA L2 40W Laser Module.
- Flammable and explosive substances may cause fire. Therefore, please ensure no flammable or explosive substances are in the working area before using TOOCAA L2 40W Laser Module.
- Please pay close attention to whether the device is properly during operation and never operate the device without supervision.
- Signs of warning and instruction
The signs of warning and instruction on the TOOCAA L2 40W Laser Module are affixed to places that may cause danger before or during operation. If the icon is damaged or missing, please replace it immediately. You can print the image on the next page to get it.
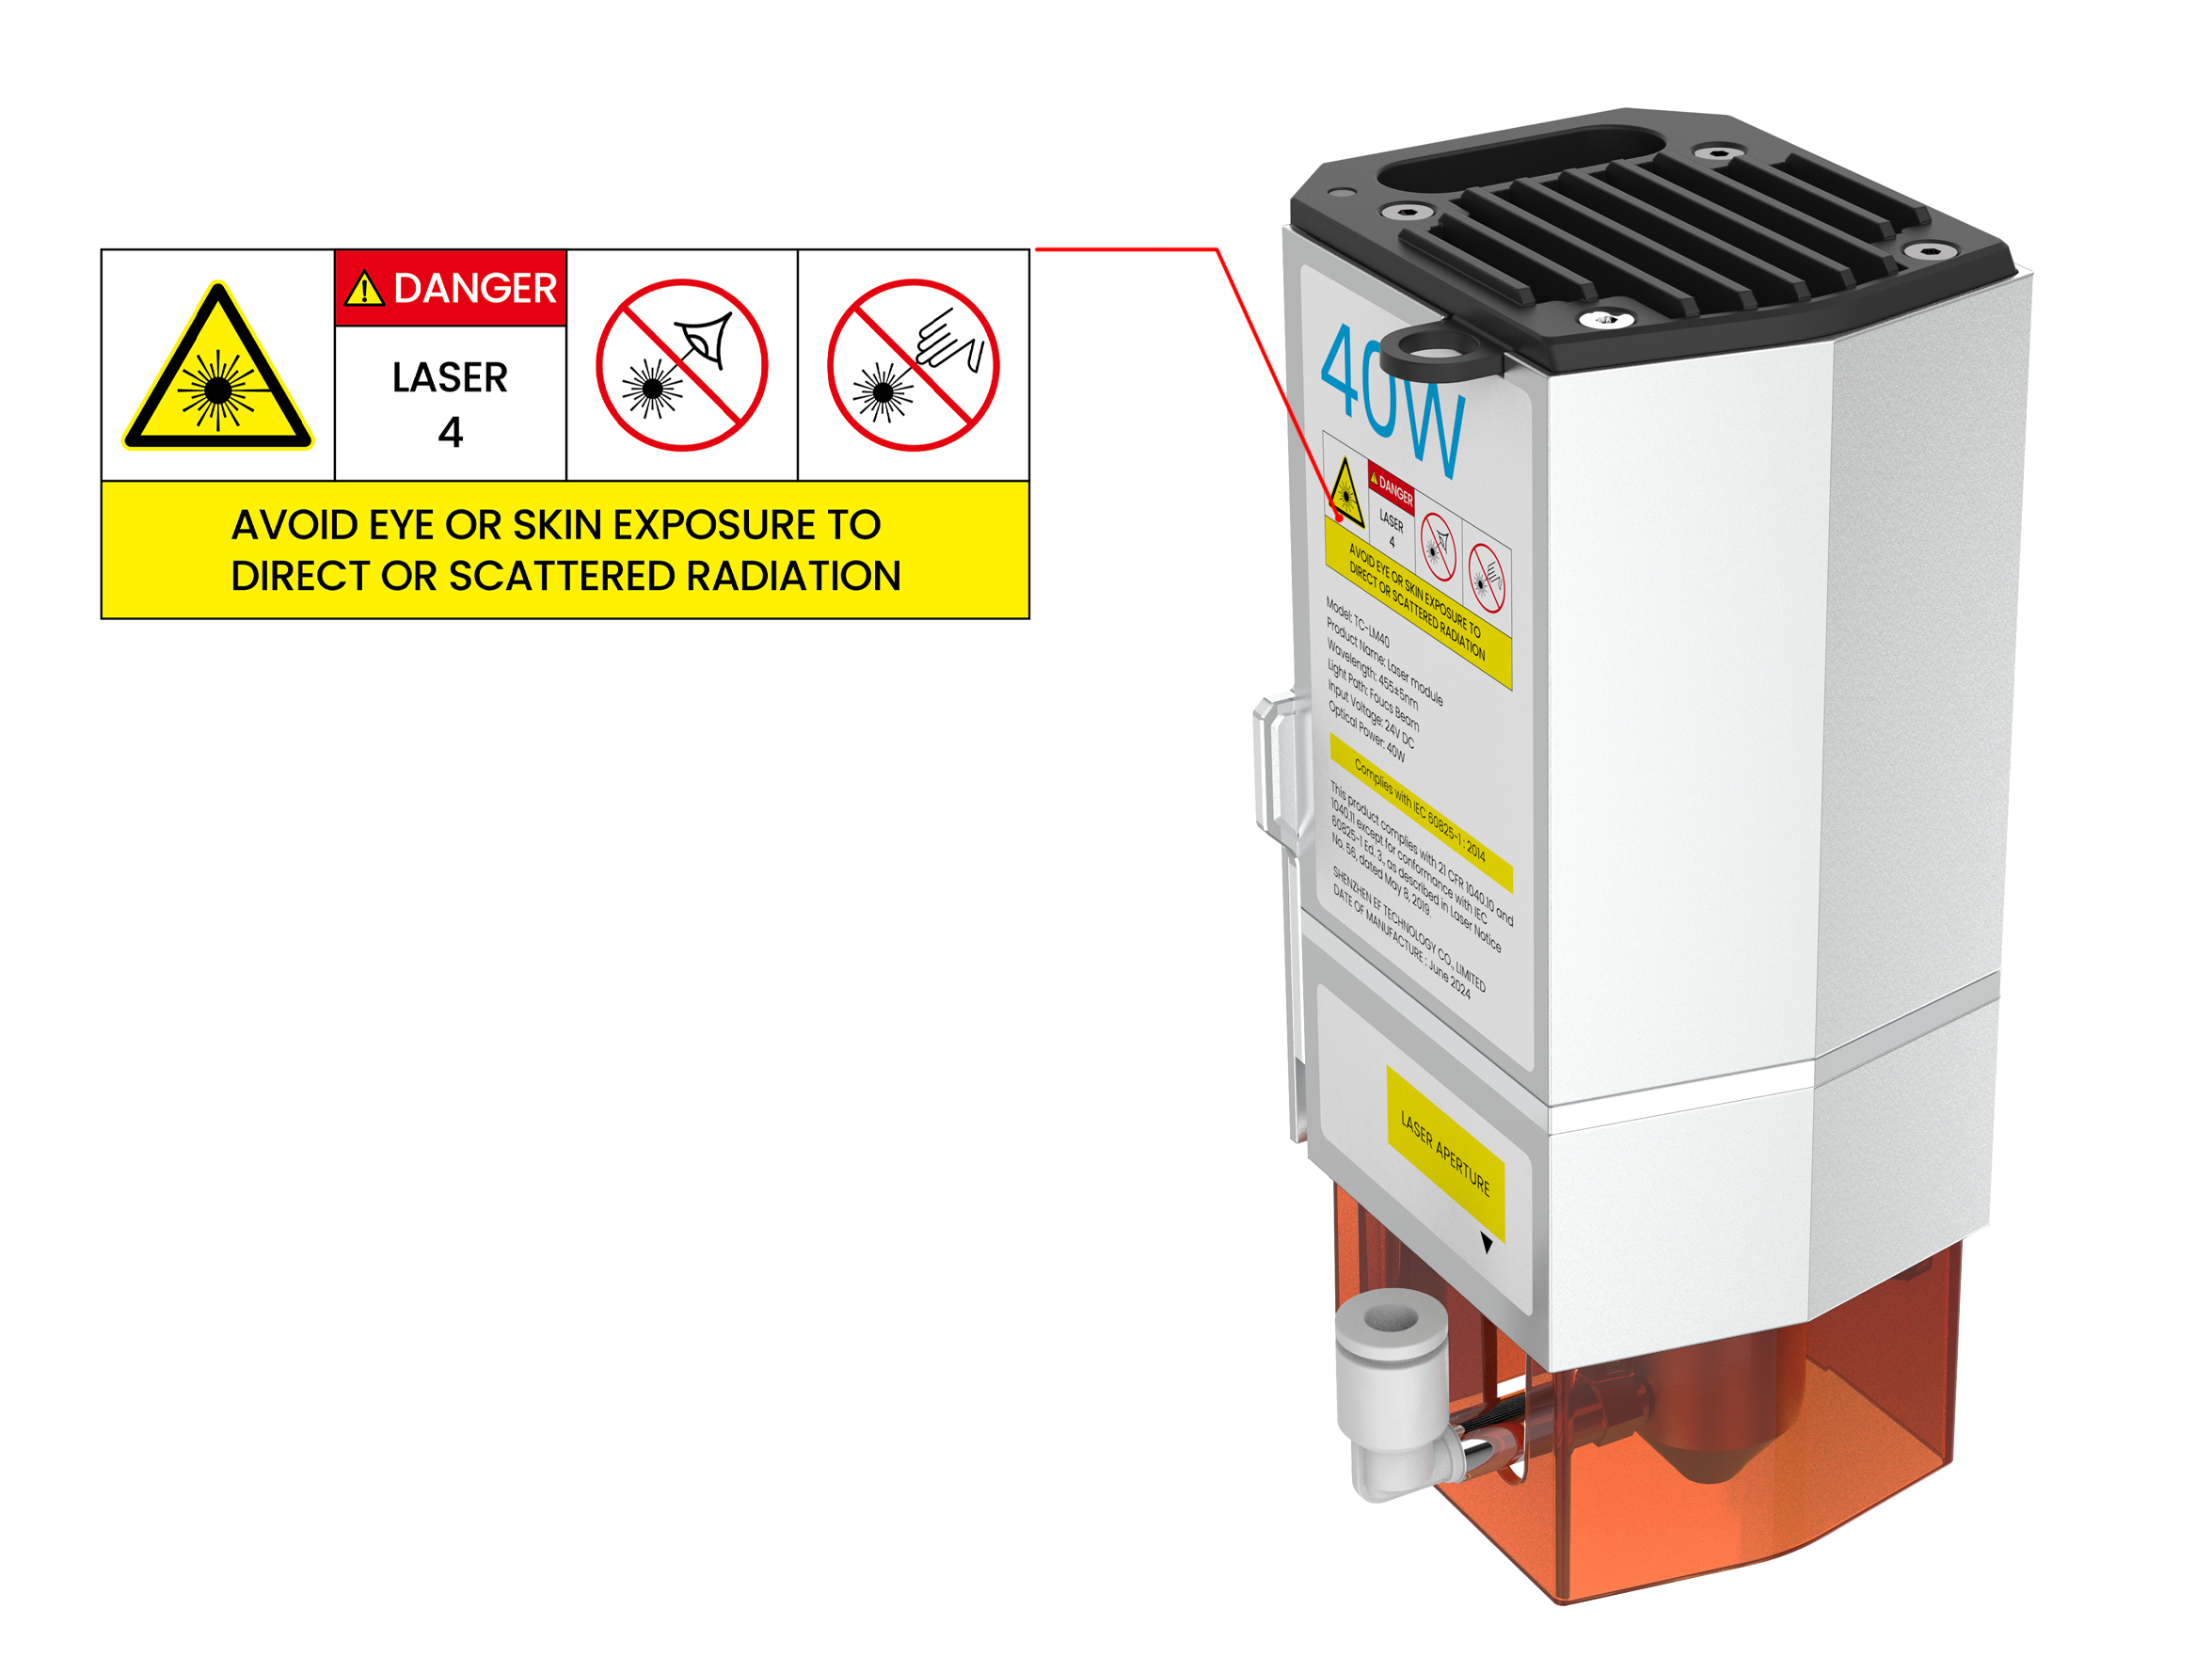
- Safety icon
| Icon | Meaning | Location |
|---|---|---|
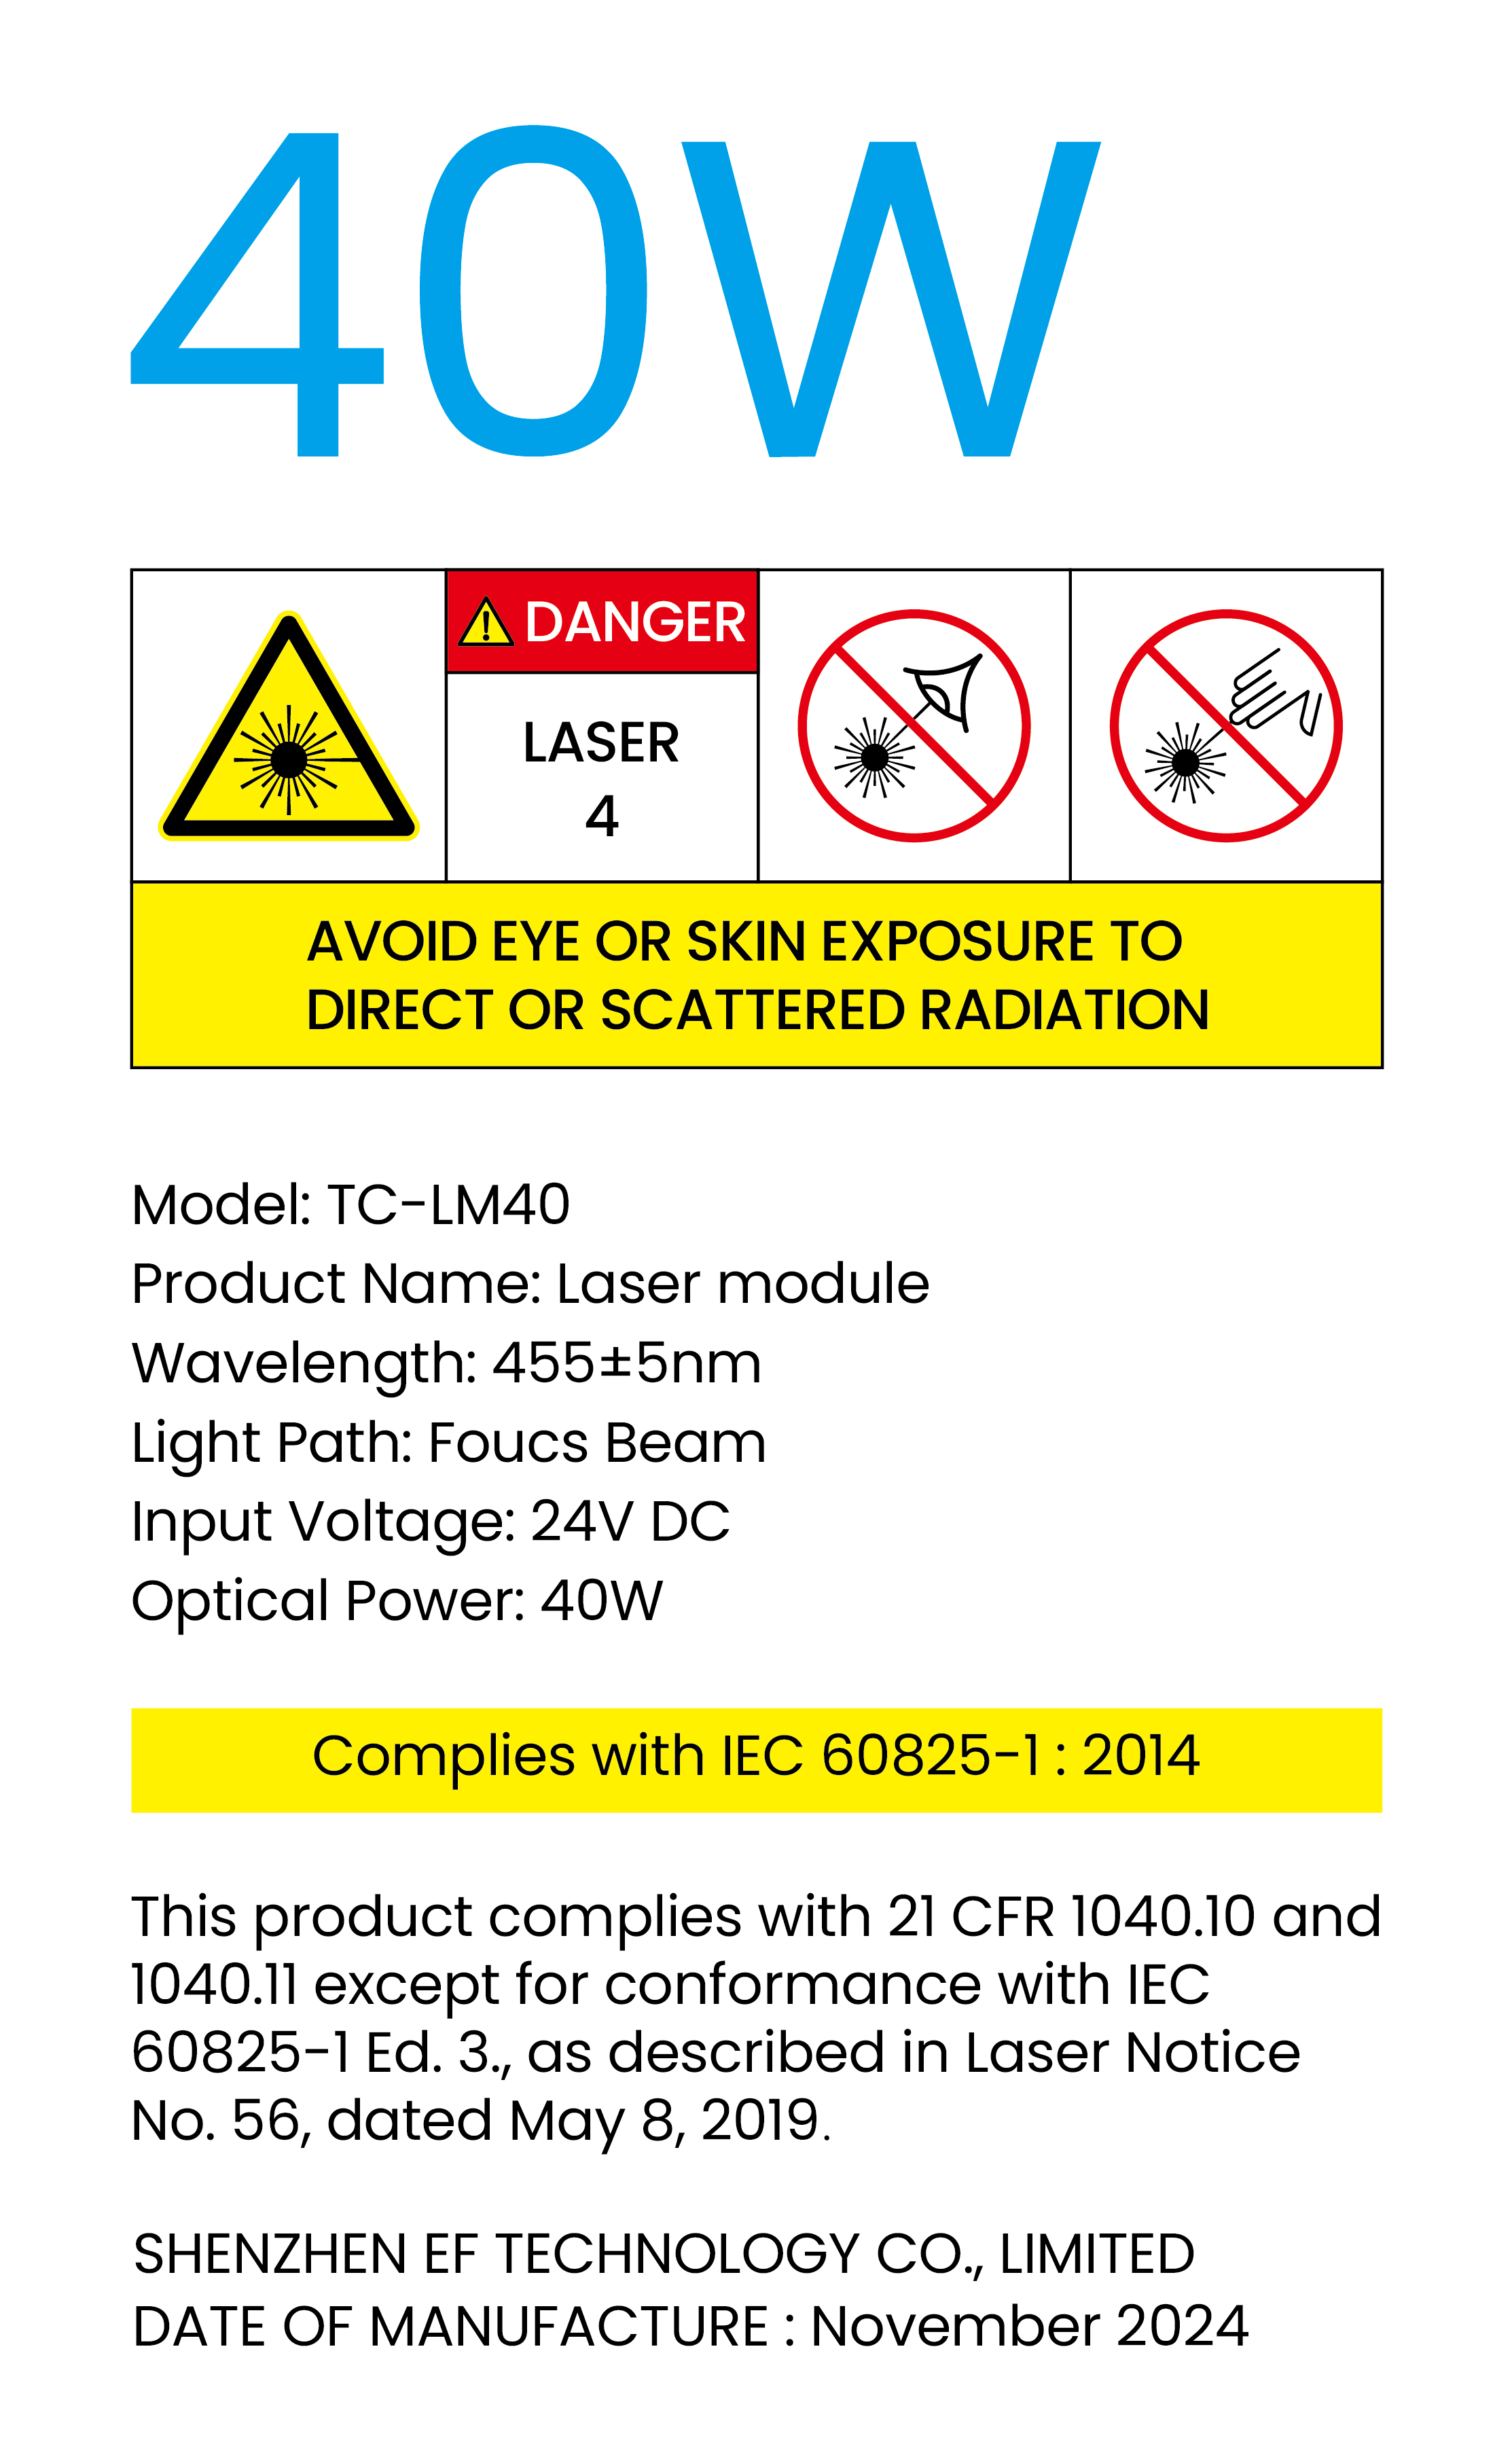 |
The laser product grade is Class IV. Avoid eyes and skin to direct or scattered light. |
On a 40W Laser Module |
|
The laser is emitted from here. | On a 40W Laser Module |
¶ TOOCAA 5-in-1 Rotary for L2
¶ Get to know TOOCAA 5-in-1 Rotary for L2
¶ Product Description
TOOCAA 5-in-1 Rotary for L2 is a versatile rotary accessory designed for precision machining of various materials. It has 5 types of accessories that can handle different types of materials in multiple scenarios, supporting the needs of hobbyists and professionals seeking high-quality engraving and cutting solutions. Applicable to manual projects, model making, small batch production, and school education.
- 【Flexible Adjustment】5-in-1 multifunctional laser rotating accessory. The 180° adjustable three-finger clamp supports 90% of daily cylinders, spheres, and special-shaped objects. You can finish your creation with various materials like wine glasses, jewelry, baseball bats, rings, etc.
- 【Exclusive Patent】The world's only patented design of 3-second elastic quick-release jaws. By quickly changing different types of locking parts, you can perform 360° engraving on different diameters of objects. Improve the creation efficiency by reducing the steps of disassembling and storing parts.
- 【Fast and Precise】The maximum engraving speed of the laser rotary attachment can reach 360°/sec. It is equipped with a high-precision, high-torque stepper motor with a minimum step angle of 0.02°, letting you capture all the details in your creation.
- 【Efficient Service】Please contact us if you encounter any problems with the swivel attachment, TOOCAA product experts will provide friendly customer service and professional technical support within 24 hours.
¶ Product Specification
| Product Name | TOOCAA 5-in-1 Rotary for L2 |
| Product Size | 286 × 88 × 128 (mm) |
| Product Weight | Net weight:2.0kg |
| Types of Accessories | Roller Rotary, Chuck Rotary, Sphere Rotary, Ring Rotary, 180° adjustable flip mode |
| Engraving Diameter Range | Roller Rotary:5-200(mm) Chuck Rotary:0-140(mm) Sphere Rotary:25-120(mm) Ring Rotary:12-100(mm) |
| Chuck Angle Adjustment Range | 0°-180° |
| Compatible Machines | TOOCAA L2 |
| Compatible Software | TOOCAA Studio\LightBurn |
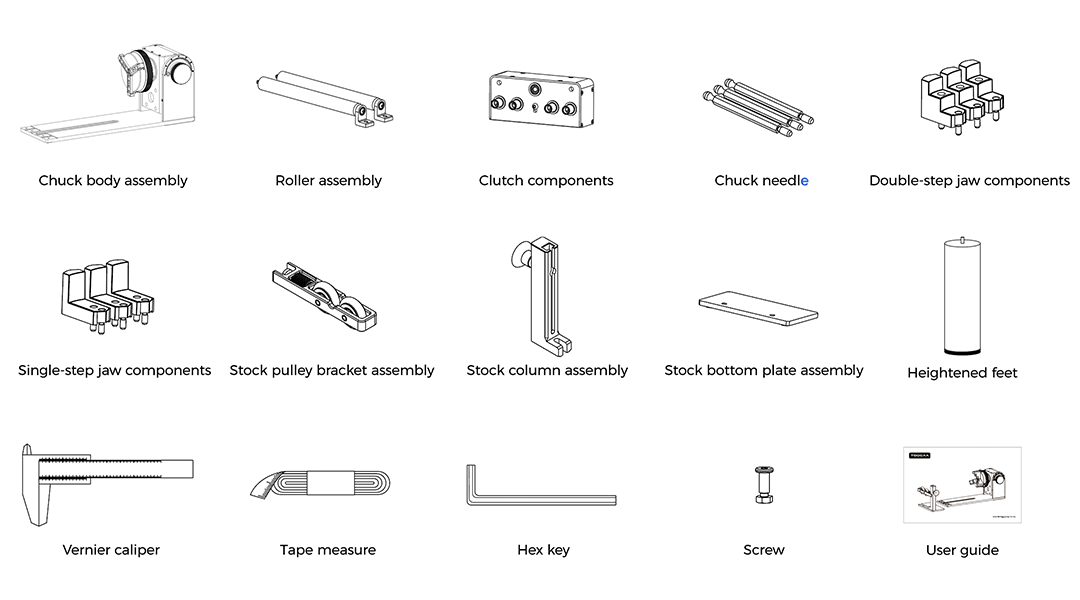
¶ Unboxing inspection
¶ Applicable object reference
We need to use different types of accessories when engraving some large or irregular consumables. The following is a reference for the objects that the 5 types of accessories are suitable for.
| Types of Accessories | Definition of Product Function | Diameter Range | Accessories Pictures |
|---|---|---|---|
| Roller Rotary | Applicable to irregular cylinders and extra-long objects | 5-200(mm) |  |
| Chuck Rotary | Applicable to objects with round or non-round bases | 0-140(mm) |  |
| Sphere Rotary | Applicable to spherical objects | 25-120(mm) |  |
| Ring Rotary | Applicable to the outer ring | 12-100(mm) |  |
| 180° Adjustable Flip Mode | Applicable to special-shaped beveled cylinders and inner rings | / |  |
¶ Roller Rotary Accessories Operation Tutorial
- Insert the clutch components into the chuck body assembly and secure it with the screws.
 TIPS:Adjust the interface angle by twisting the knob of the rotating accessory can for easy alignment and proper insertion of the clutch components.
- Measure the diameter of the material being cut with a vernier caliper or tape measure and select the appropriate clutch components based on the diameter of the material being cut/engraved.
- Insert the roller assembly into the clutch components along the gap at the bottom of the chuck body assembly.
TIPS:By twisting the knob on the chuck body assembly of the rotating accessory to adjust the interface angle inside the clutch components, the roller assembly can be easily aligned and correctly inserted.
Note:The screw holes at the rear of the roller assembly should be aligned perfectly with the screw holes on the chuck body assembly of the swivel attachment to be properly connected.
- Secure the roller assembly with screws.
Note:Please rotate and move the roller assembly in a small range after fixing it to ensure that the roller assembly can be used normally. If it is loose, it means that the roller assembly has not been installed properly. Please remove the roller assembly and recalibrate and install it.
¶ Chuck Rotary Accessories Operation Tutorial
- As shown in the figure. Adjust the chuck knob clockwise to unlock, and adjust the chuck knob counterclockwise to lock. The chuck can be expanded or contracted by adjusting the chuck knob to facilitate the insertion of the double-step jaw components.
- Press the button on the top of the chuck and insert the double-step jaw components into the chuck of the appropriate cutting/engraving material size.
¶ Sphere Rotary Accessories Operation Tutorial
- As shown in the figure. Adjust the chuck knob clockwise to unlock, and adjust the chuck knob counterclockwise to lock. The chuck can be expanded or contracted by adjusting the chuck knob to facilitate the insertion of the chuck needle.
- Press the button on the top of the chuck and insert the chuck needle into the chuck of the appropriate cutting/engraving material size.
- Insert the stock column assembly along the gap at the bottom of the chuck body assembly.
- Fix the chuck body assembly with screws.
¶ Ring Rotary Accessories Operation Tutorial
- As shown in the figure. Adjust the chuck knob clockwise to unlock, and adjust the chuck knob counterclockwise to lock. The chuck can be expanded or contracted by adjusting the chuck knob to facilitate the insertion of the chuck needle.
- Press the button on the top of the chuck and insert the chuck needle into the chuck of the appropriate cutting/engraving material size.
¶ 180° Adjustable Flip Mode Accessories Operation Tutorial
The tilt angle of the chuck body assembly can be adjusted by the side knob. When the tilt angle is appropriate, tighten the knob to fix it.
Note:Before adjusting the tilt angle of the chuck body assembly, the roller assembly and clutch components must be removed.
¶ Support Module Operation Tutorial
The support module consists of a stock column assembly, a stock pulley bracket assembly, and a stock bottom plate assembly, which can be connected as shown in the figure.
Note:Pay attention to the direction when installing the stock pulley bracket assembly into the stock column assembly.
The support module is specially designed for longer consumables. The height of the support module support wheel can be adjusted by turning the knob. By holding up the tail of the cutting/engraving materials, the longer cutting/engraving materials can be kept horizontal, which is convenient for high-quality engraving and cutting work.
¶ Device Connection Operation
- Remove the black silicone pad from the TOOCAA L2 foot pad, connect the heightening feet to the foot pad, and increase the height of the machine.
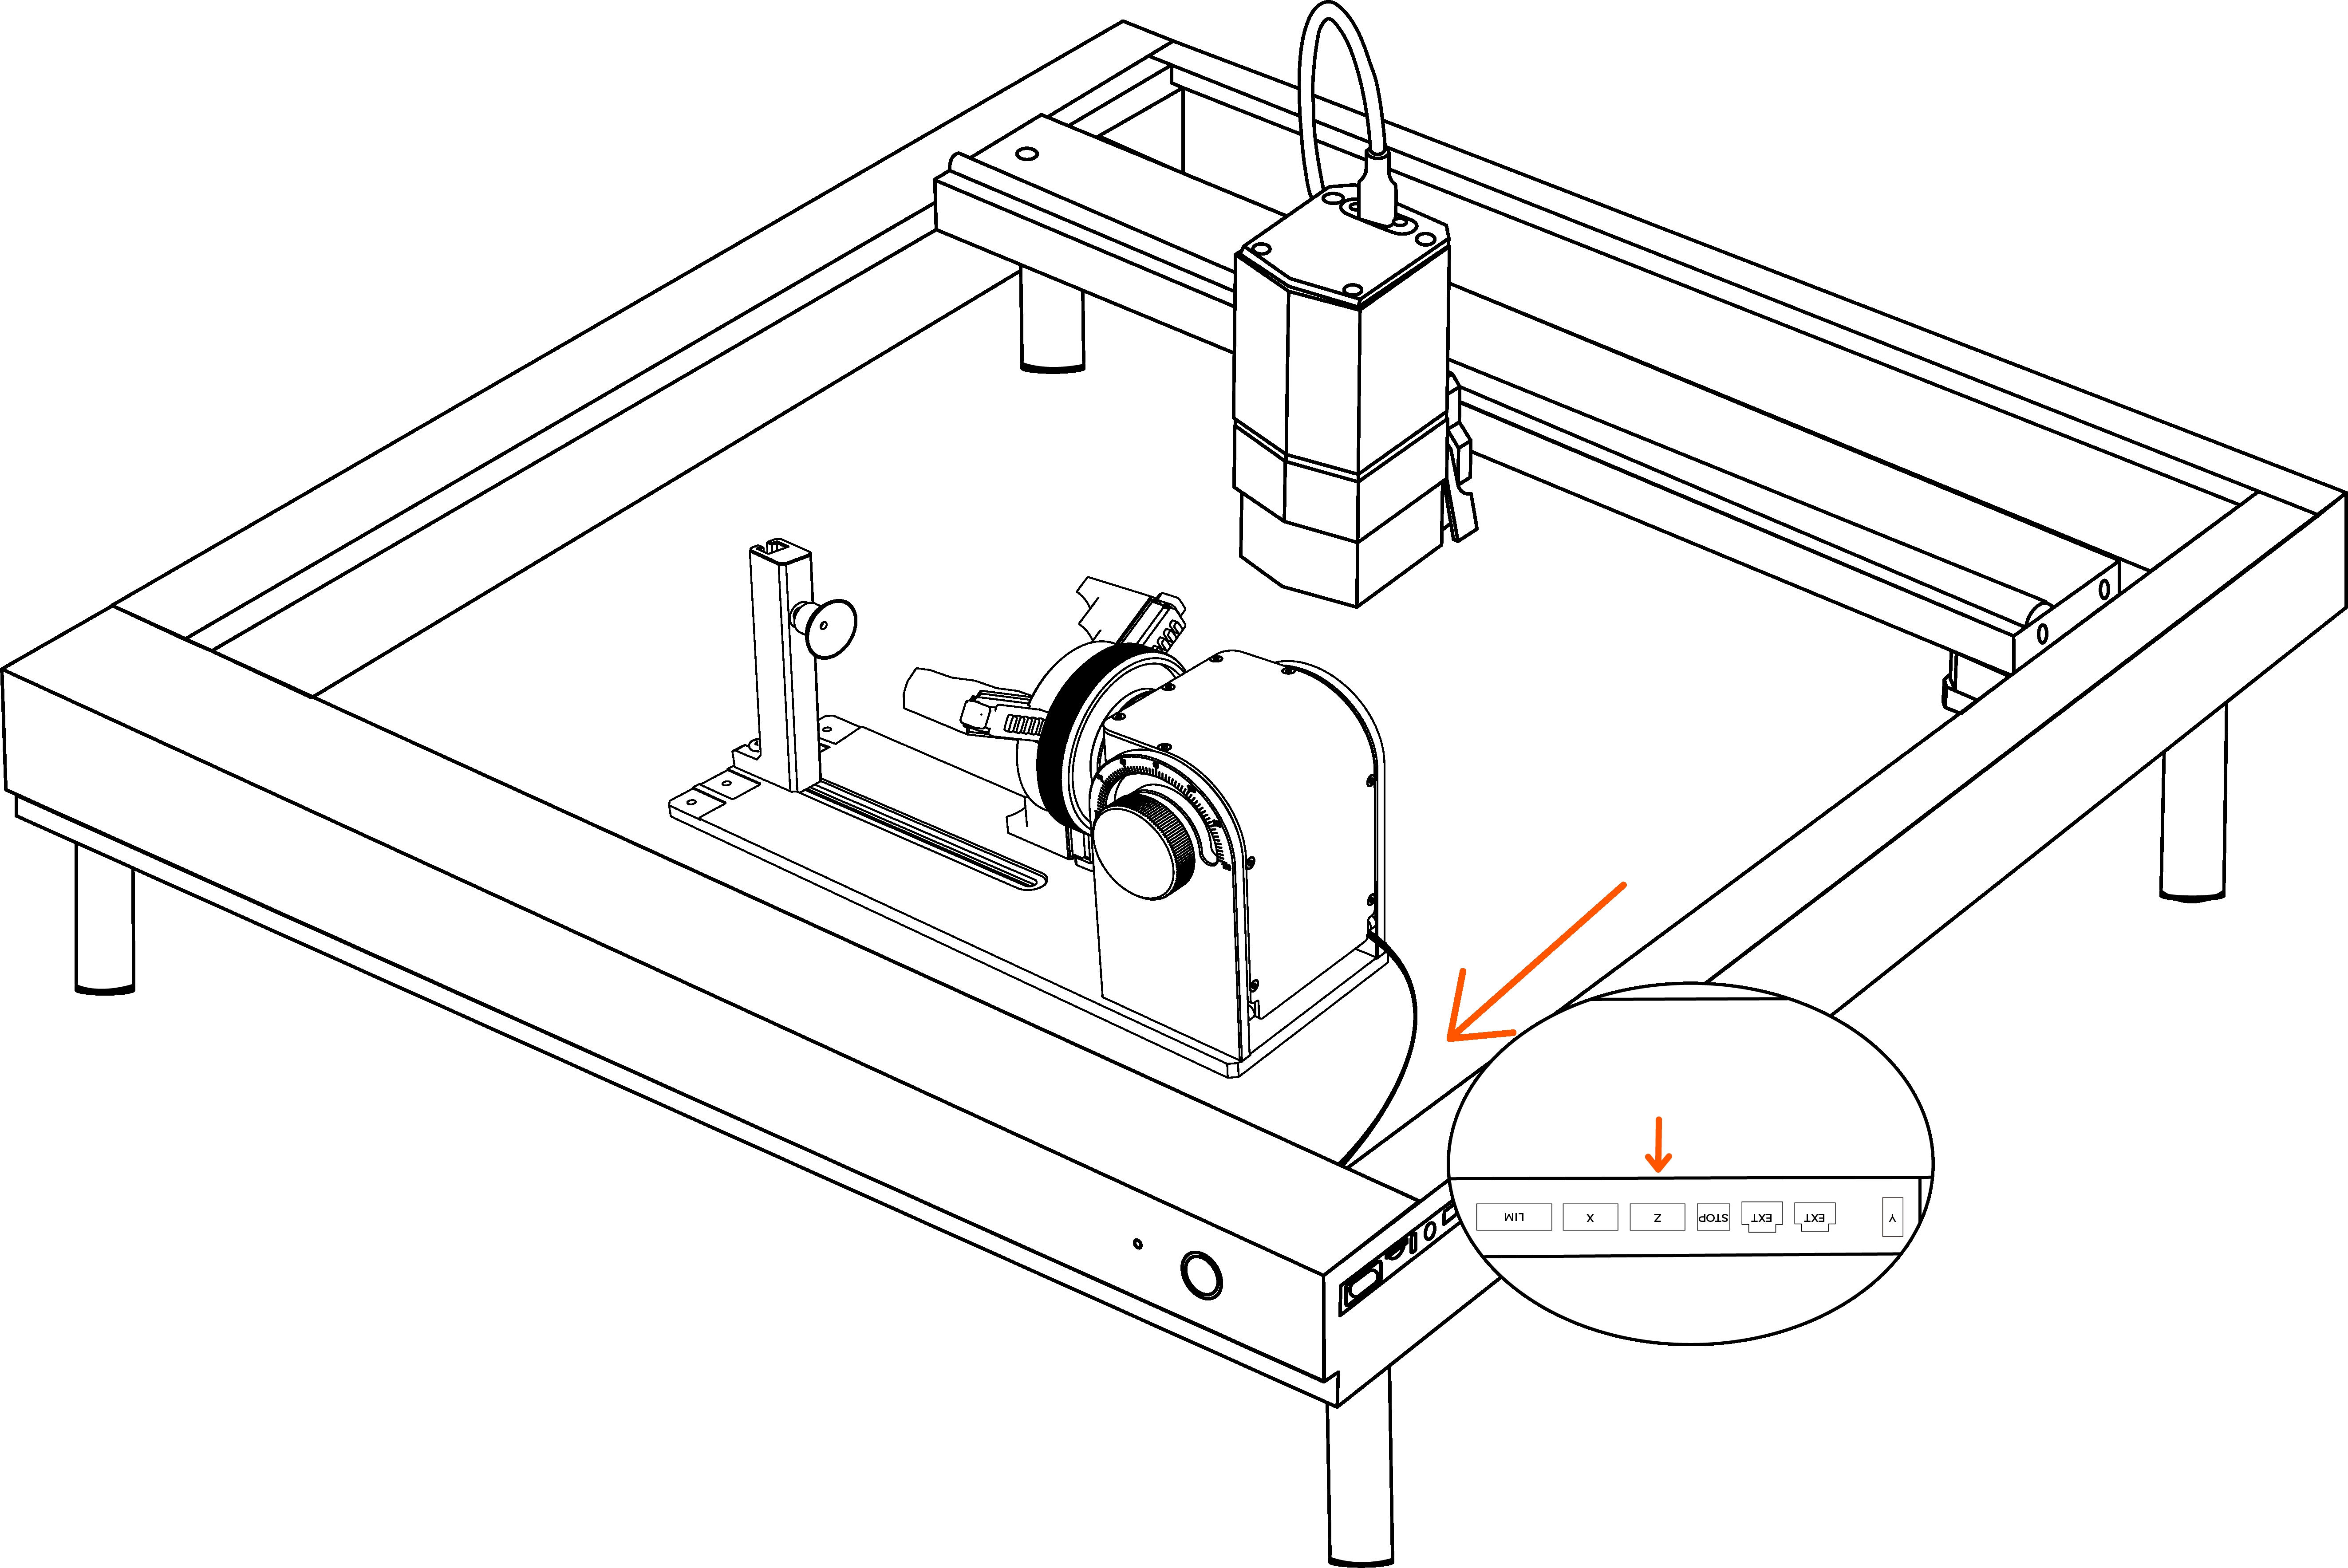
- Connect the motor cable plug of TOOCAA 5-in-1 Rotary for L2 to the Z-axis socket of TOOCAA L2.
Q&A:__The Z-axis connection of TOOCAA L2 is located on the back of the TOOCAA L2 body.


¶ Focus Operation
Select the appropriate accessories according to the type of cutting/engraving material, and adjust the TOOCAA 5-in-1 Rotary for L2, cutting/engraving material, and TOOCAA L2 machine X-axis to a horizontal and parallel state.

TIPS:You can purchase a level to help confirm whether the cutting/engraving material is in a horizontal state.
Adjust the laser module focus lever so that the tip of the focus lever touches the cutting/engraving material.
¶ Software Operation
¶ Download and verify the configuration file of TOOCAA 5-in-1 Rotary for L2
- Please click the link below to download the configuration file.
Download Link:
https://www.elecfreaks.com/download/toocaa/toocaa5-in-1rotaryforl2configurationfilev1.0.nc
- After downloading the configuration file, import it into the TOOCAA L2's built-in SD card, insert the SD card into TOOCAA L2, click the button to return the laser module to its initial position, and then double-click the button to start the machine to complete the configuration file setting.
TIPS:Double-click the button to start the machine and there will be responsive music.
- Connect the machine through LightBurn. Click Machine Settings in the Edit window.
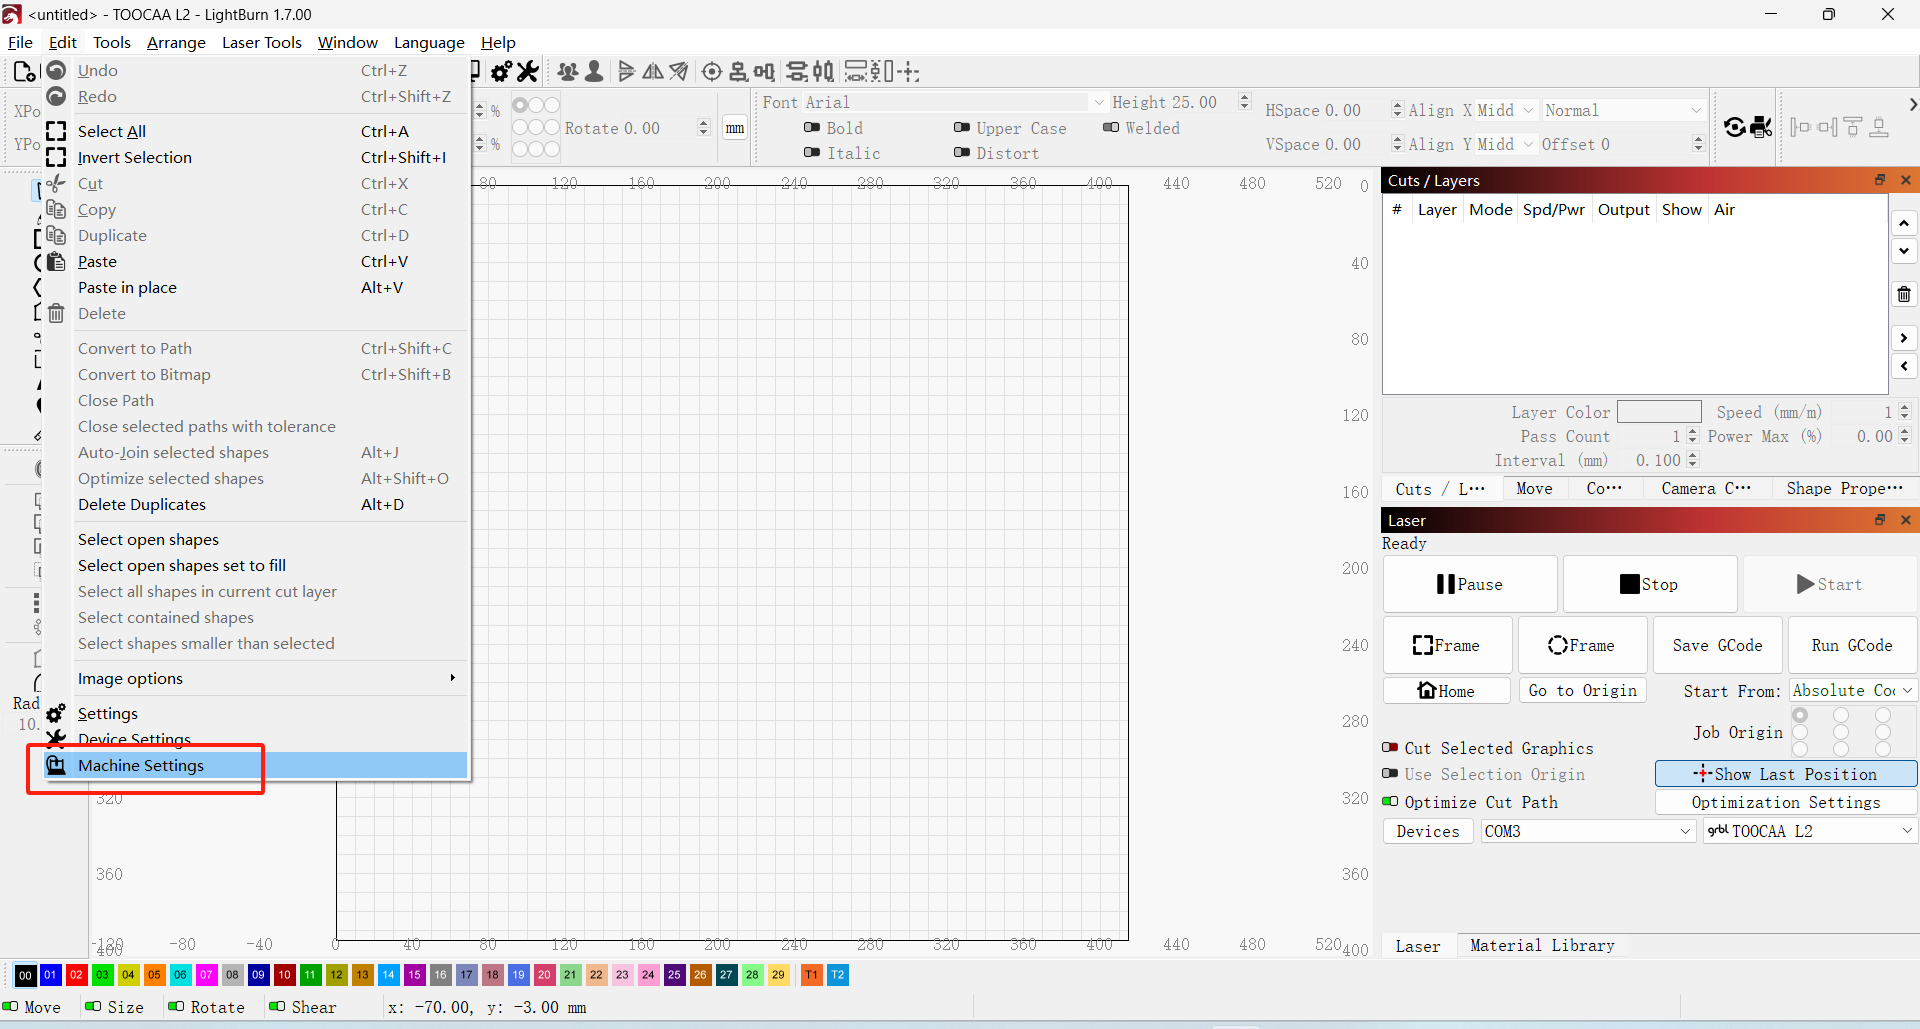
Select** output settings**.
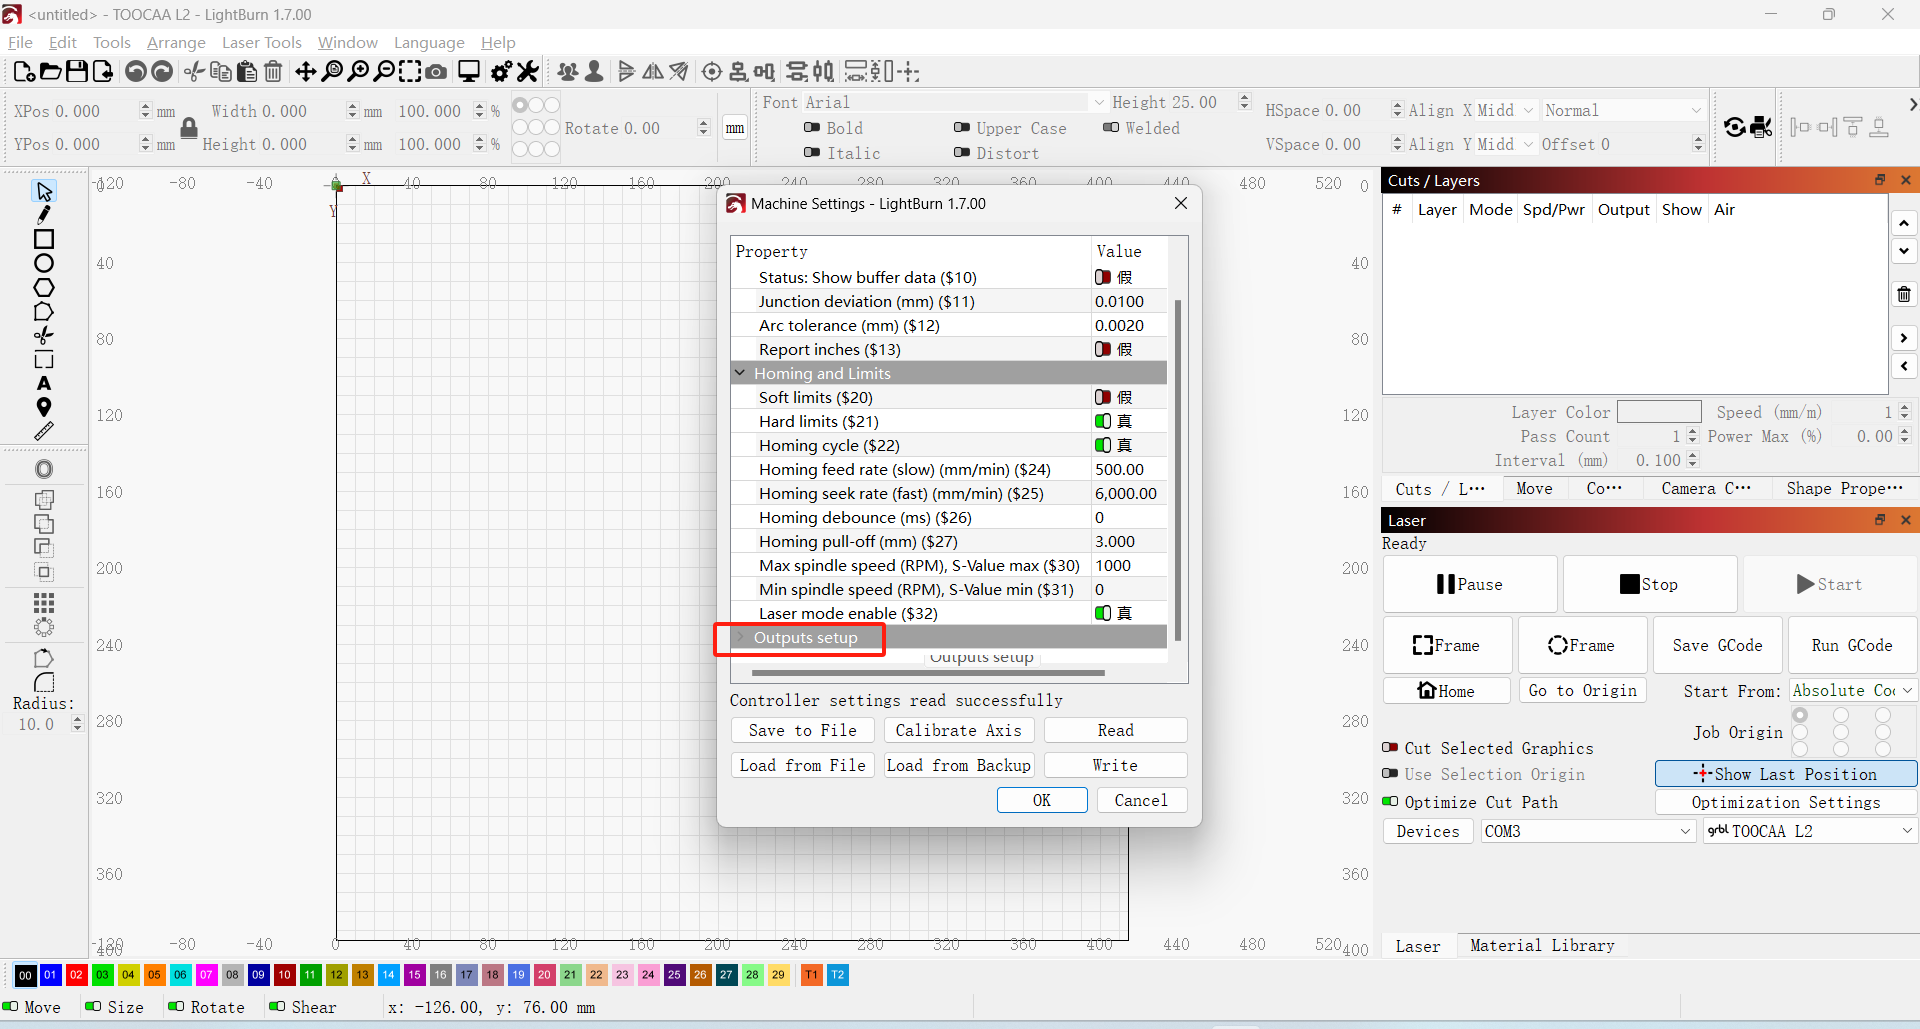
If the suffix of Z Steps per mm ($102) is 100.000, the file configuration is complete and the TOOCAA 5-in-1 Rotary for L2 can start to operate normally.
**Note: If the suffix of Steps per mm ($102) is not 100.000, please contact TOOCAA after-sales technicians in time (TOOCAA after-sales technicians contact information: **zack@toocaa.com). We will solve it for you as soon as possible.
%E5%90%8E%E7%BC%80%E6%98%BE%E7%A4%BA%E4%B8%BA100.000.png)
¶ TOOCAA Studio & TOOCAA 5-in-1 Rotary for L2 Tutorial
Start TOOCAA Studio.
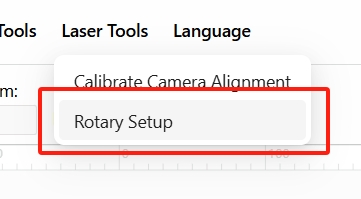
Click Laser Tools in the menu bar.
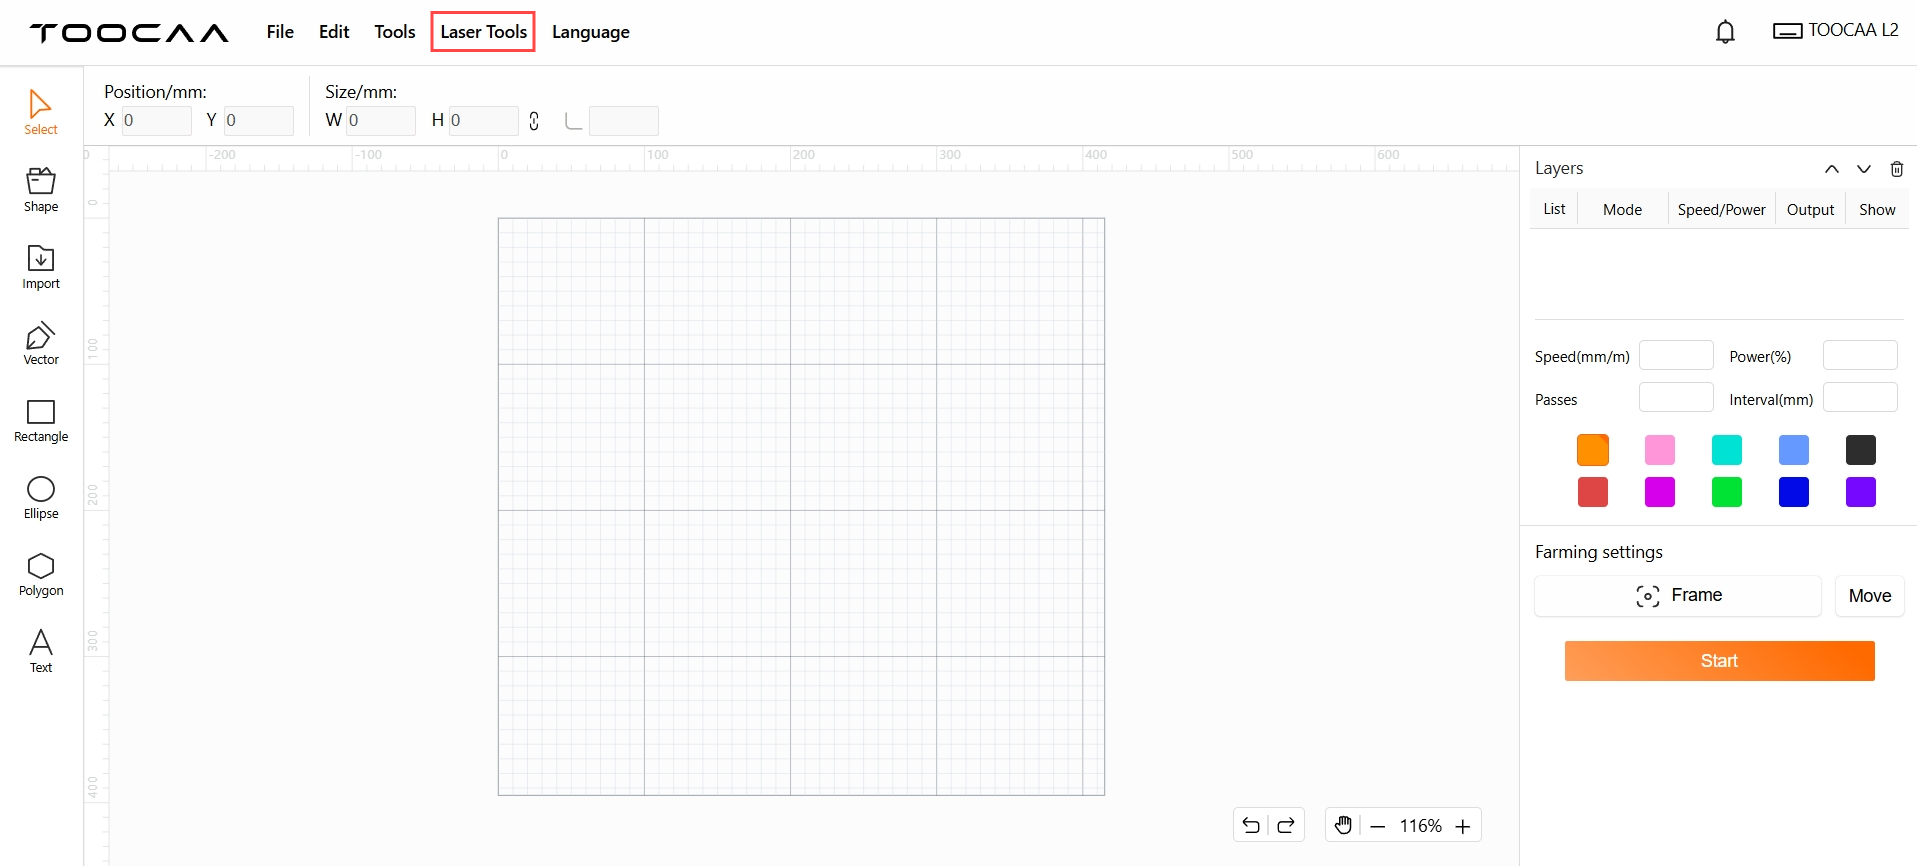
Select the Rotary Setup.
Select the mode you will be using。
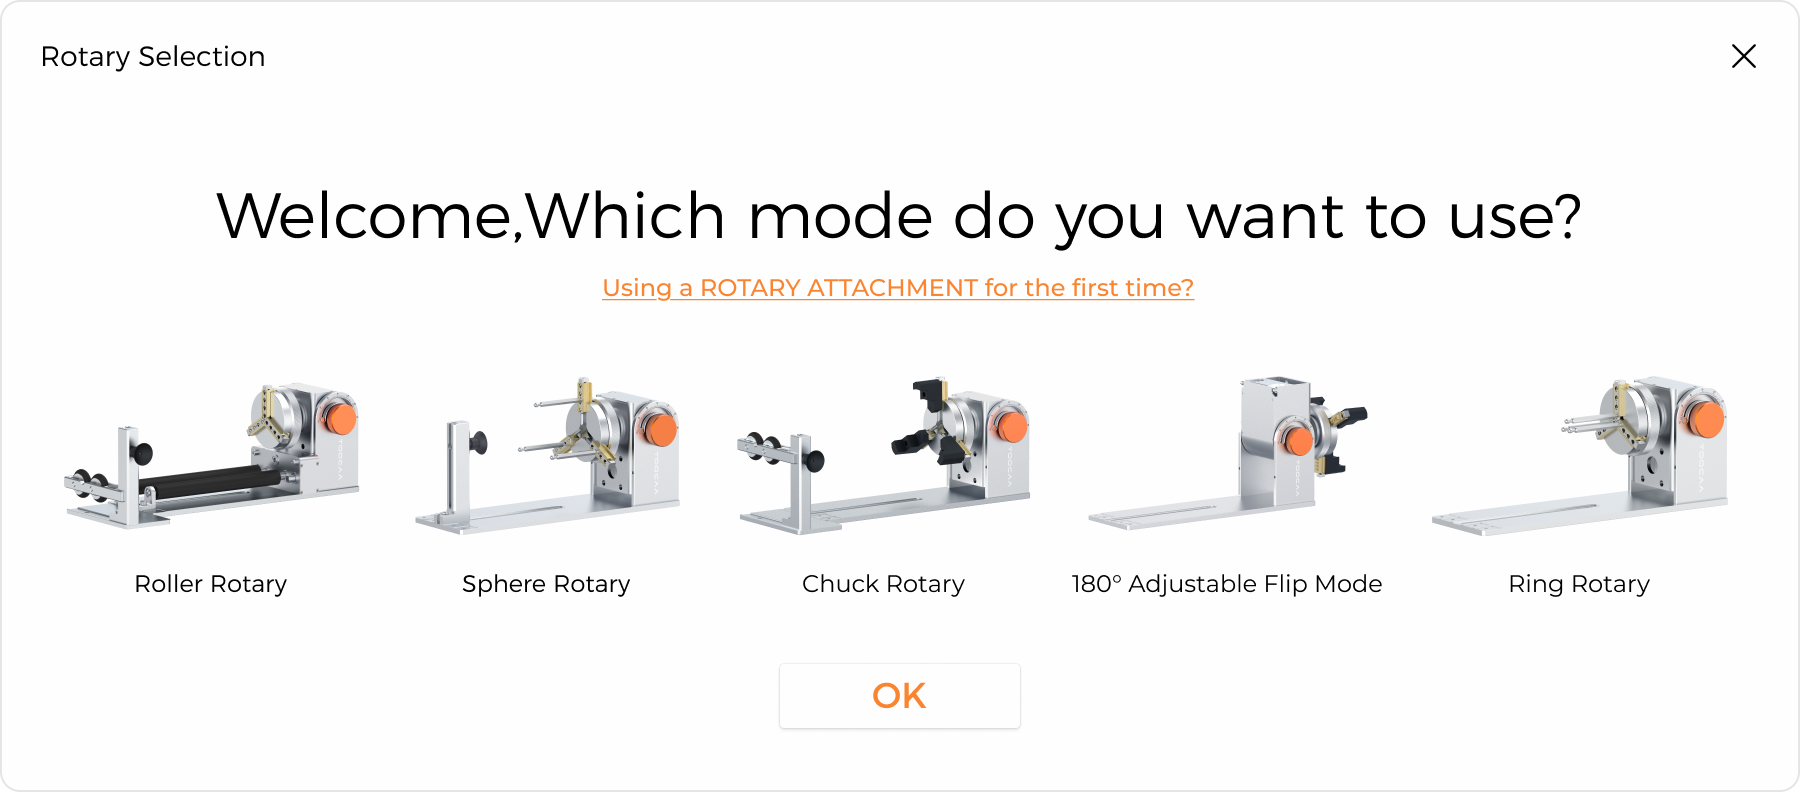
If you select the Roller Rotary mode, just click OK to start using it.
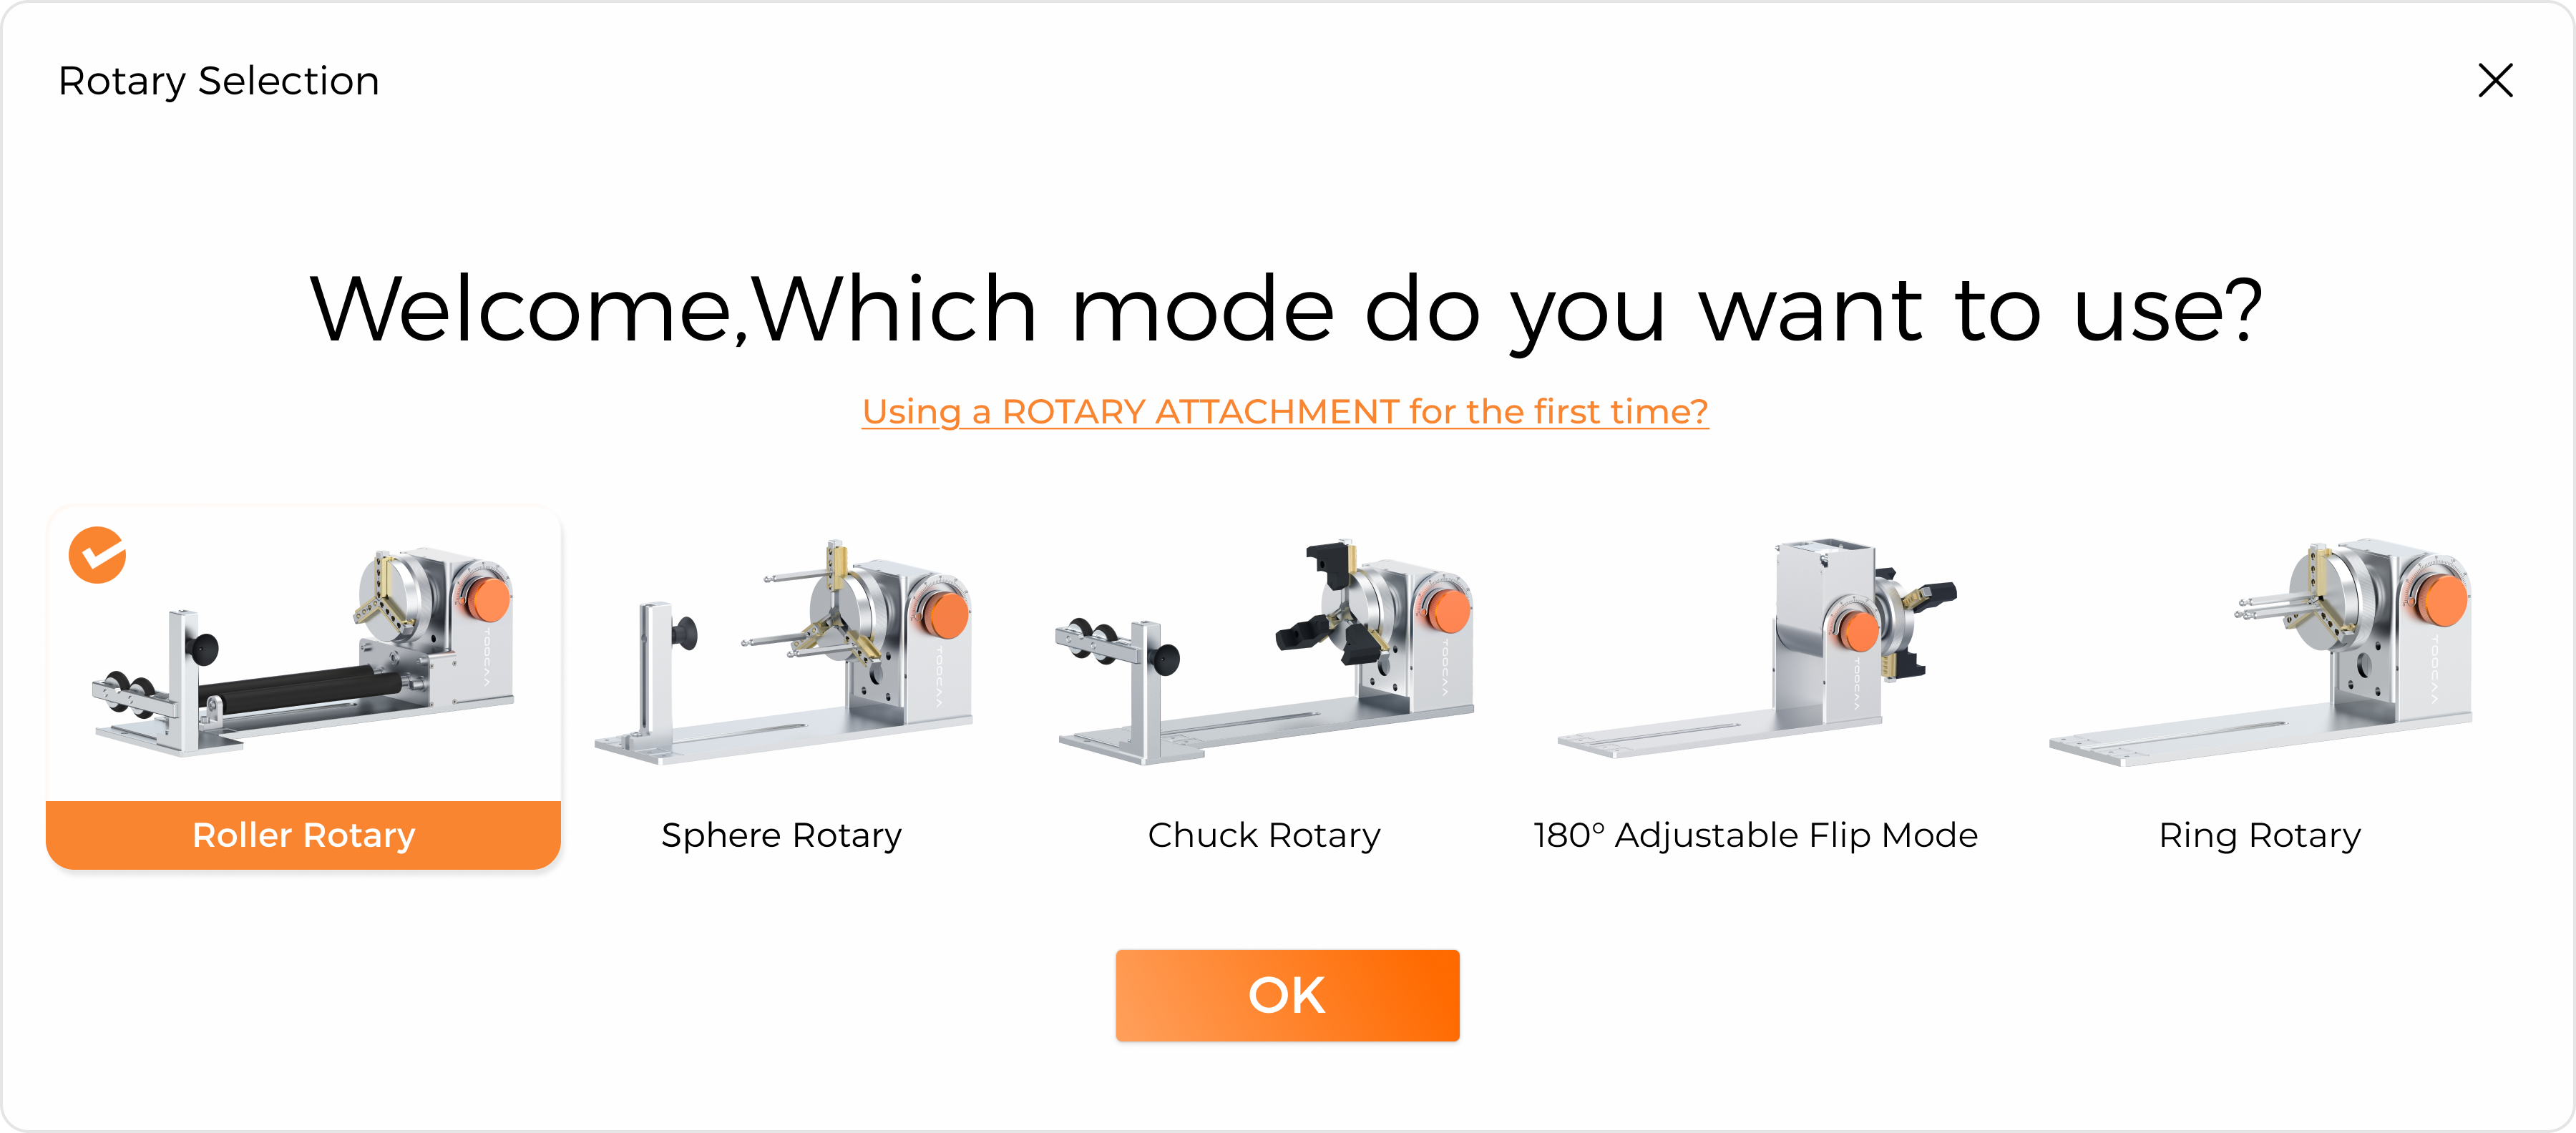
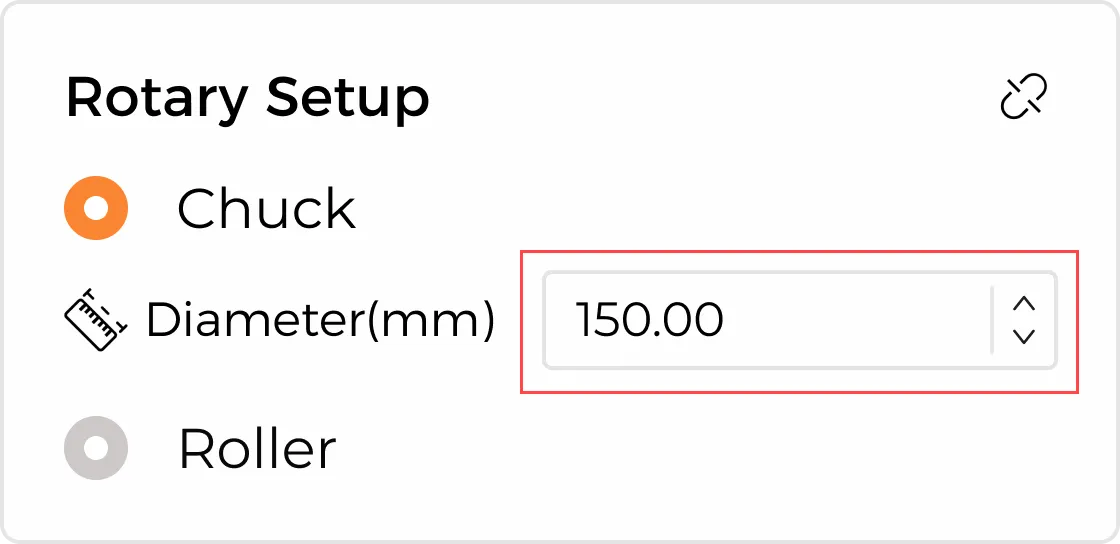
If you select the Chuck Rotary, Sphere Rotary, Ring Rotary, or 180° adjustable flip mode, please enter the object diameter in the rotation accessory toolbar on the right after clicking OK.
Congratulations! You have completed all TOOCAA 5-in-1 Rotary for L2 function settings!
After setting appropriate parameters for the material, perform the Frame operation. If the position meets your requirements, you can click in the lower right corner to start creating.
Notice:
1. After selecting the rotary accessory mode in TOOCAA Studio, the positioning mode automatically switches from absolute coordinates to the current position of the focus lever (relative coordinates). Please pay attention to the position of the object in the canvas to avoid limit errors.
2. In the rotary accessory mode, the laser module's working starting position is the current position of the focus lever (relative coordinate). After using the focus lever to adjust the focal length to the actual filament size, processing can be started directly without the need to move (or return) the laser module a second time.
¶ LightBurn
Notice:
- Make sure you have purchased, downloaded, and installed a genuine copy of LightBurn.
- Before using LightBurn to operate TOOCAA 5-in-1 Rotary for L2, please make sure you have updated the machine firmware through TOOCAA Studio. (To check whether it is the latest firmware, please read this document 《TOOCAA L2 Firmware Version Update Tutorial》:
- Please click the link below to download the configuration file.
(Configuration file download link:
https://www.elecfreaks.com/download/toocaa/toocaa5-in-1rotaryforl2configurationfilev1.0.nc)
After the configuration file is downloaded, import it into the built-in SD card of TOOCAA L2. Insert the SD card containing the configuration file into TOOCAA L2 and double-click the button to start the machine.
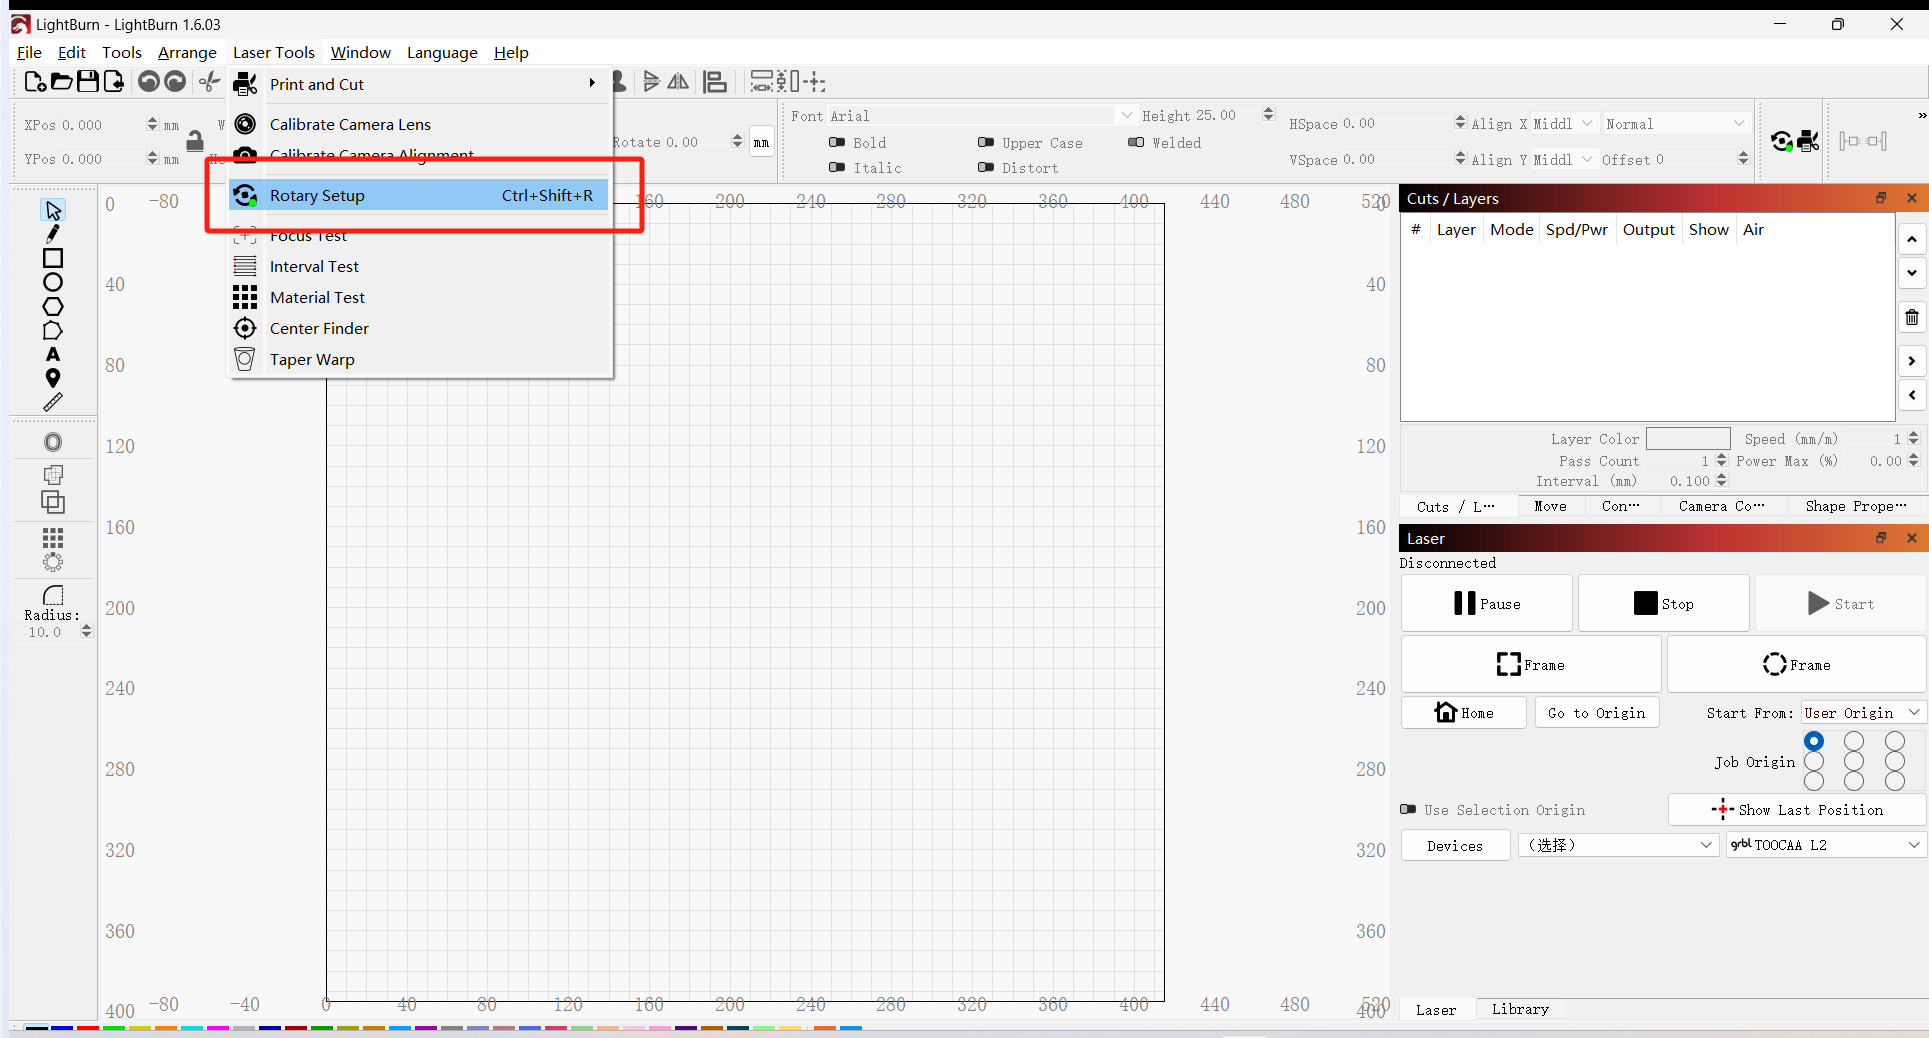
Start LightBurn:
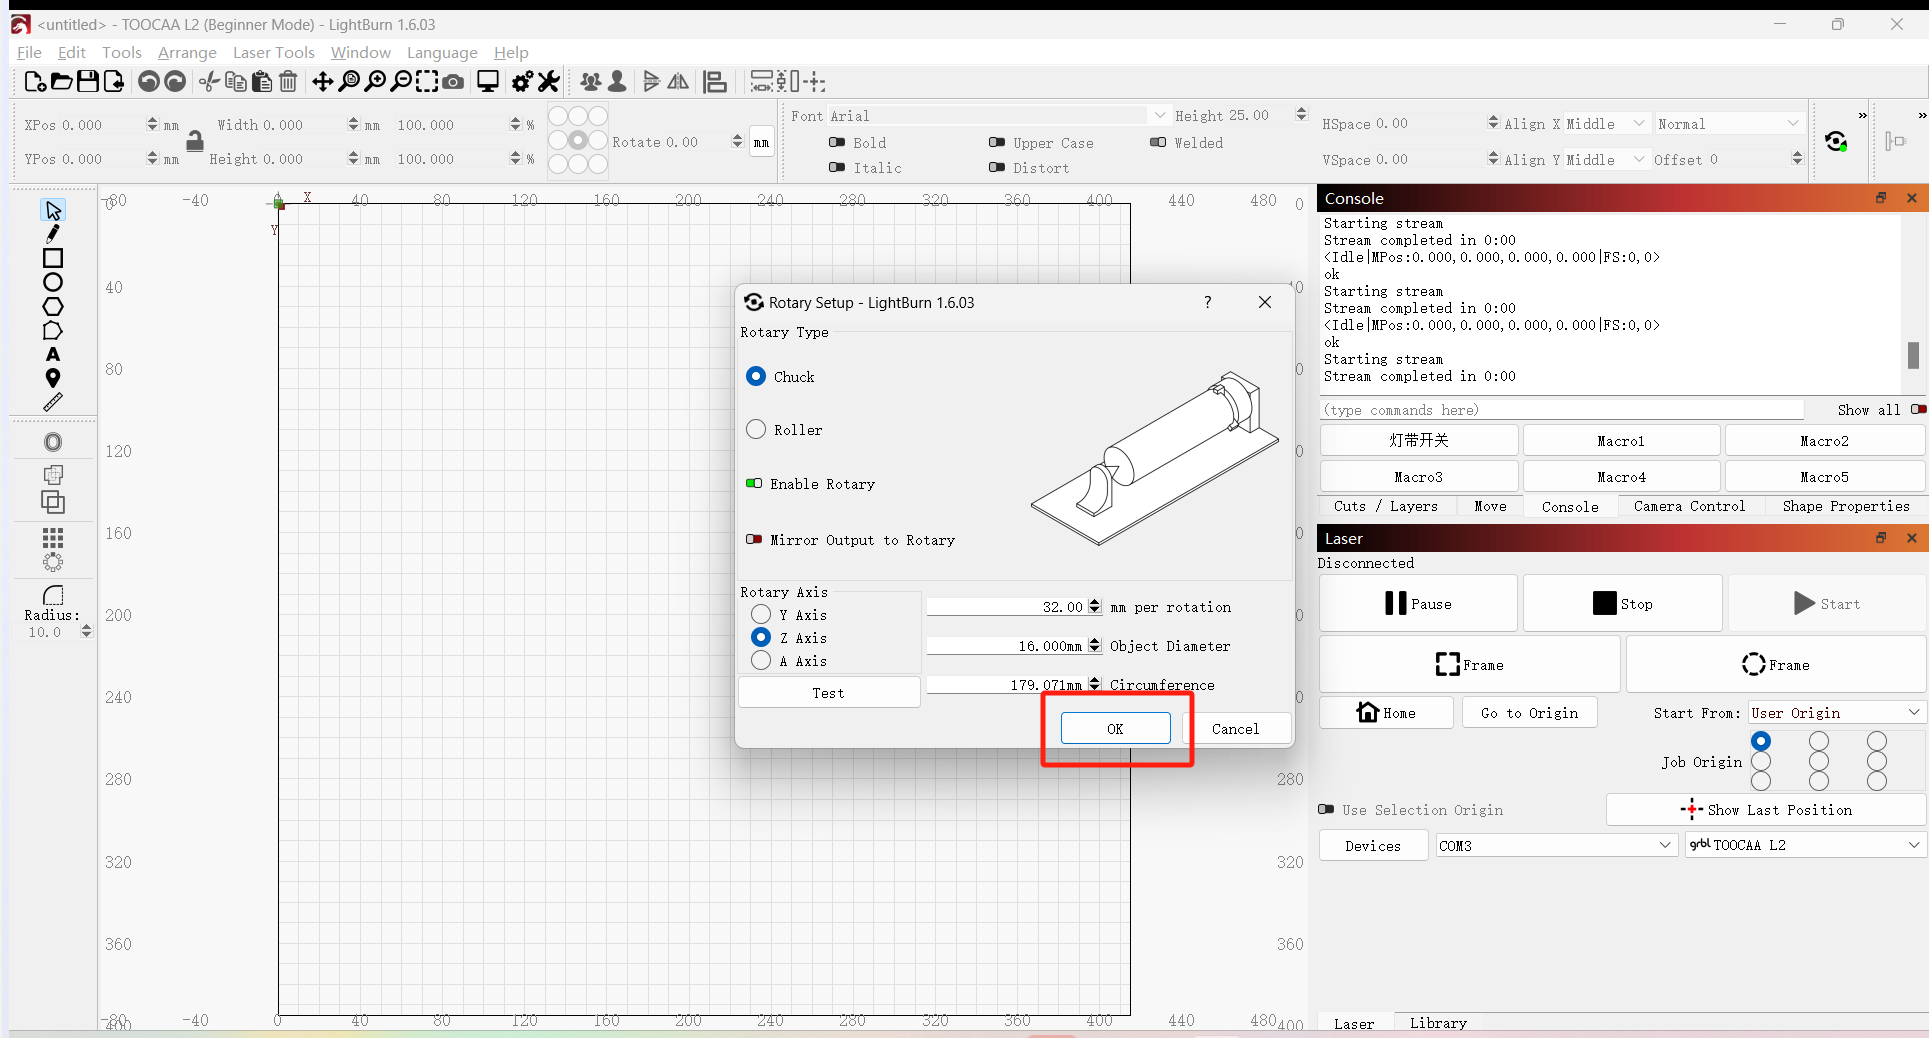
Click Rotary Setup in the Mode toolbar.
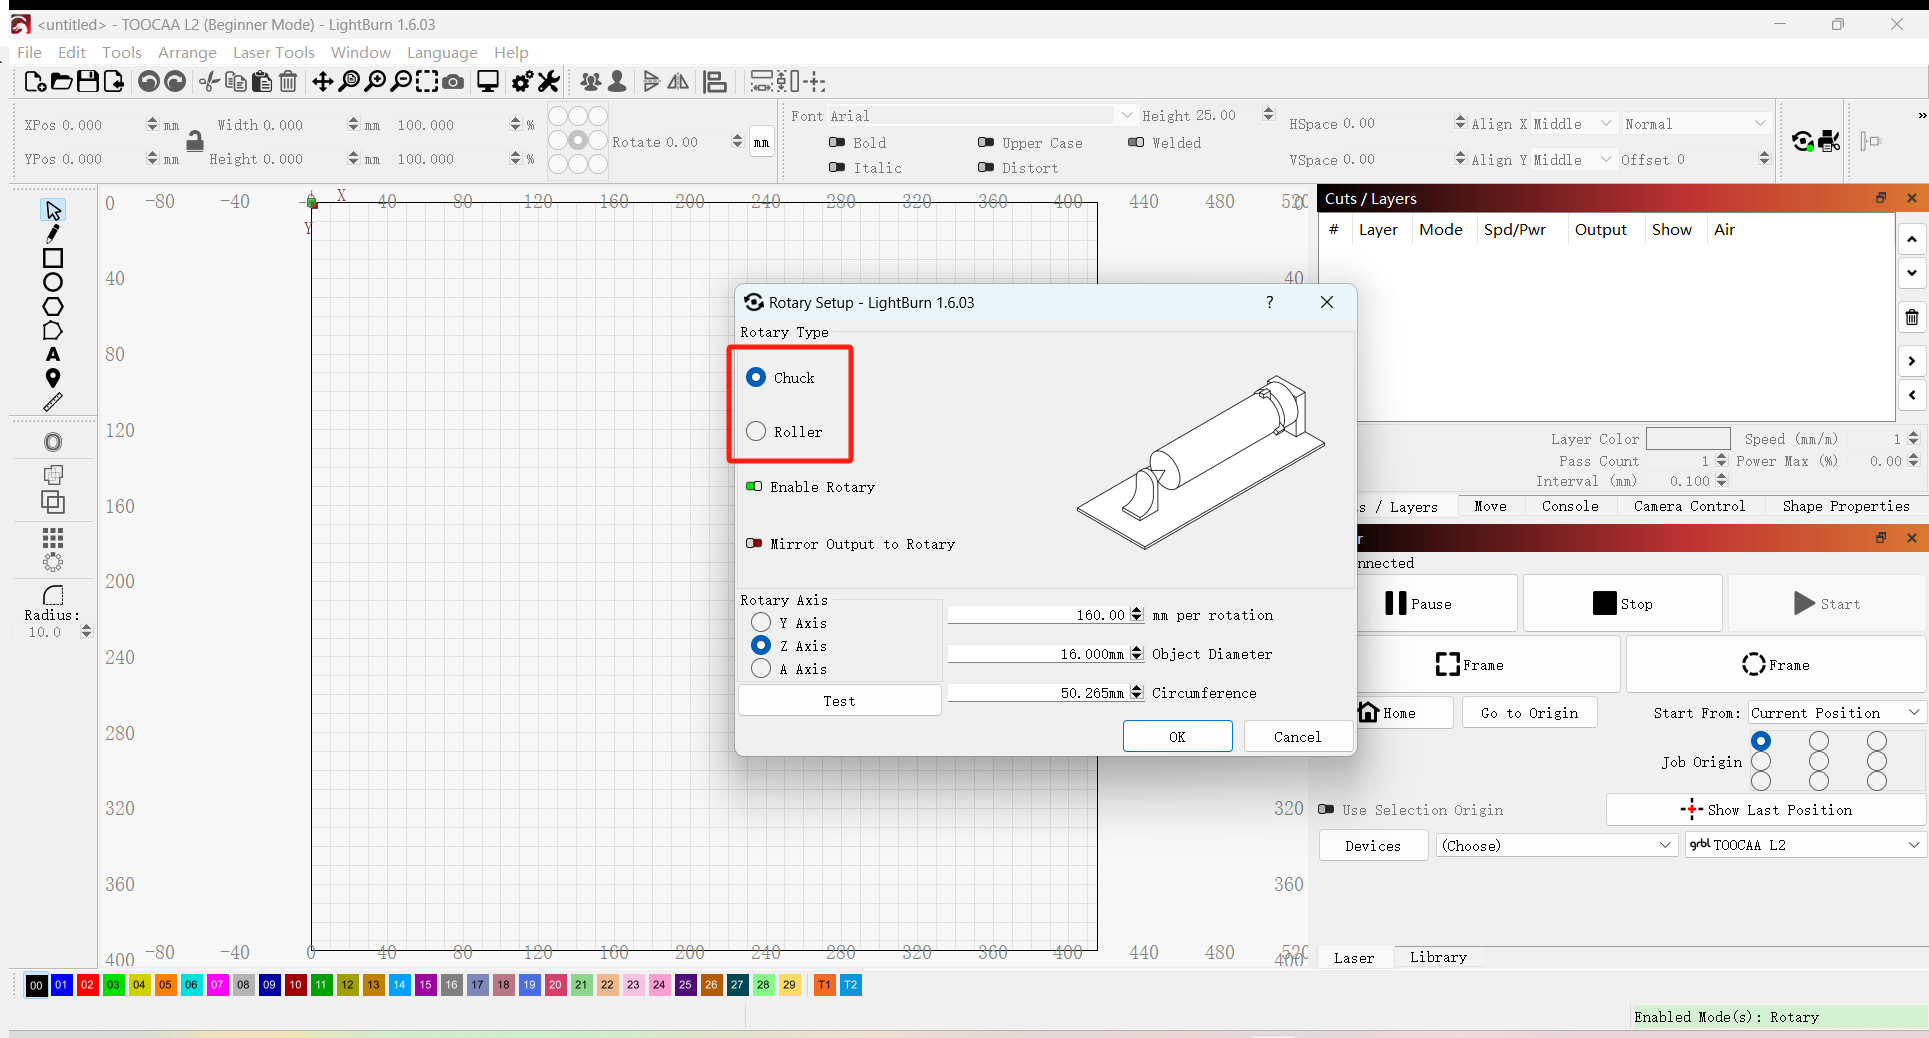
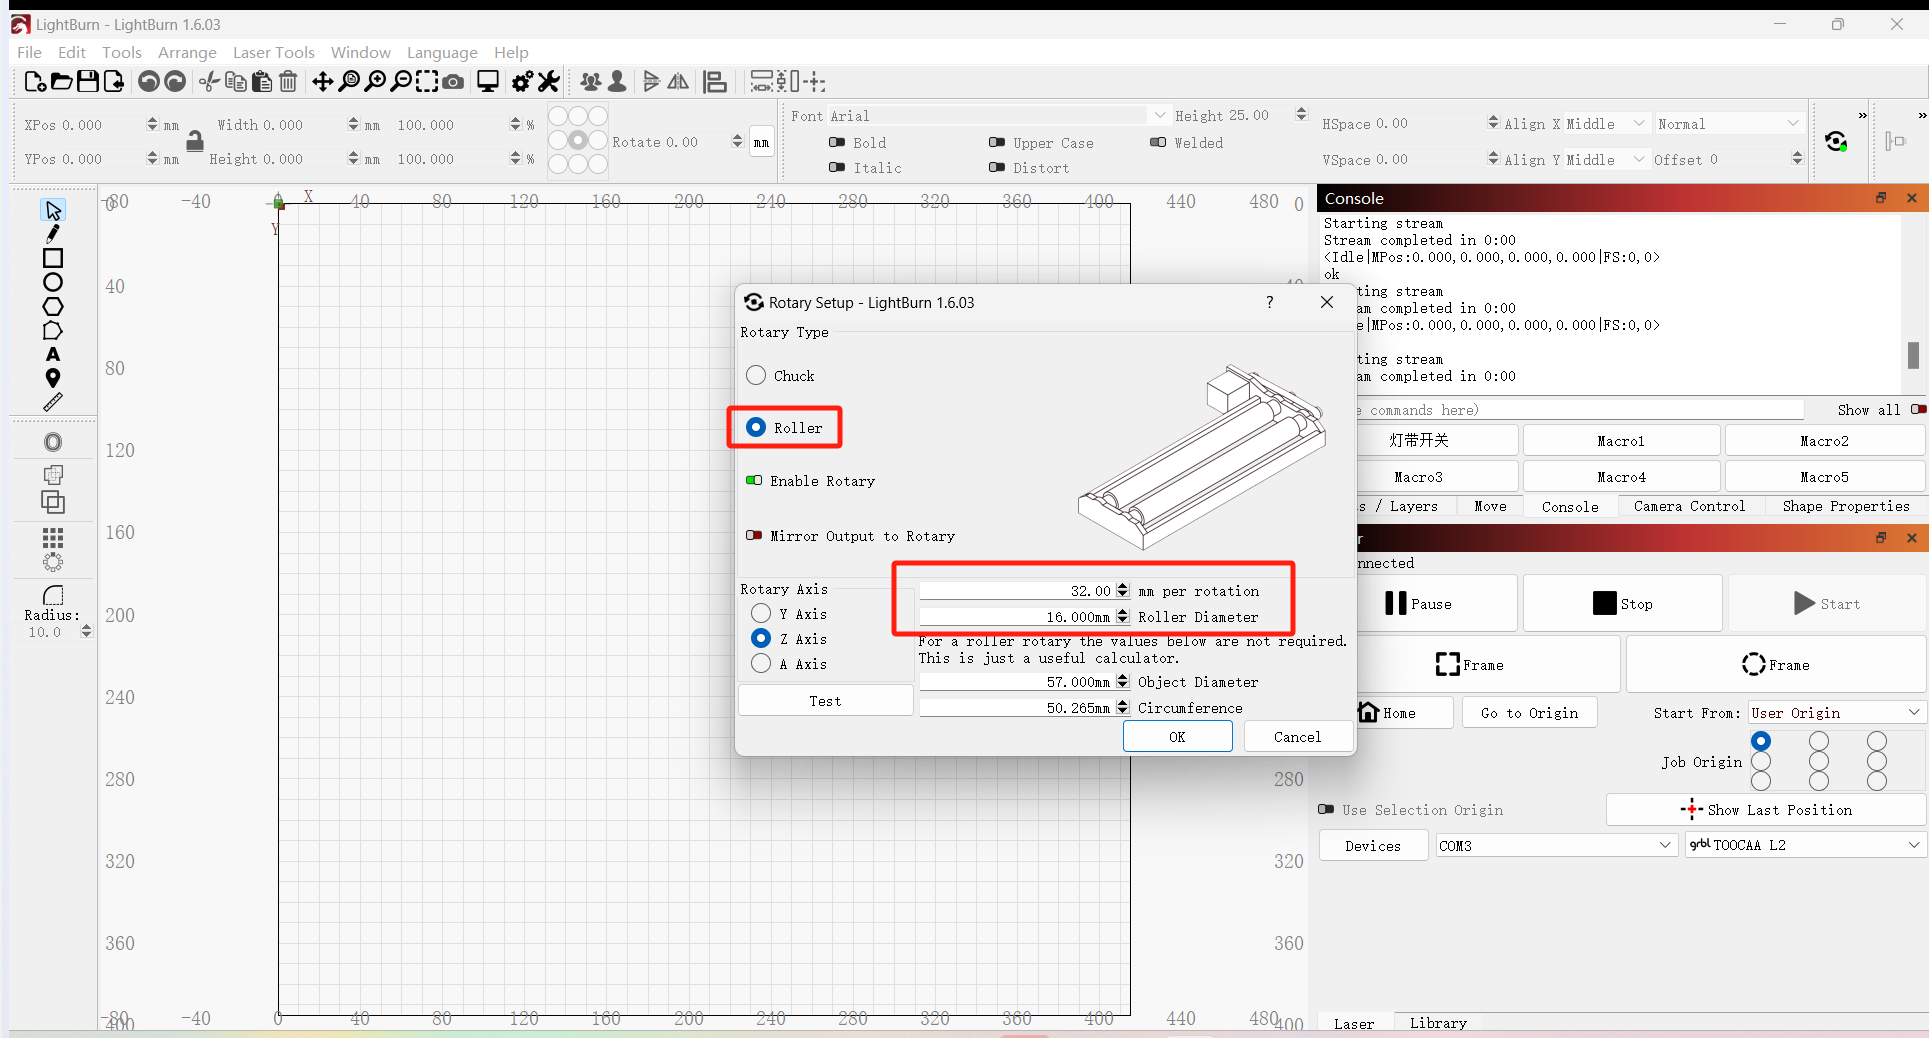
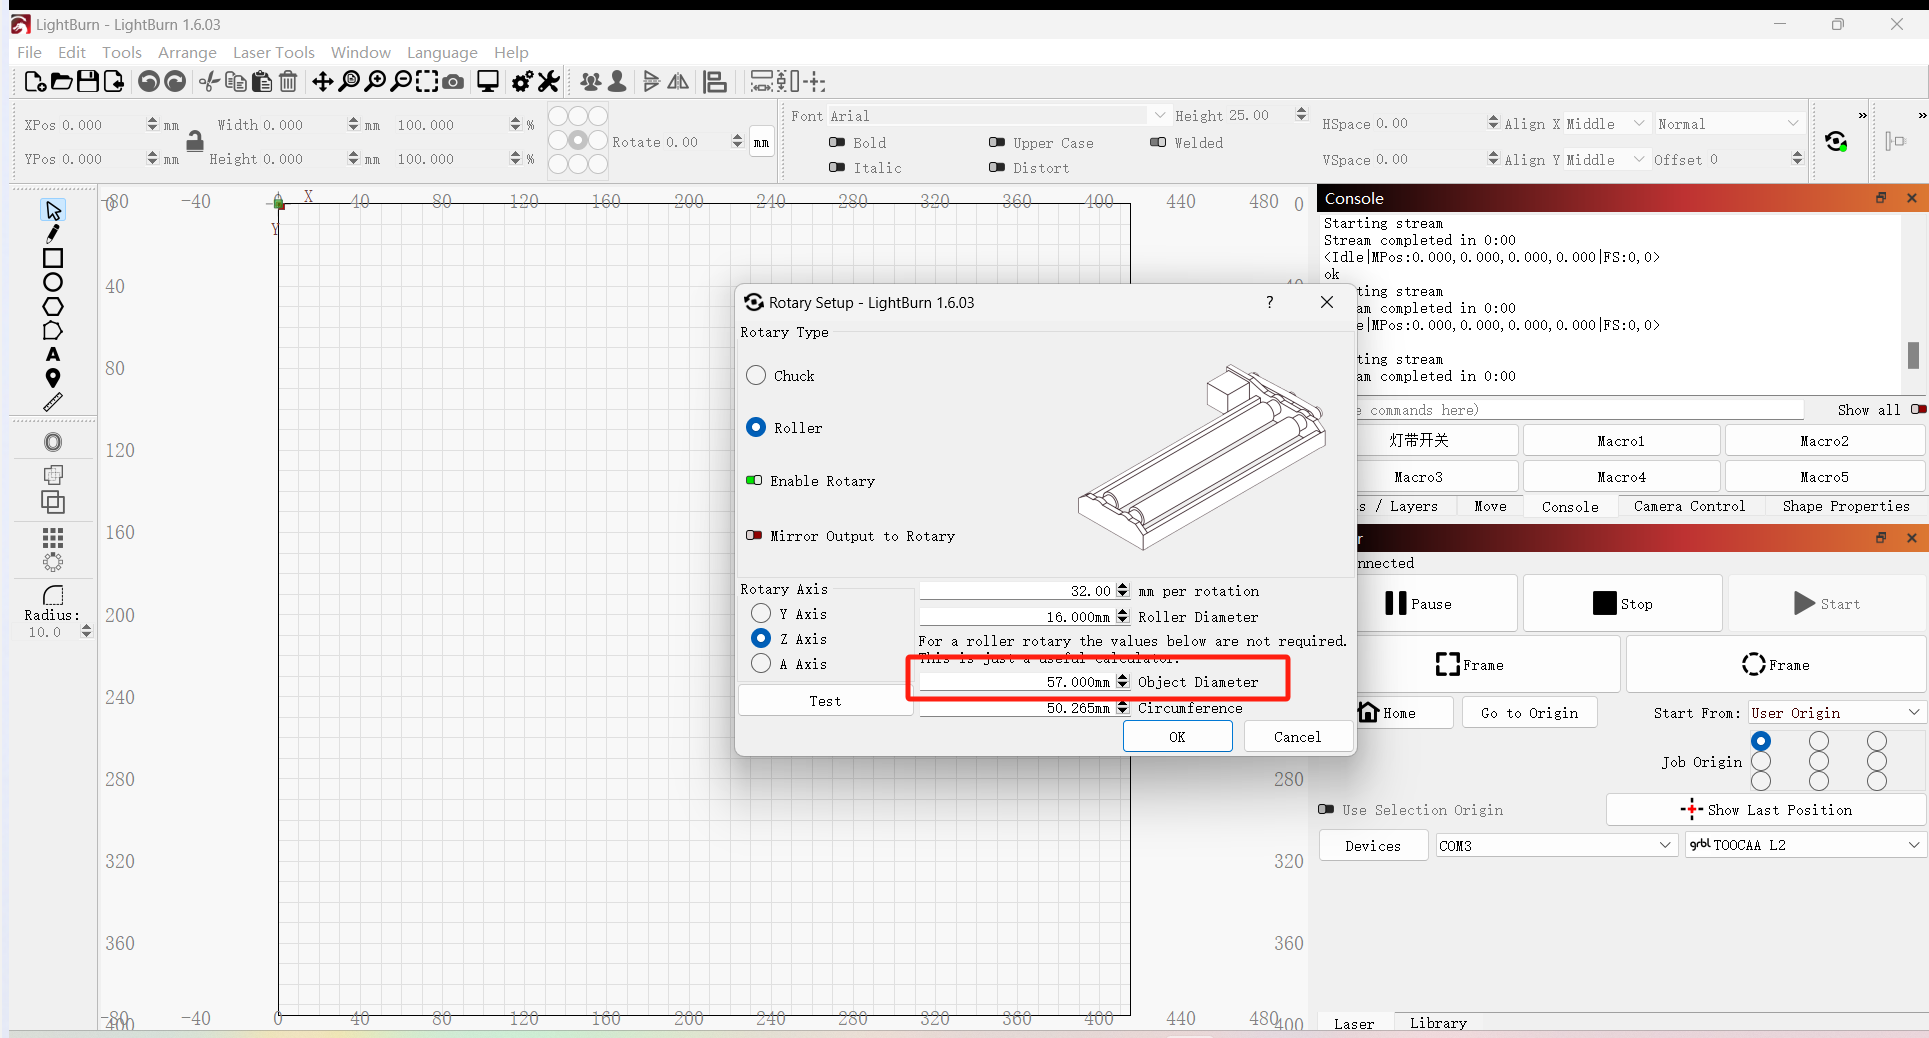
Select the type of rotary accessory you want to use (Chuck Rotary or Roller Rotary).
Note:Except for the roller rotary accessories which are of the roller type, the chuck rotary accessories, sphere rotary accessories, ring rotary accessories, and 180° adjustable flip mode accessories are all of the chuck type.
If using a roller rotary accessory mode, please set the Steps per Revolution value to 32.00 mm and the Roller Diameter value to 16.00 mm.
If using a chuck rotary accessory mode, please set the steps per revolution value to 160.00 mm.
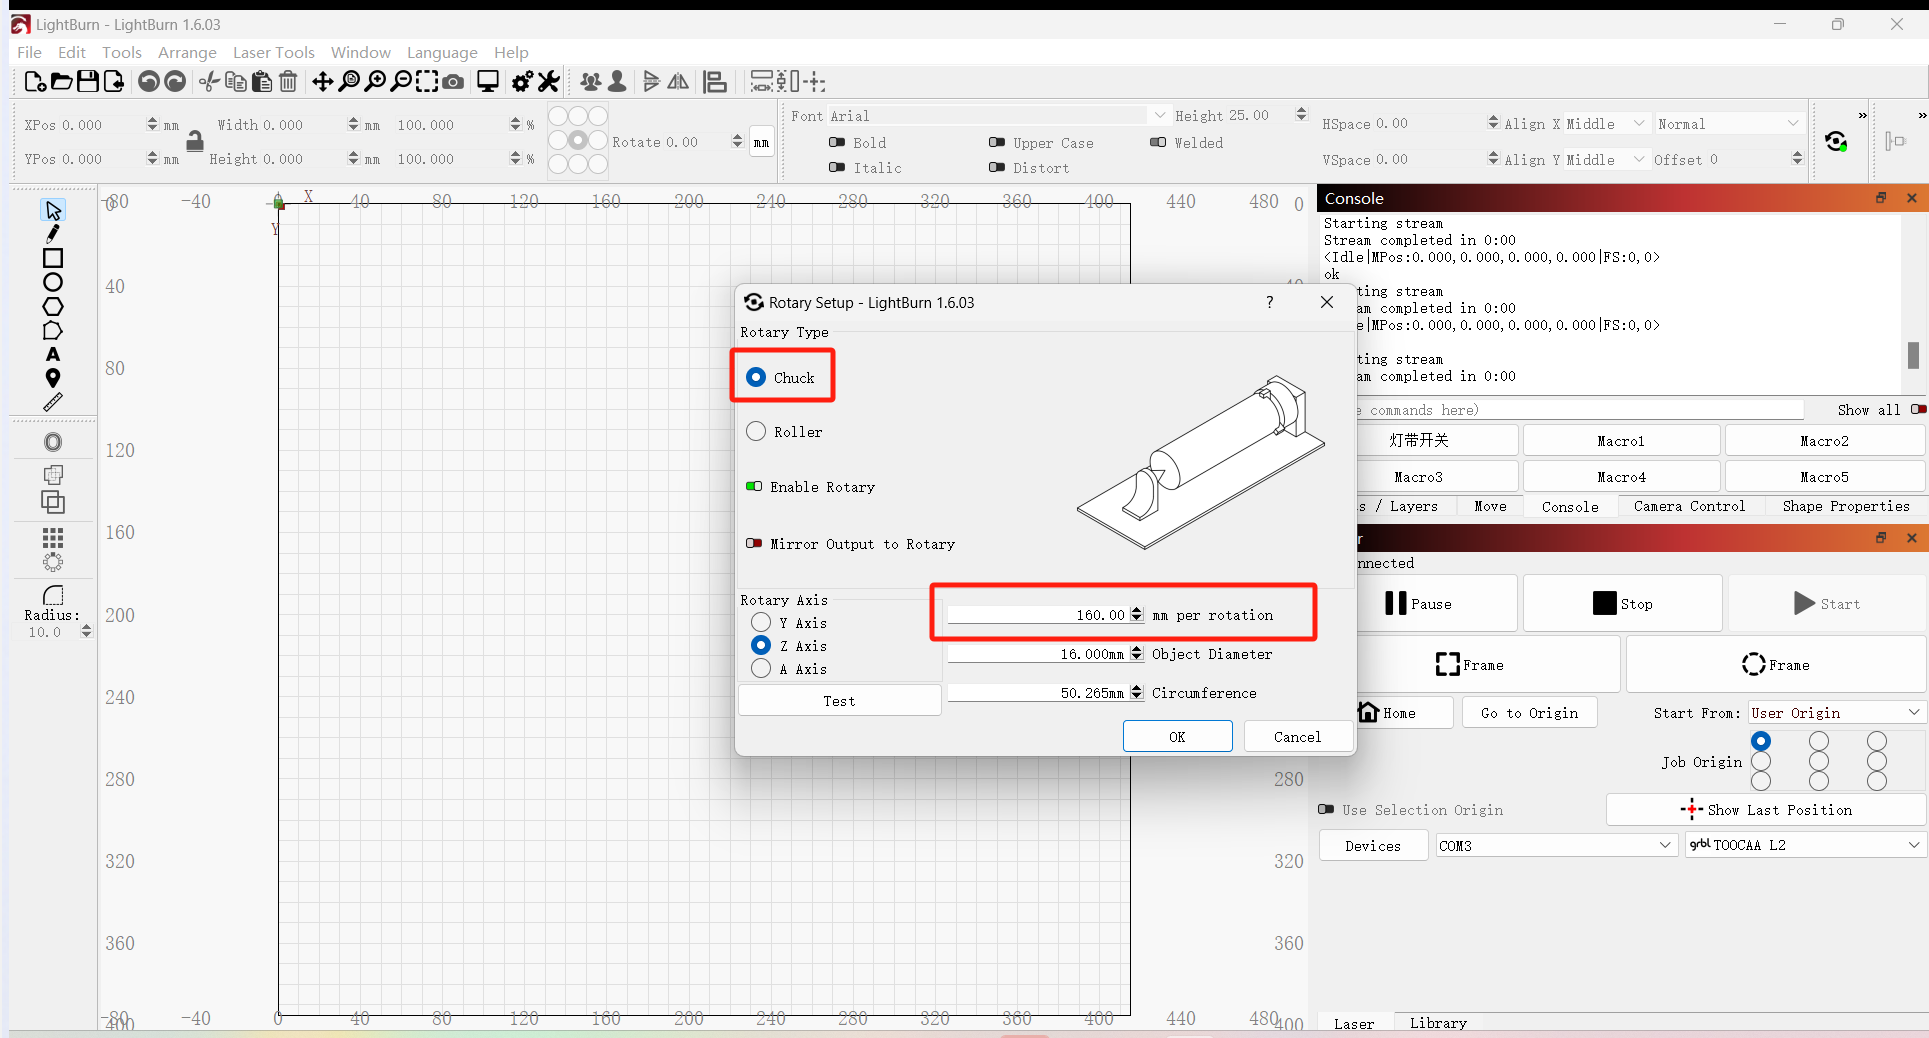
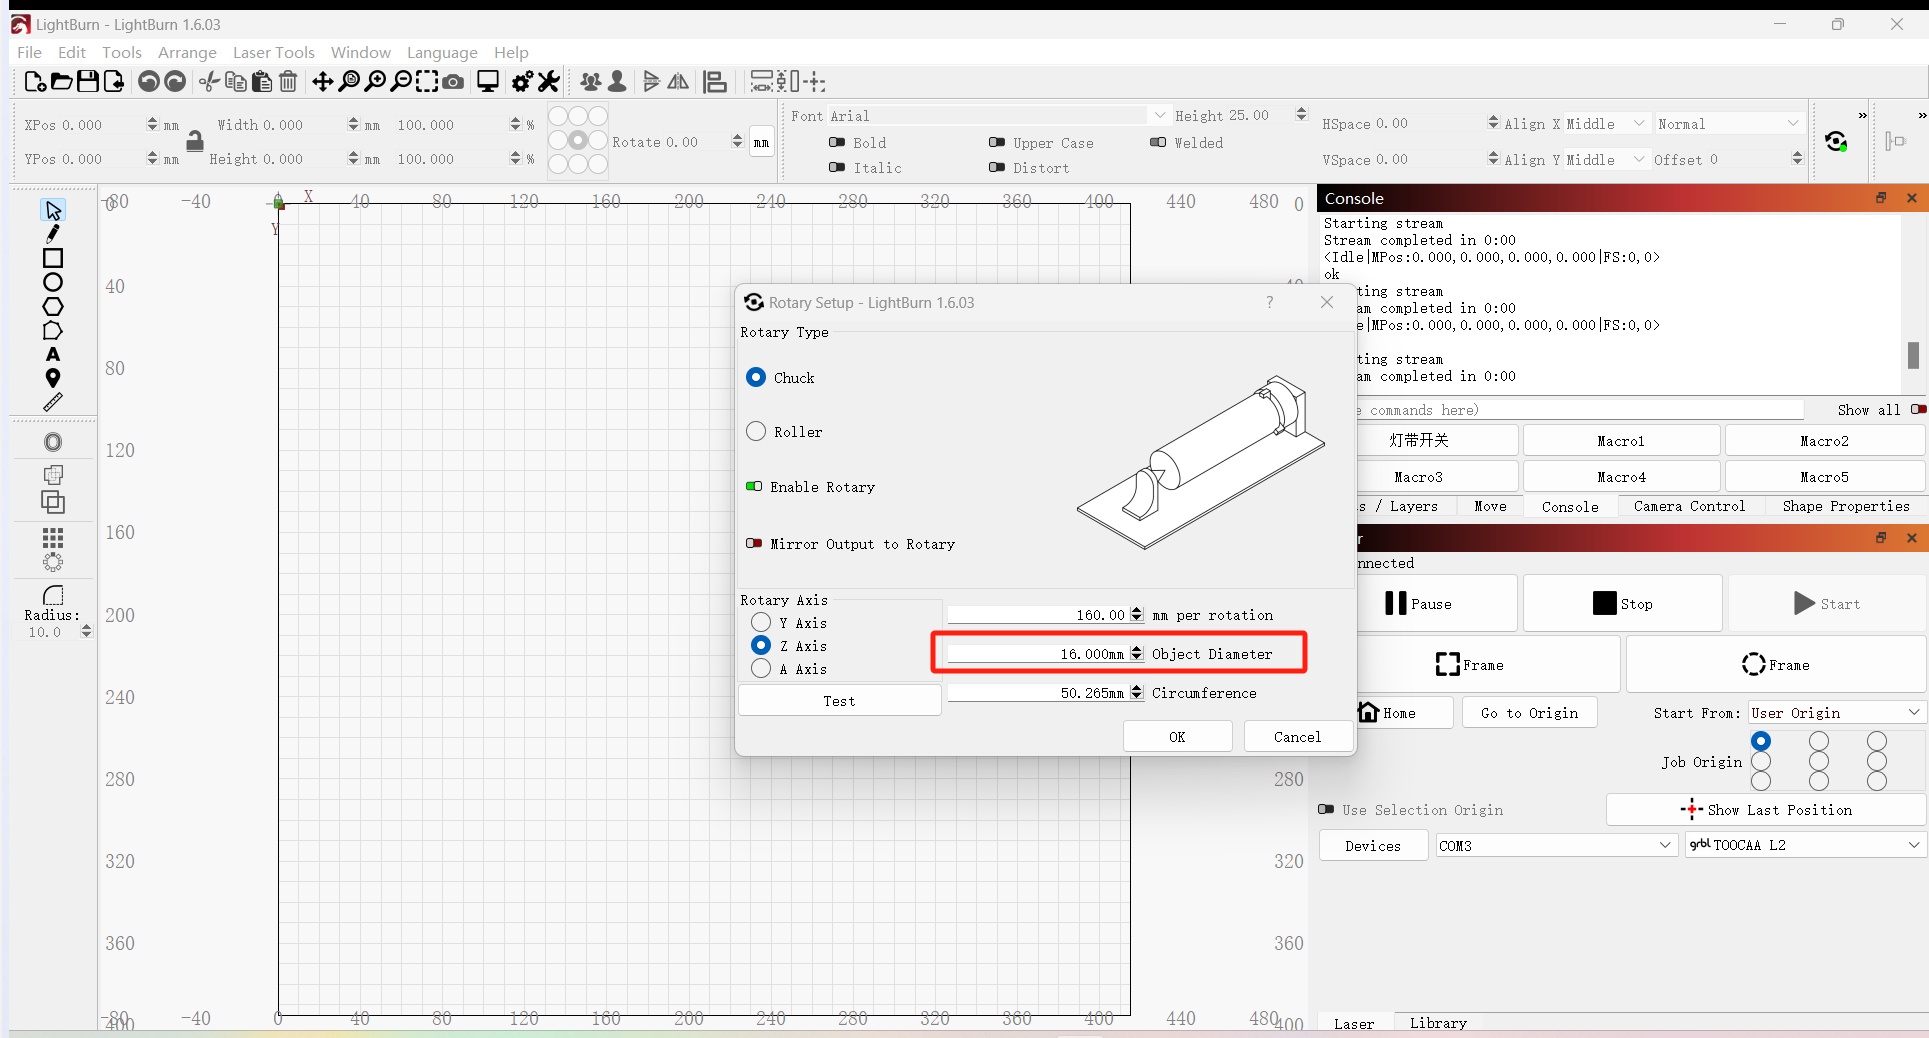
Please carefully measure and enter the object diameter of the item on the rotary accessory. This value must be updated each time you place an object of different diameter on the rotary accessory. If it is not accurate, the engraving result will be distorted or broken.
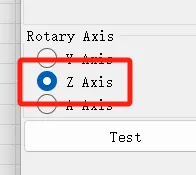
Whether the rotary accessory mode is roller mode or chuck mode, the rotary axis should be the Z axis.
Click the **OK **button to complete the settings.
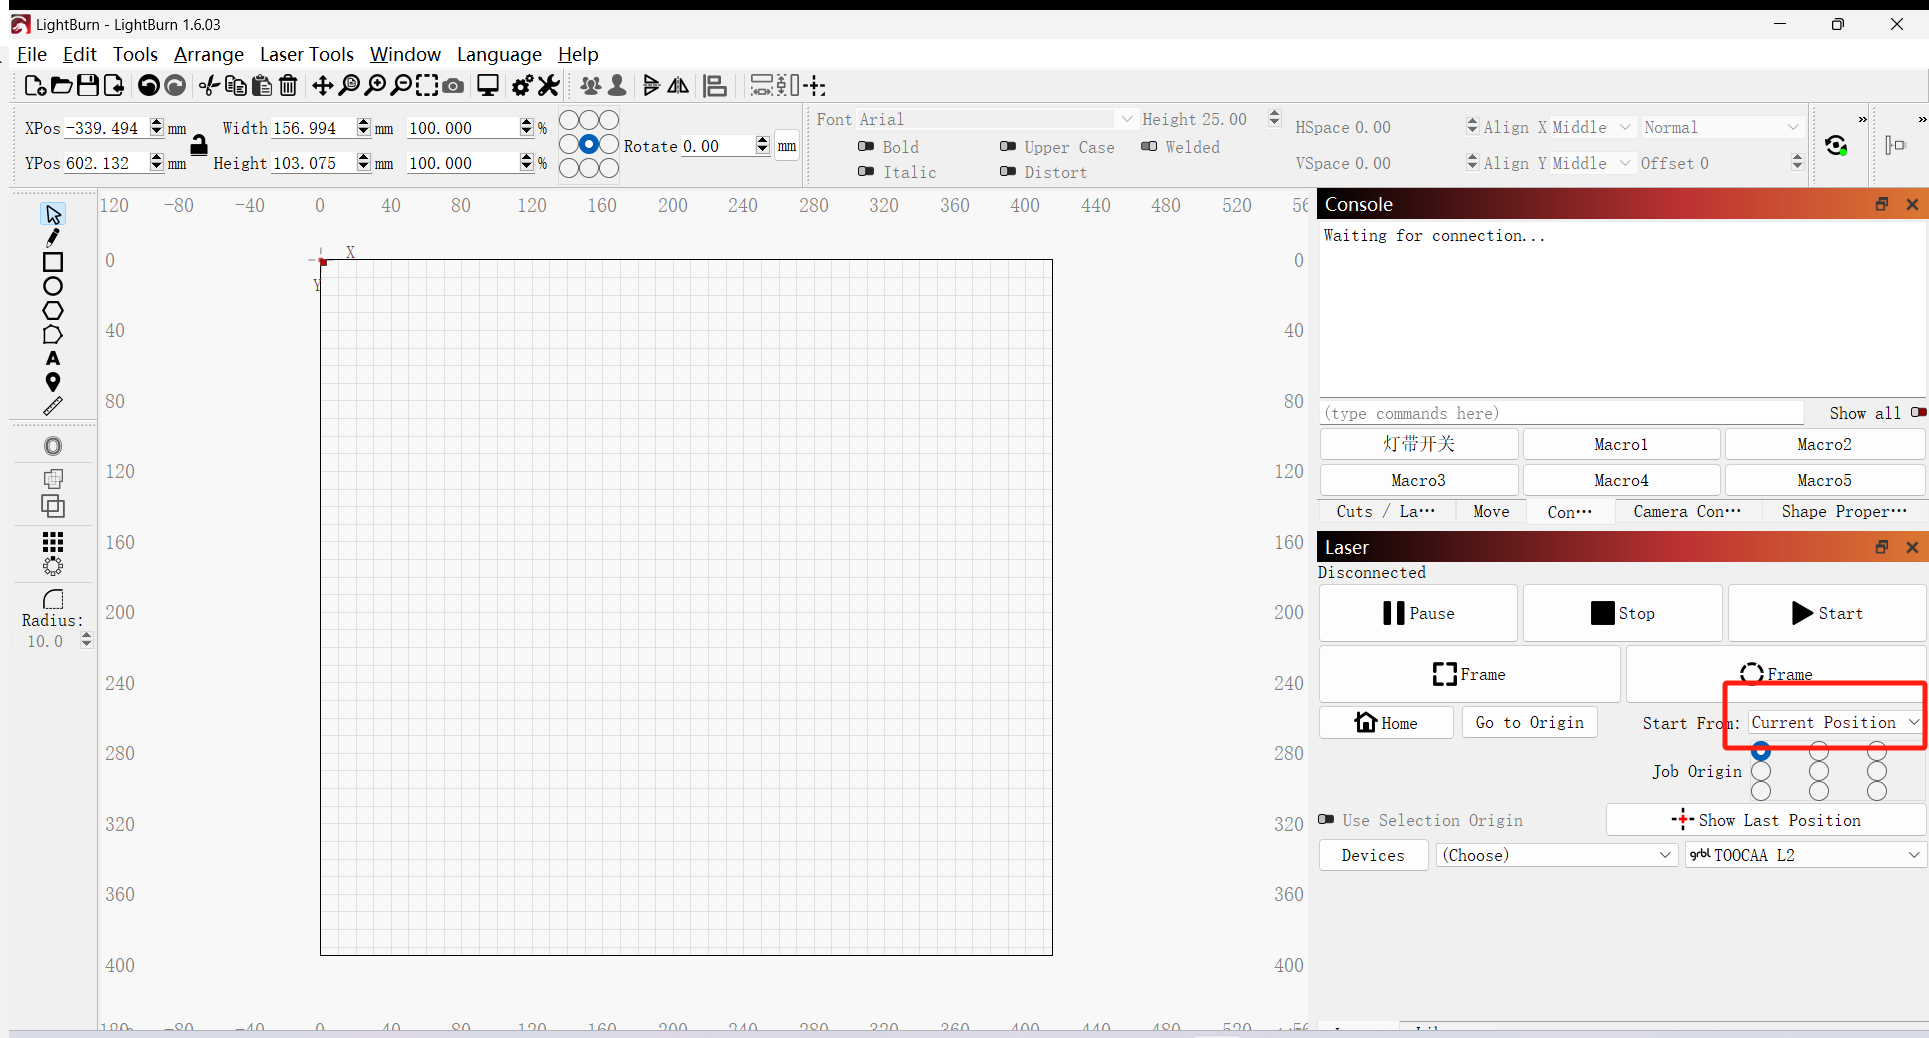
Set the laser module's start position to the current position.
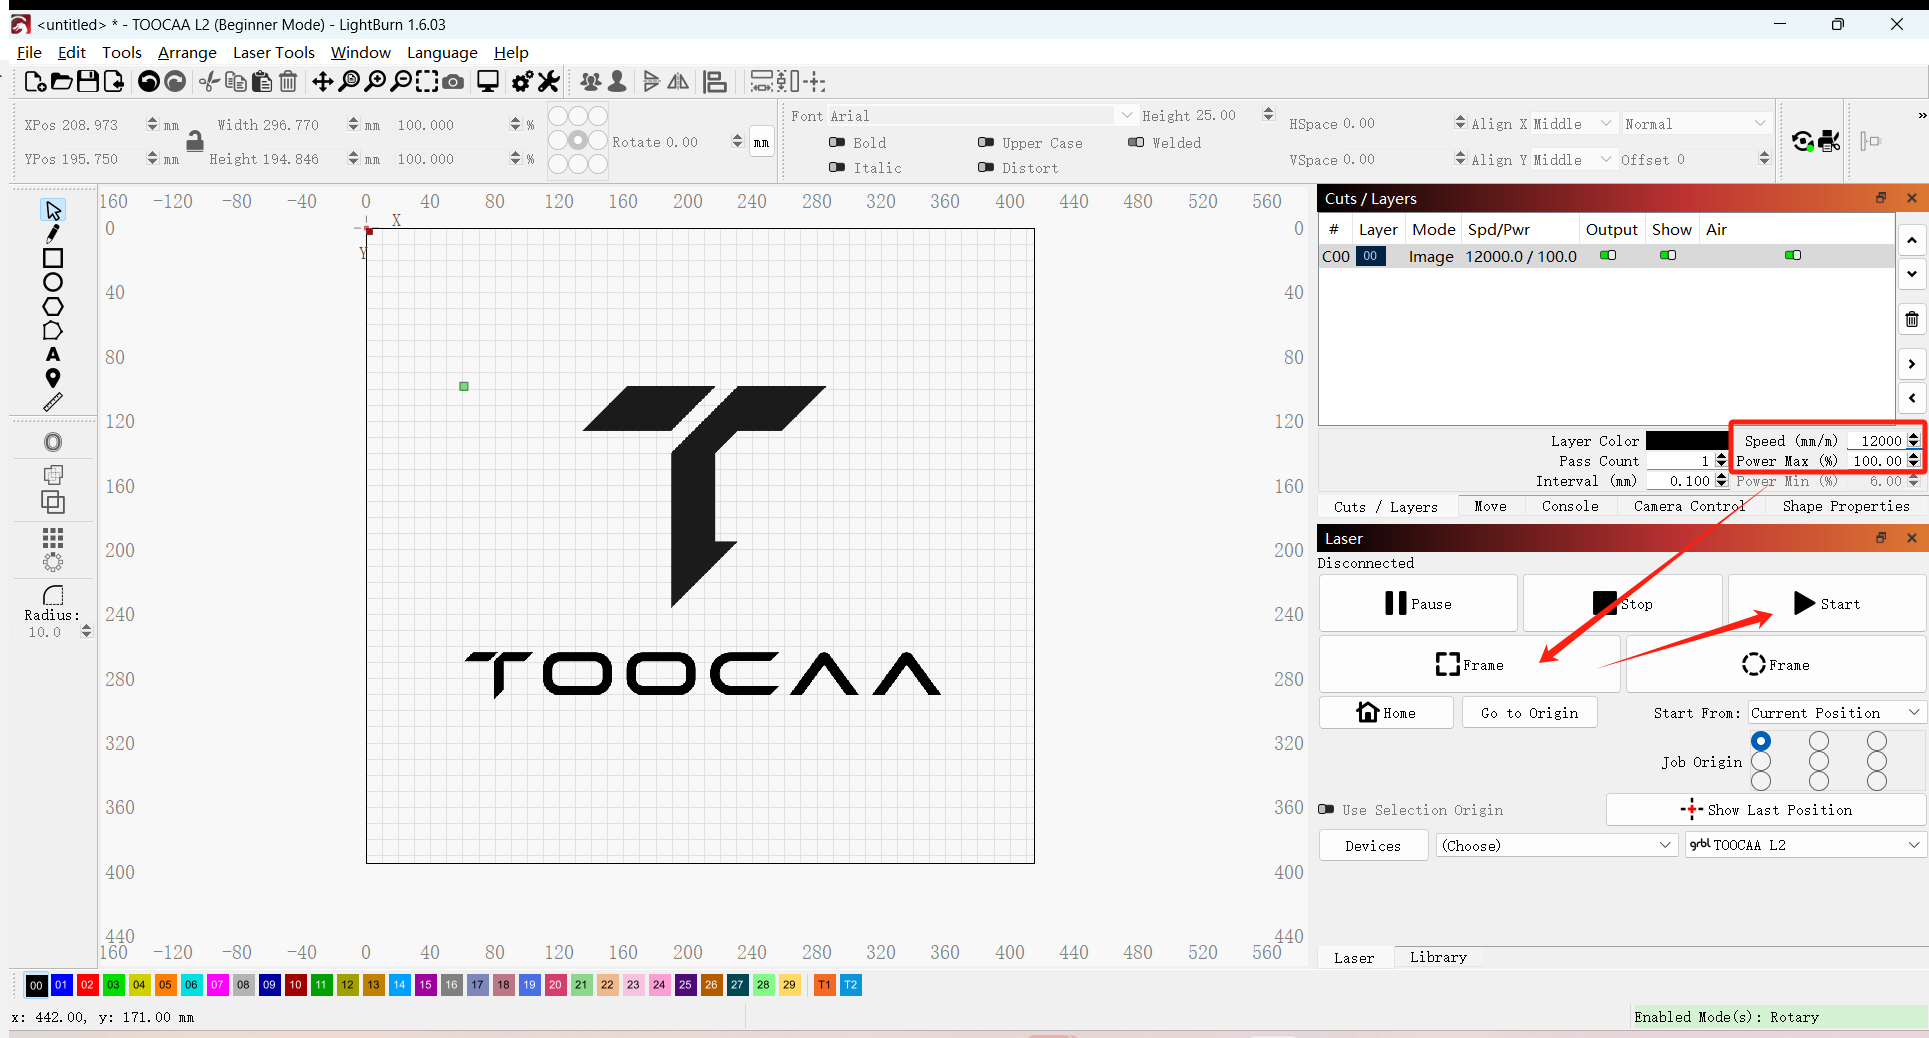
Import the material into LightBurn, set appropriate parameters for the cutting/engraving material, and click Frame test. When the tested position meets the requirements, you can click Start Creation.
Note:In roller rotary accessory mode, the maximum working speed is set to 6000mm/min; in chuck rotary accessory mode, the maximum working speed is set to 12000mm/min. Please reduce the engraving speed according to the material you choose.
¶ FAQ
¶ 1. The rotary accessory does not rotate or rotates irregularly.
- Make sure the machine is connected to the Z axis correctly.
- Check whether the rotary accessory mode on LightBurn and the corresponding parameters of the step value per rotation and the roller diameter value are filled in correctly.
- If you confirm that the machine is connected correctly and the parameters are set correctly, but it still does not rotate or rotates irregularly, please contact TOOCAA after-sales technicians in time (TOOCAA after-sales technicians contact information: zack@toocaa.com), and we will solve it for you as soon as possible.
¶ 2. Why can't the extension double-step jaw components/chuck needle be inserted after pressing the top button of the chuck?
Please adjust the tightness of the chuck knob and then insert the double-step jaw components/chuck needle.
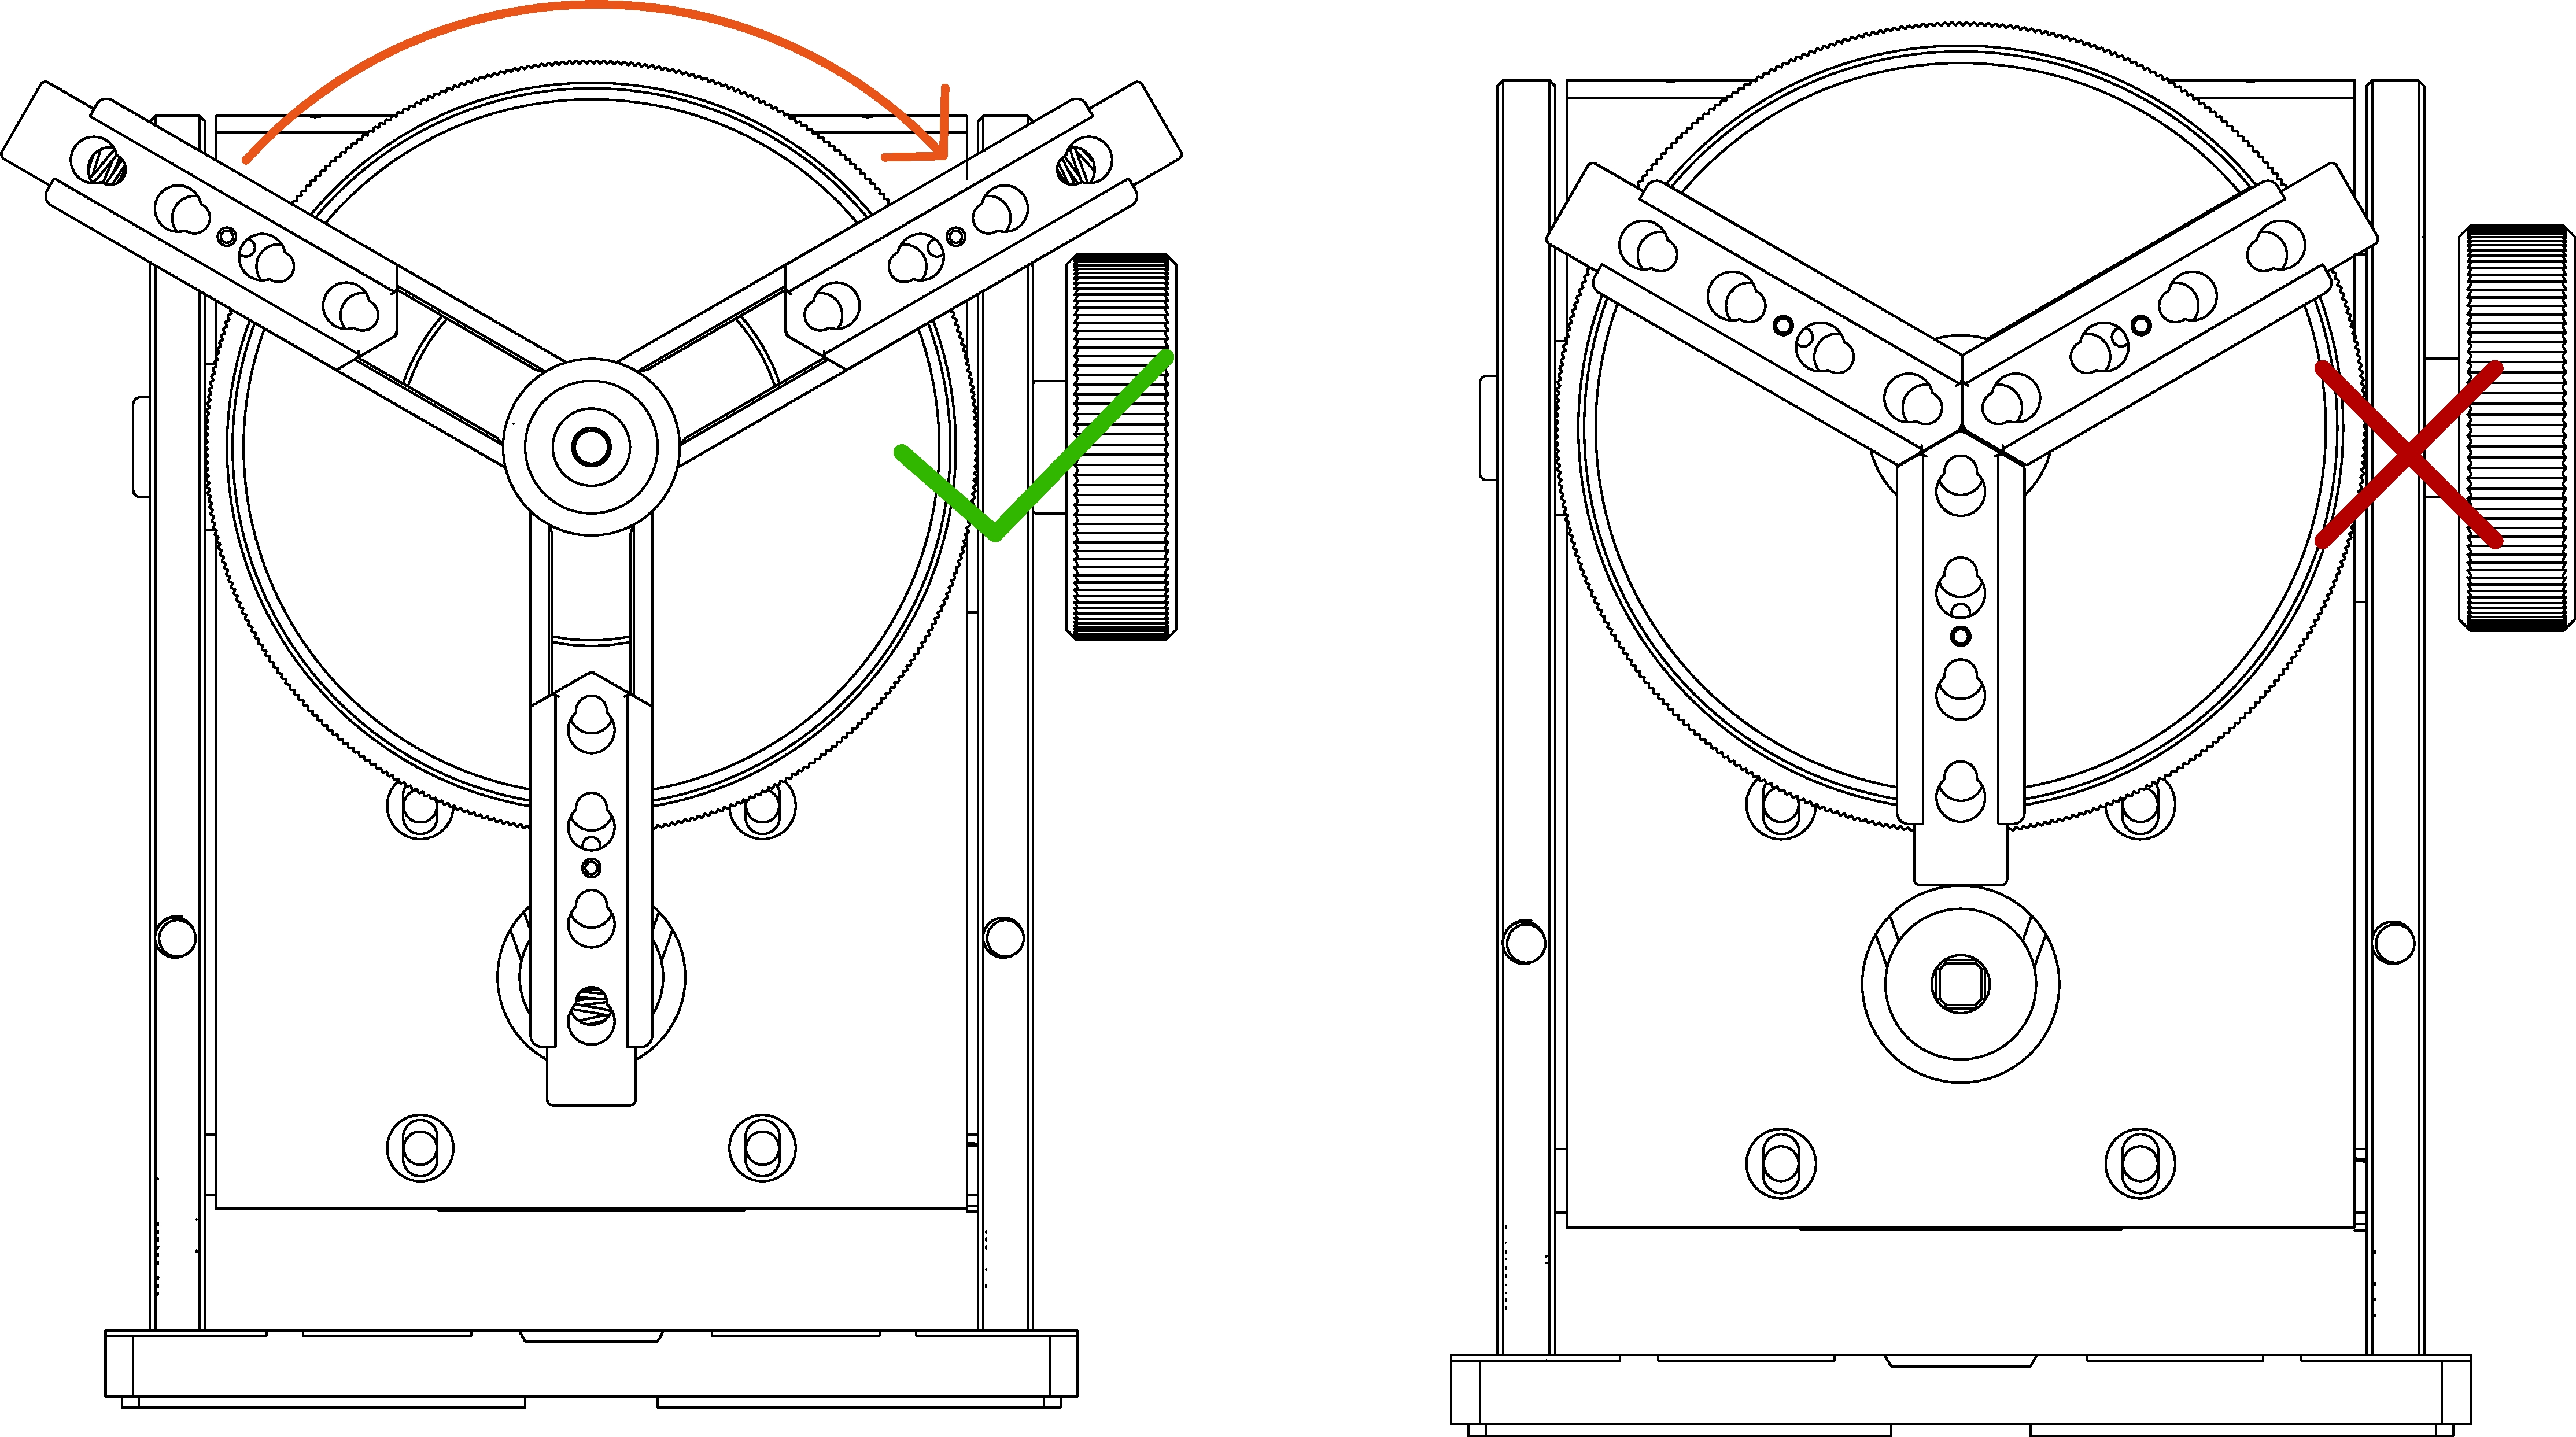
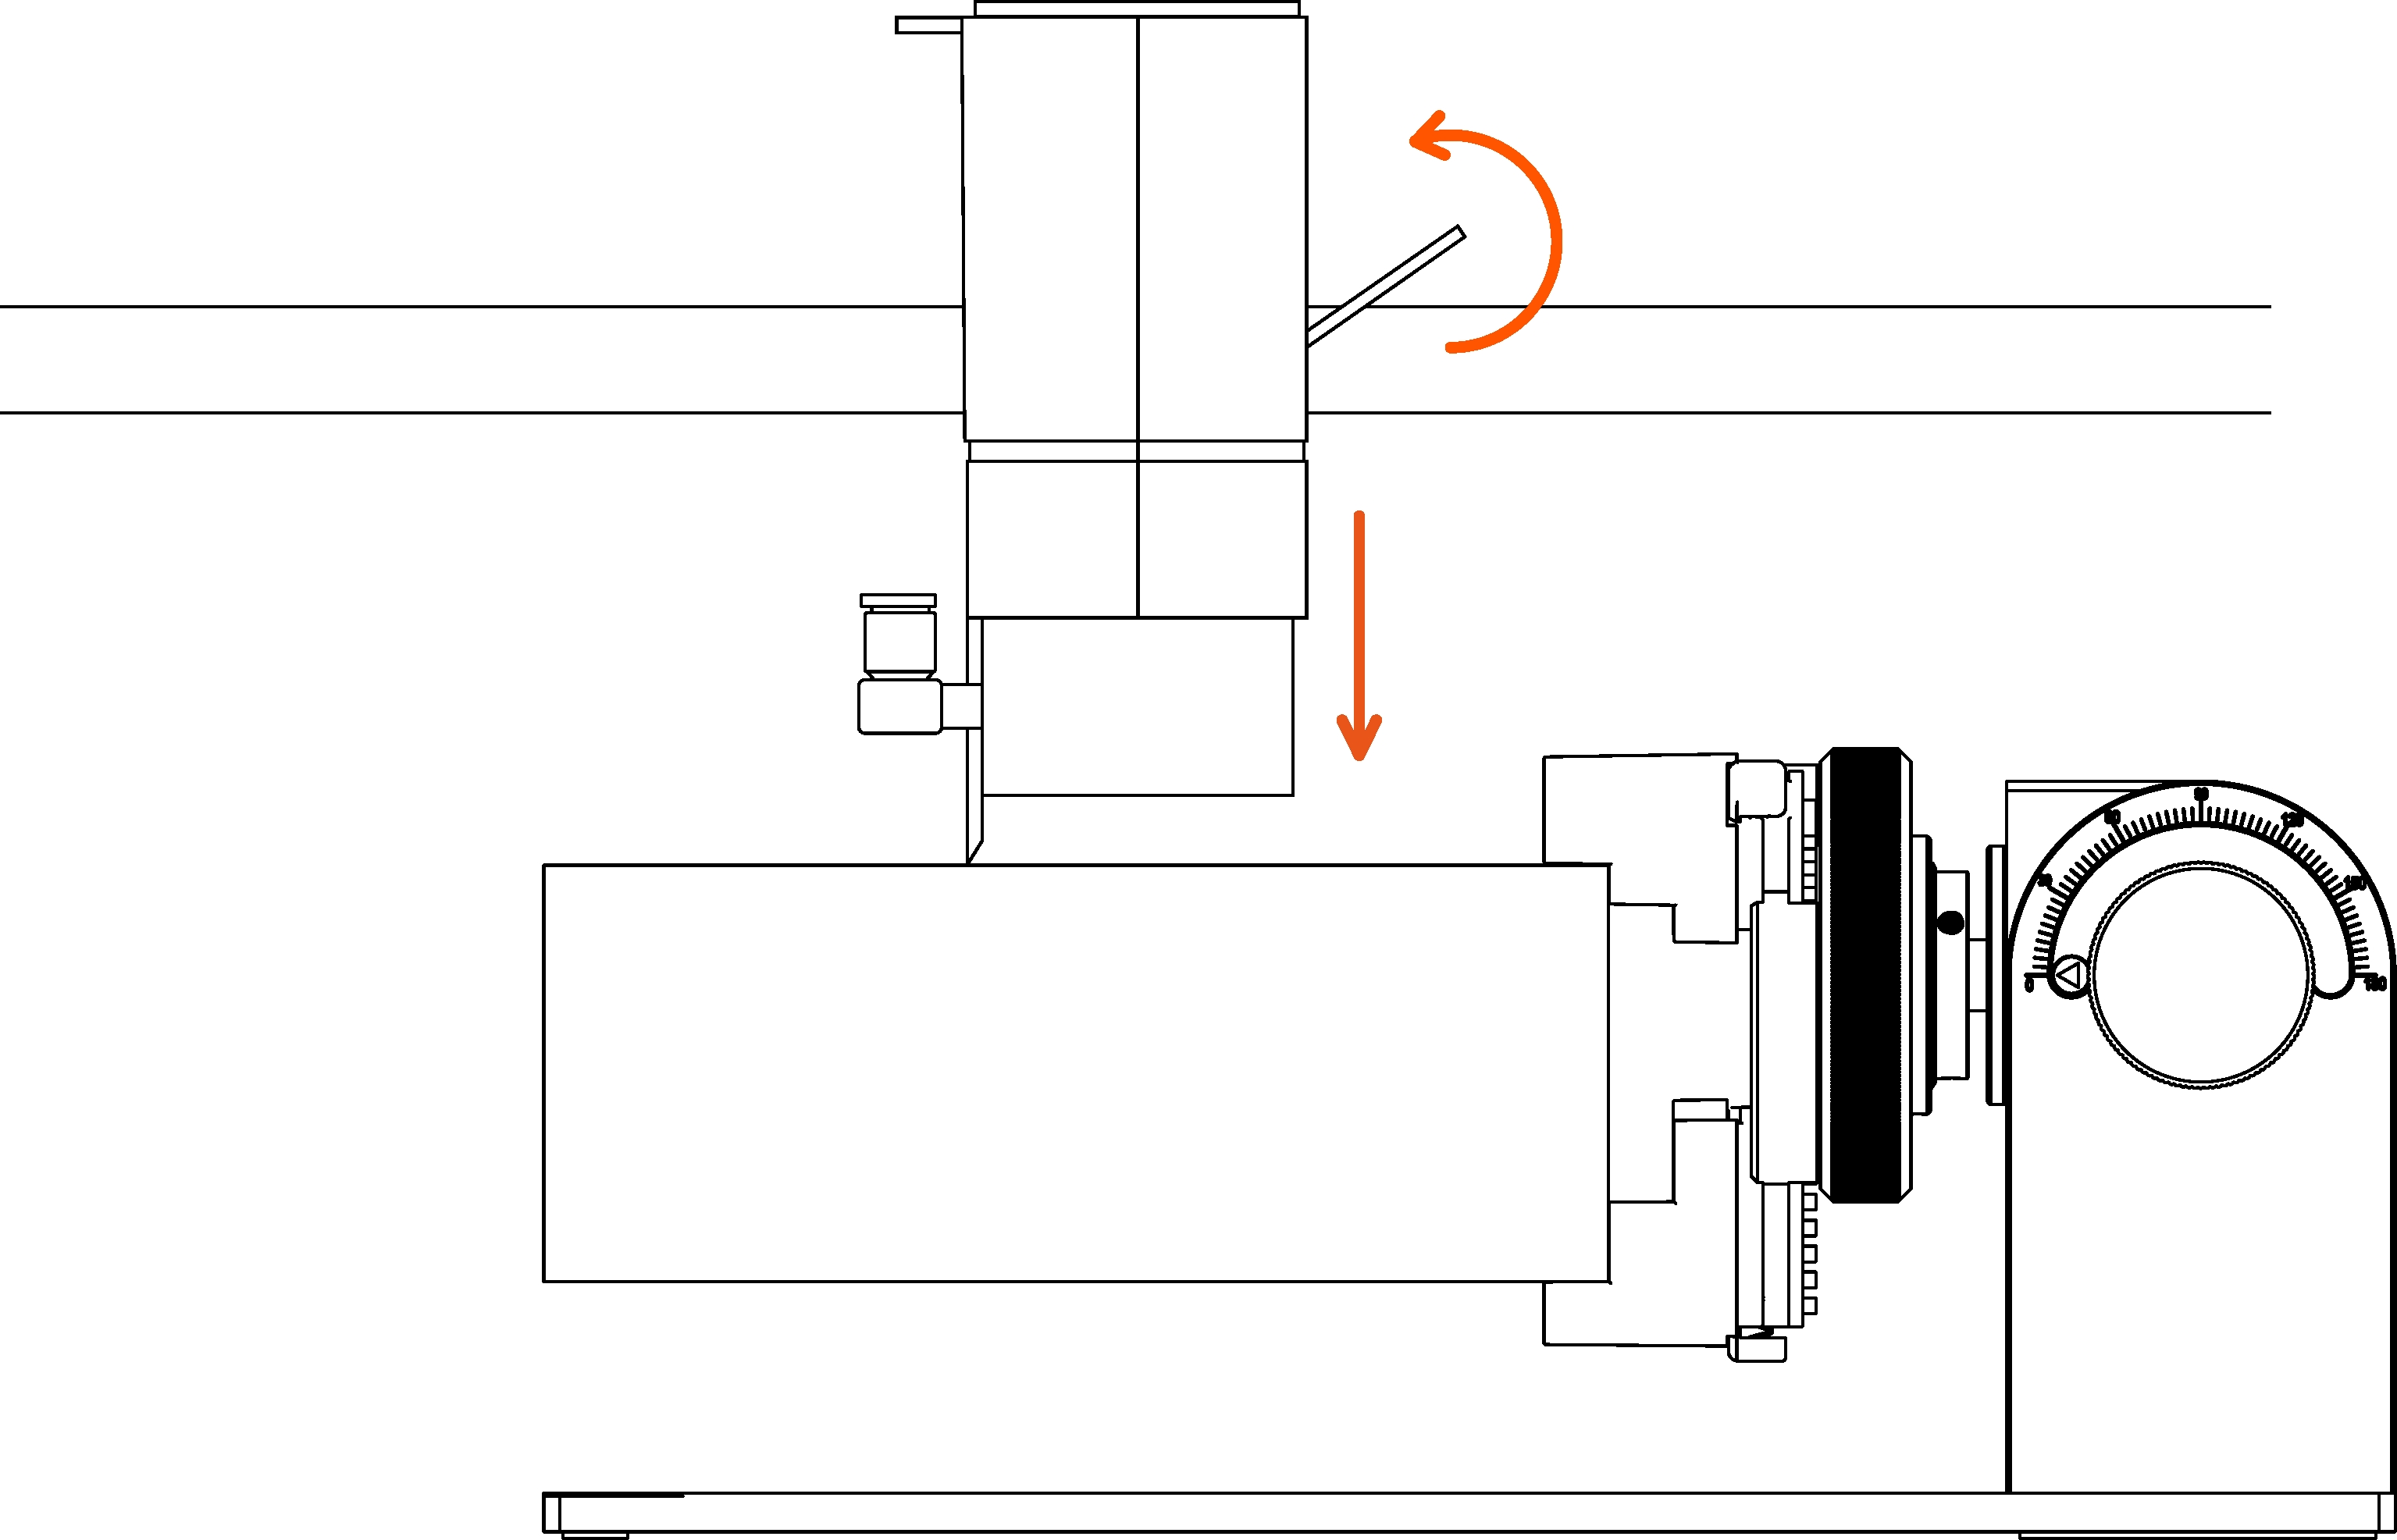
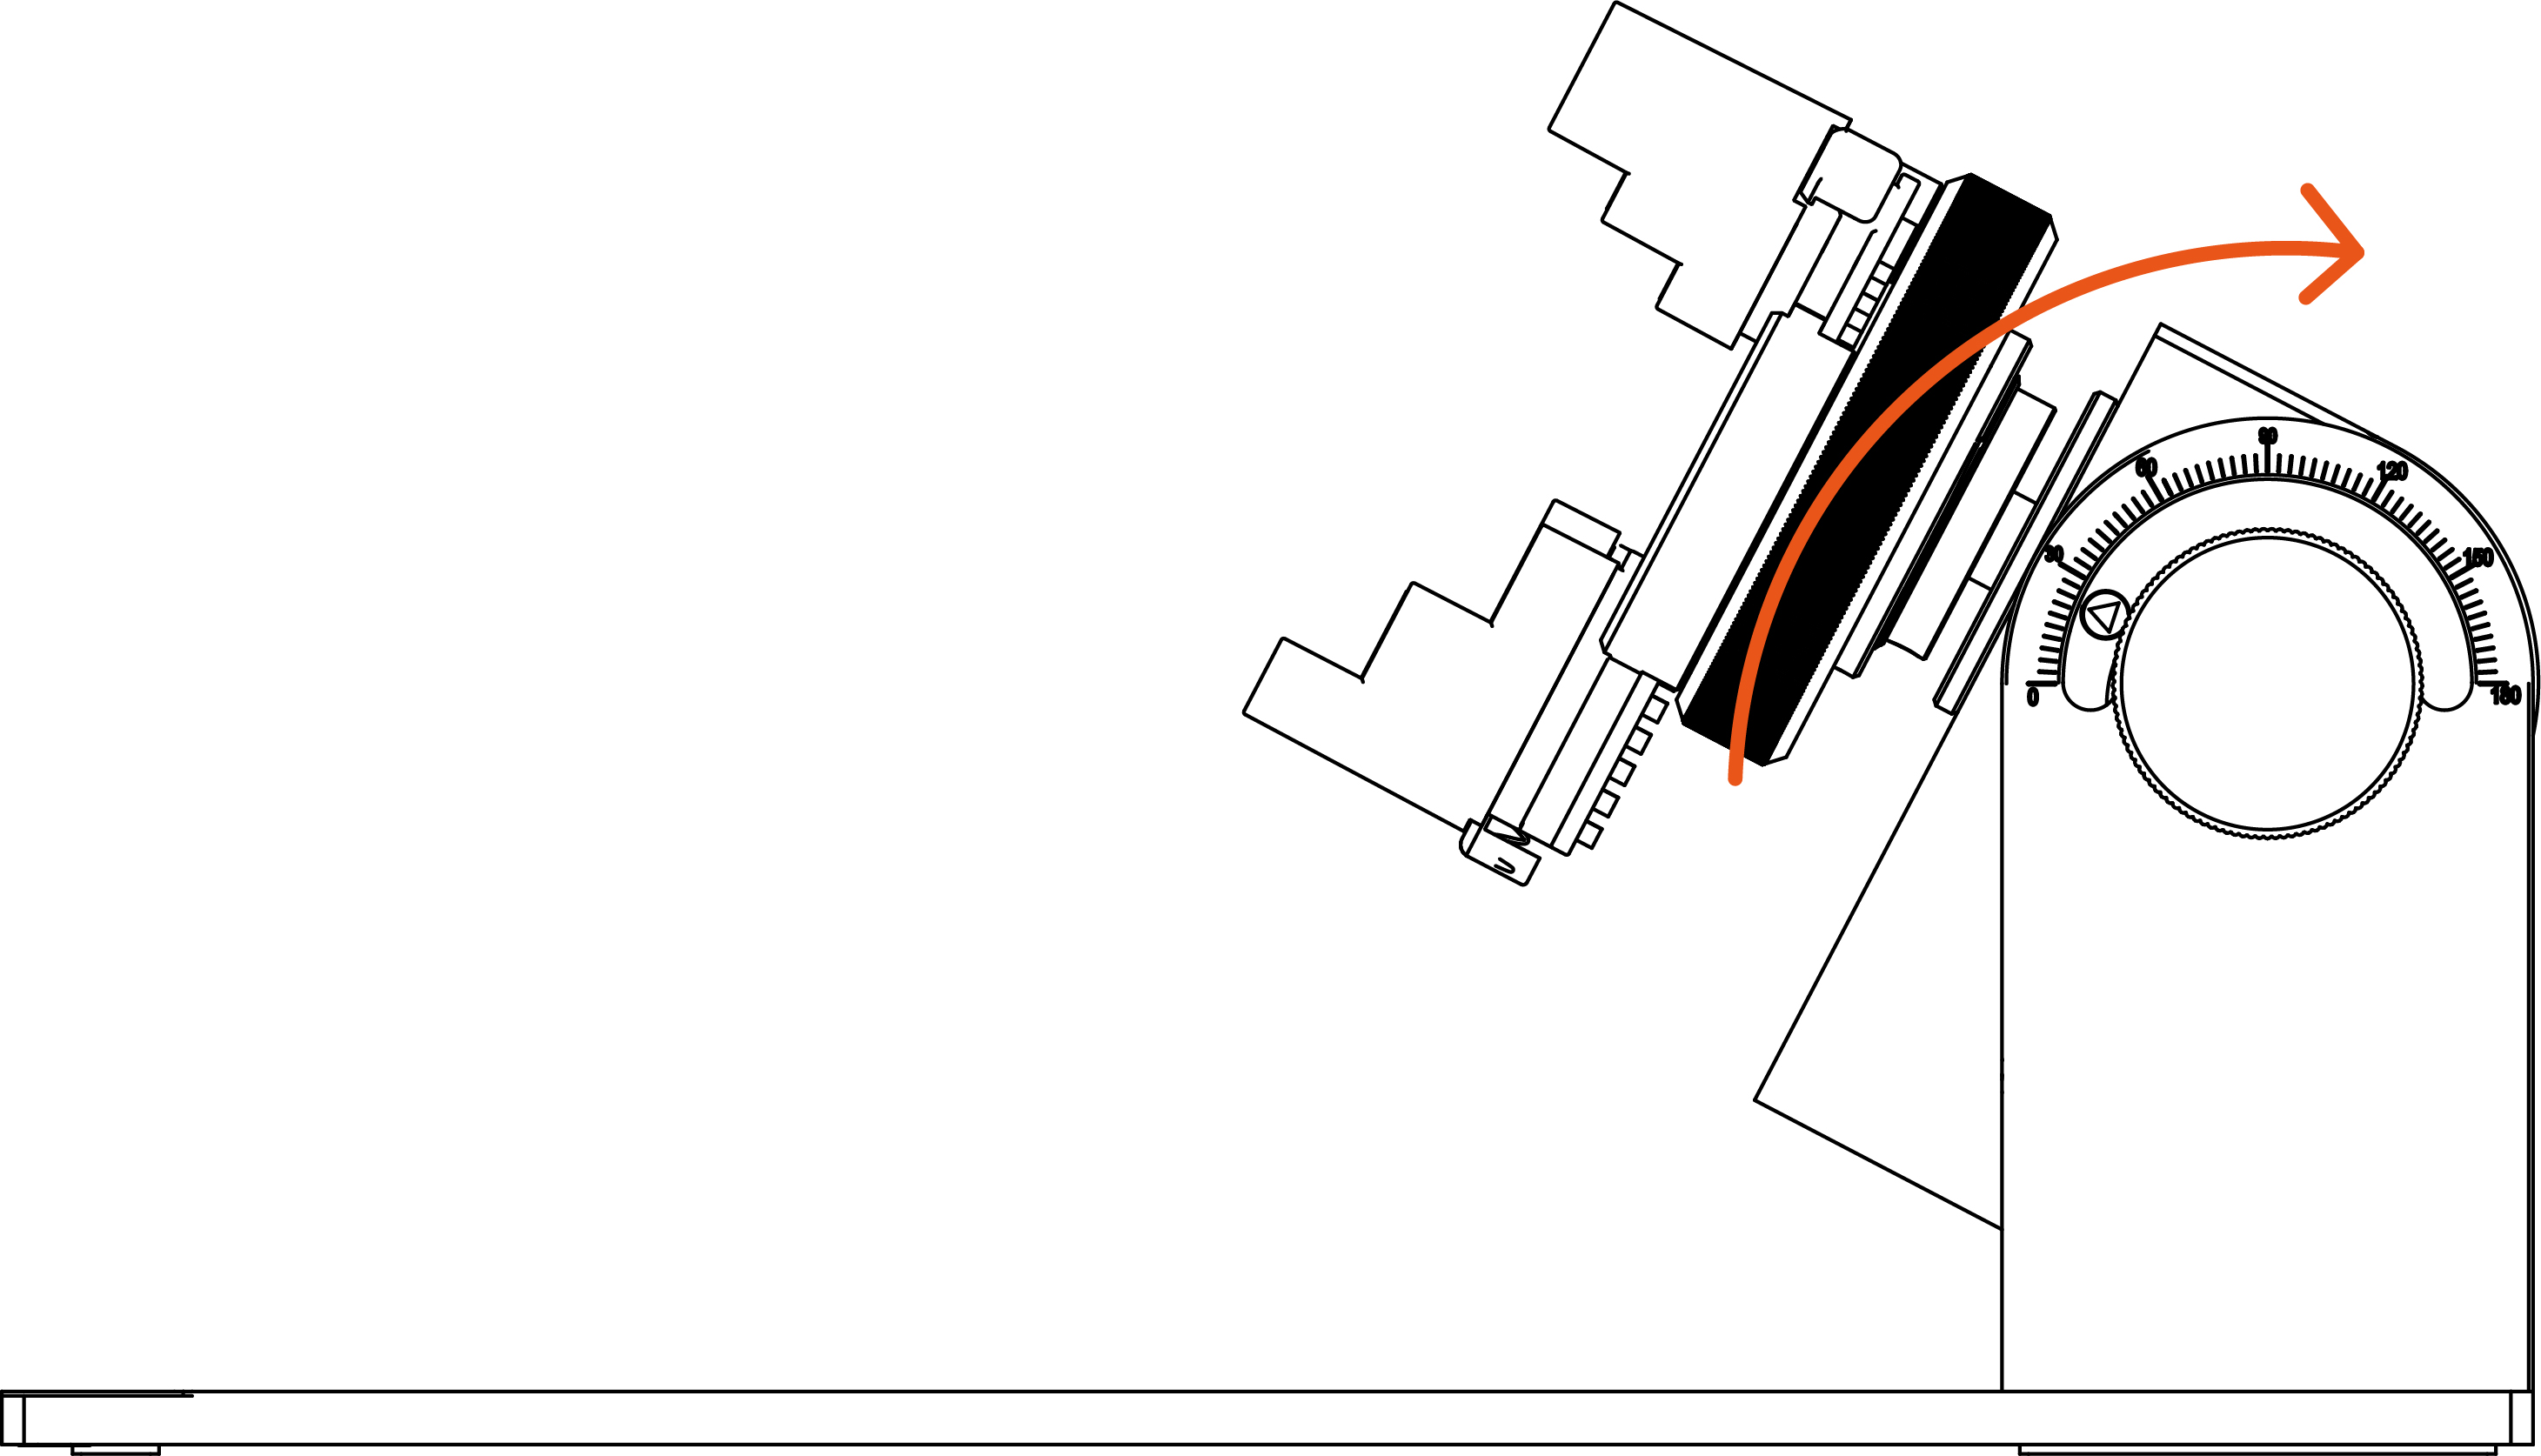
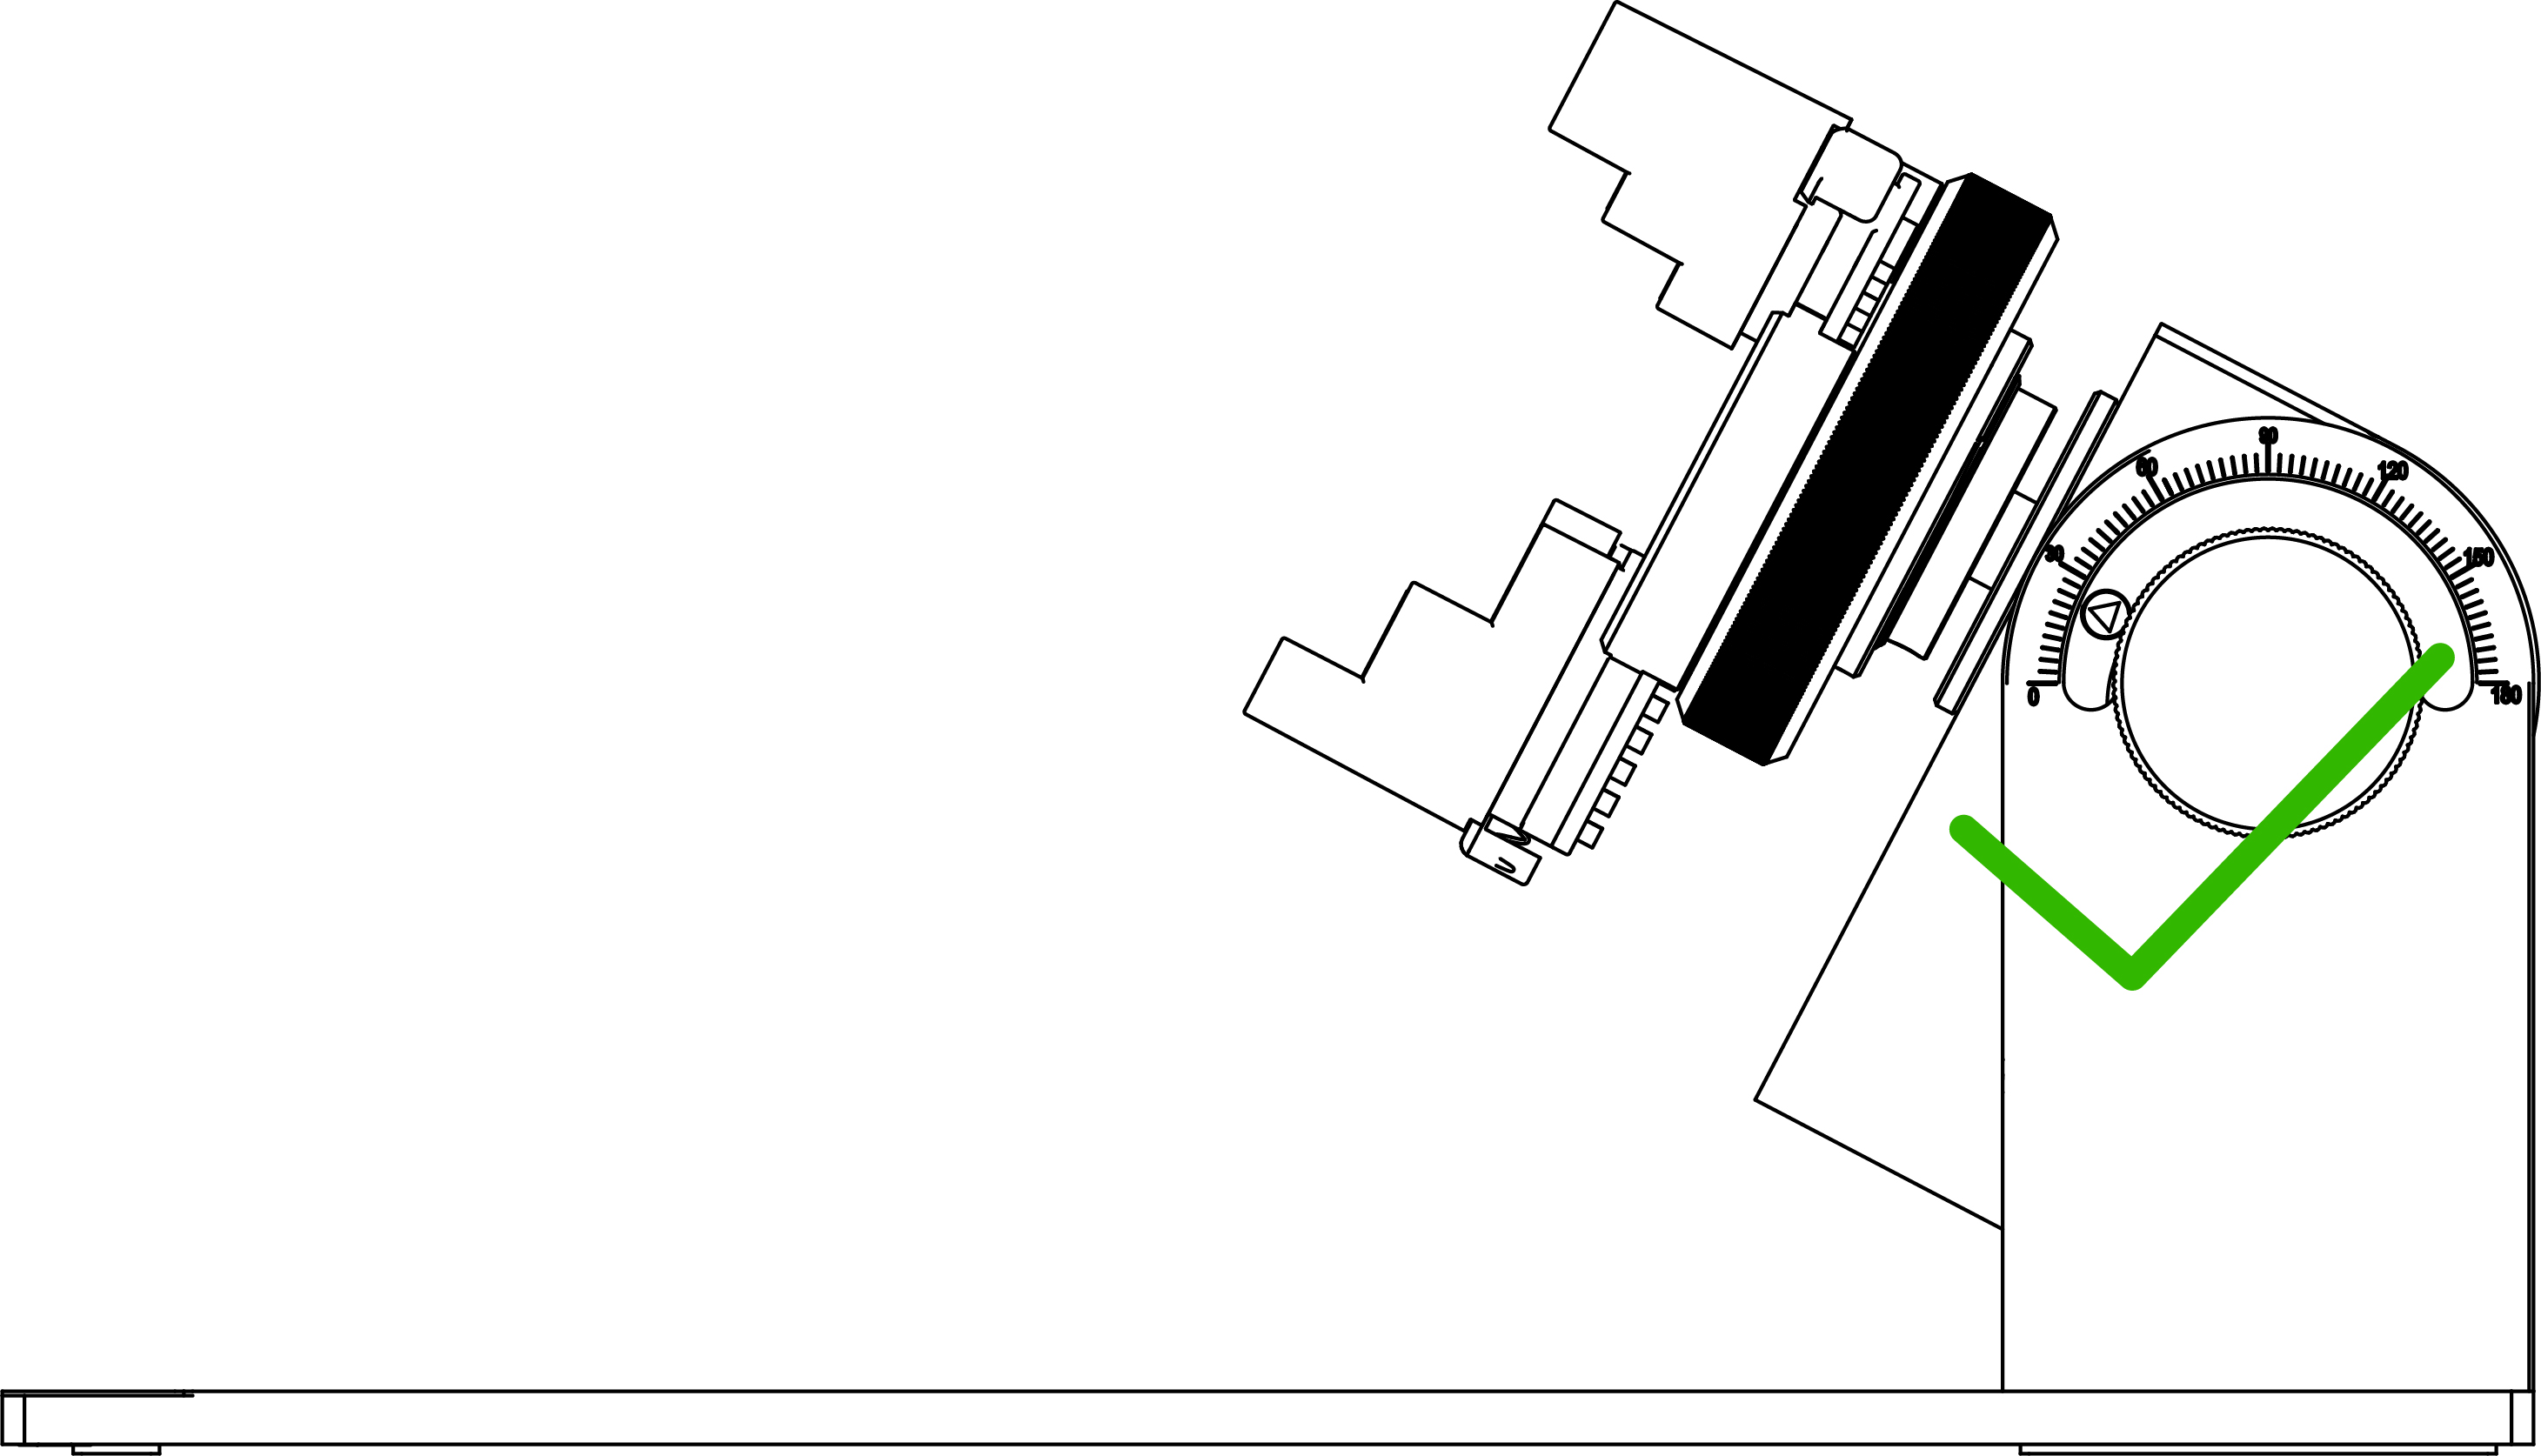
¶ 3. The side knob of the rotary accessory is locked.
If the side knob is locked and cannot be turned, please turn the rotary accessory body clockwise as shown in the figure below. After adjustment, the side knob can be easily turned.
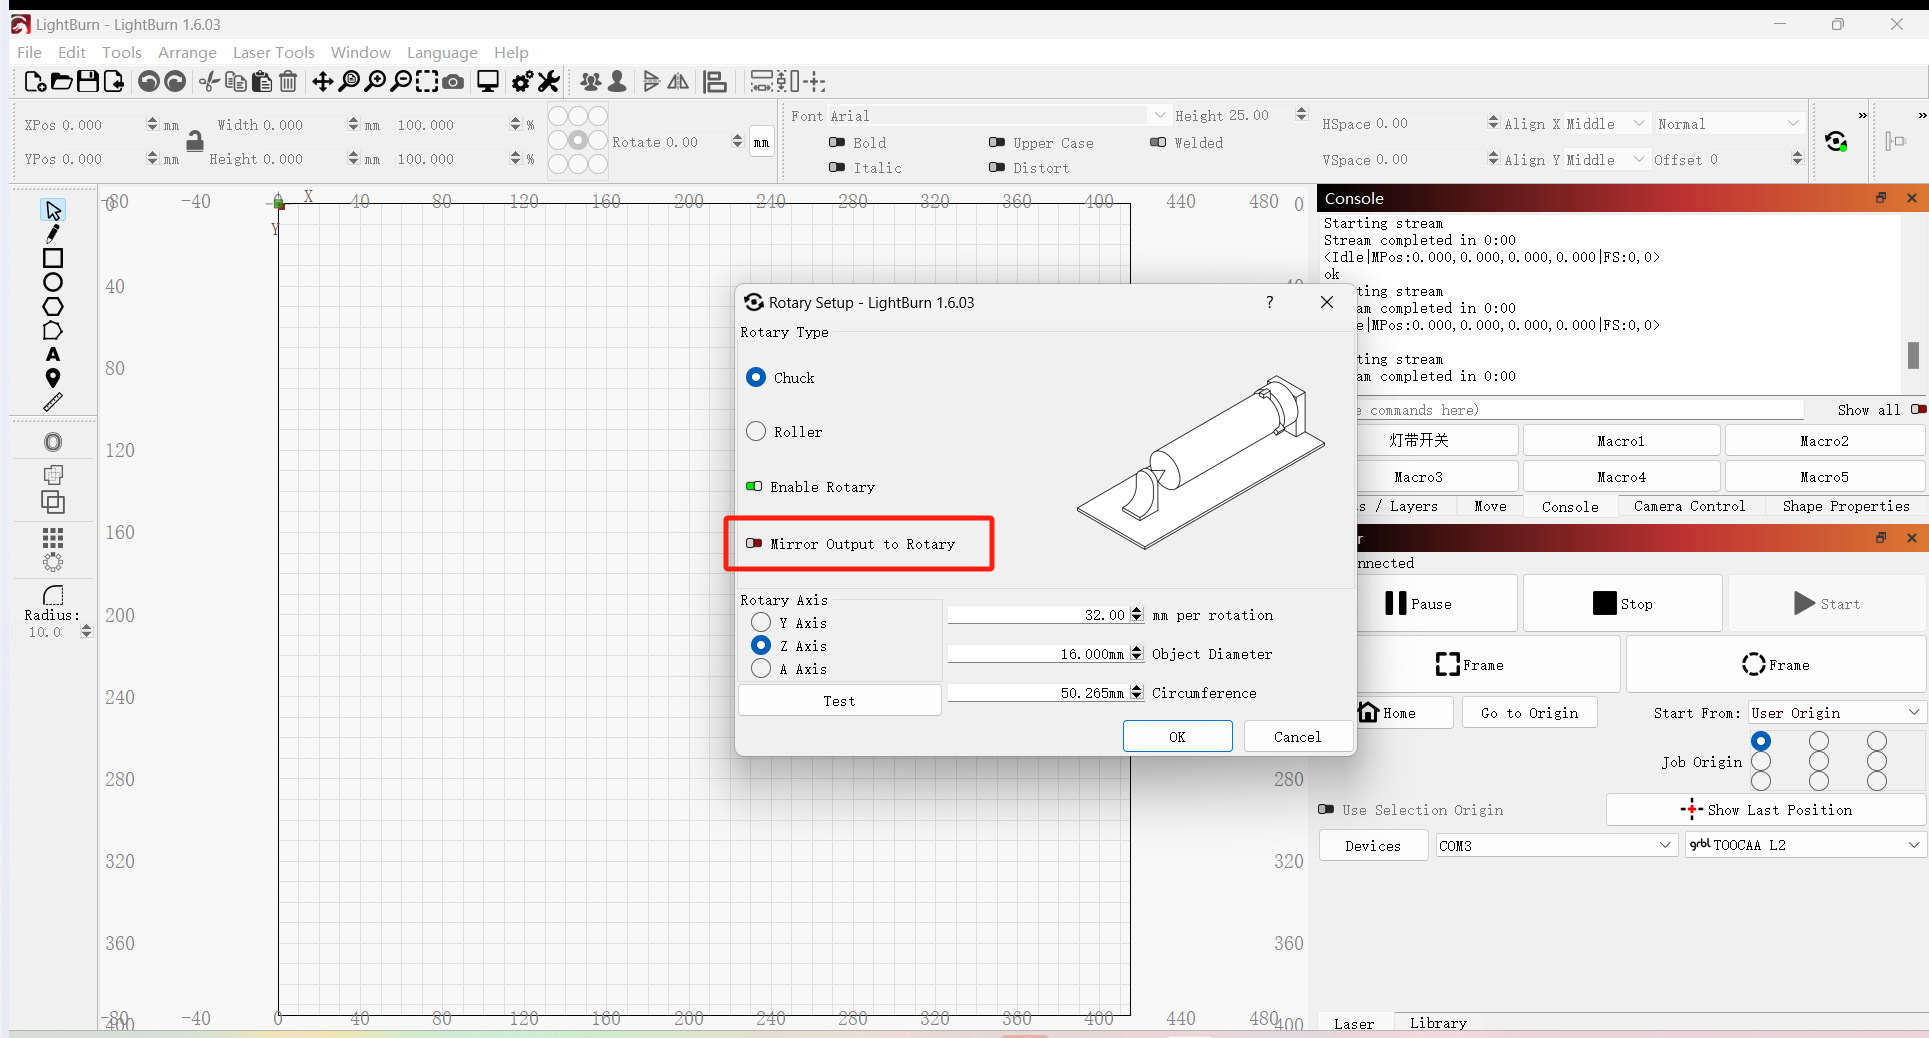
¶ 4. Why does the image appear mirrored after engraving?
Please cancel the 'mirror output to rotary' set when clicking the rotary setup in the mode toolbar to set parameters.
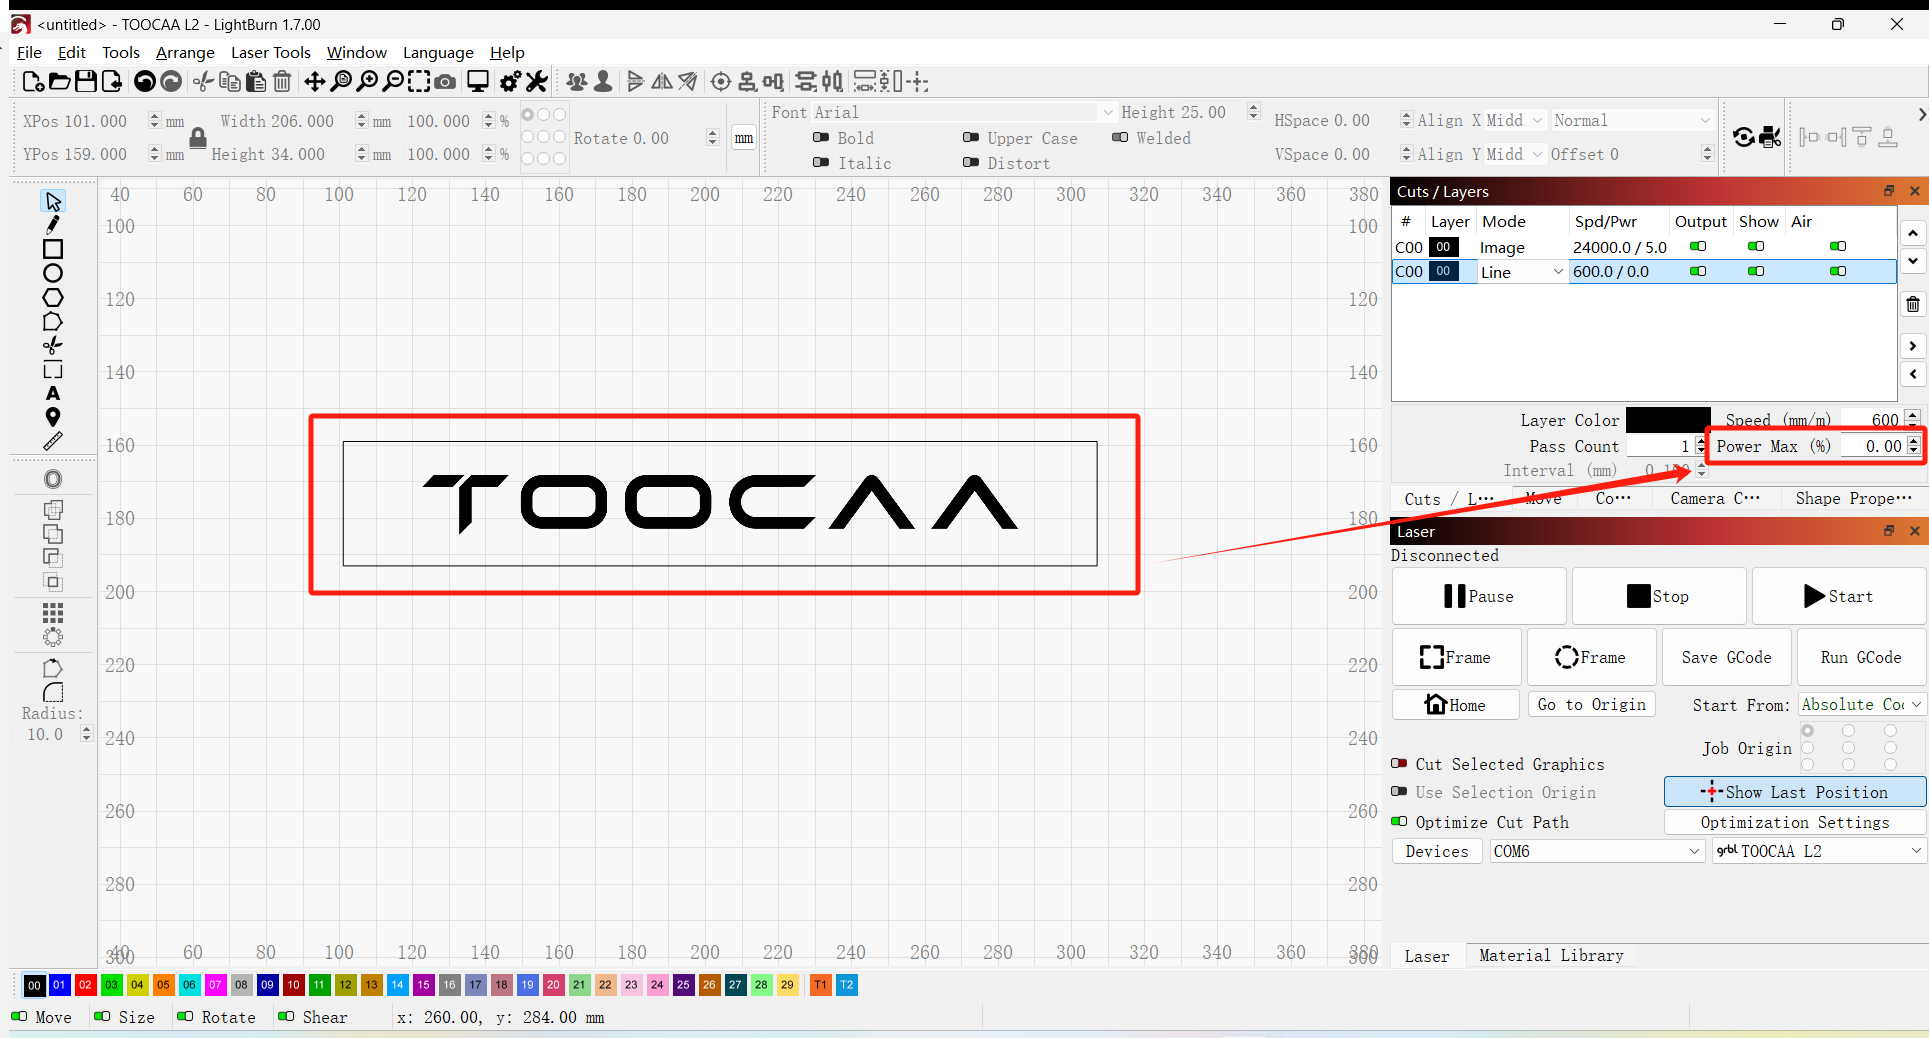
¶ 5. The top or bottom of the engraved image is incomplete.
Please manually set the Z-axis overscan.
How to set: In LightBurn, draw a rectangular frame larger than the engraved image, select Power Max to 0, and then engrave the image.
¶ 6. How to engrave materials with larger diameters (>140mm) using chuck accessories?
If you need to engrave materials with larger diameters (>140mm), it is recommended to use the roller rotary accessory for engraving.
¶ 7. How to use a vernier caliper?
If you have any questions about how to read a vernier caliper, please read the following tutorial document:
https://en.wikipedia.org/wiki/Vernier_scale
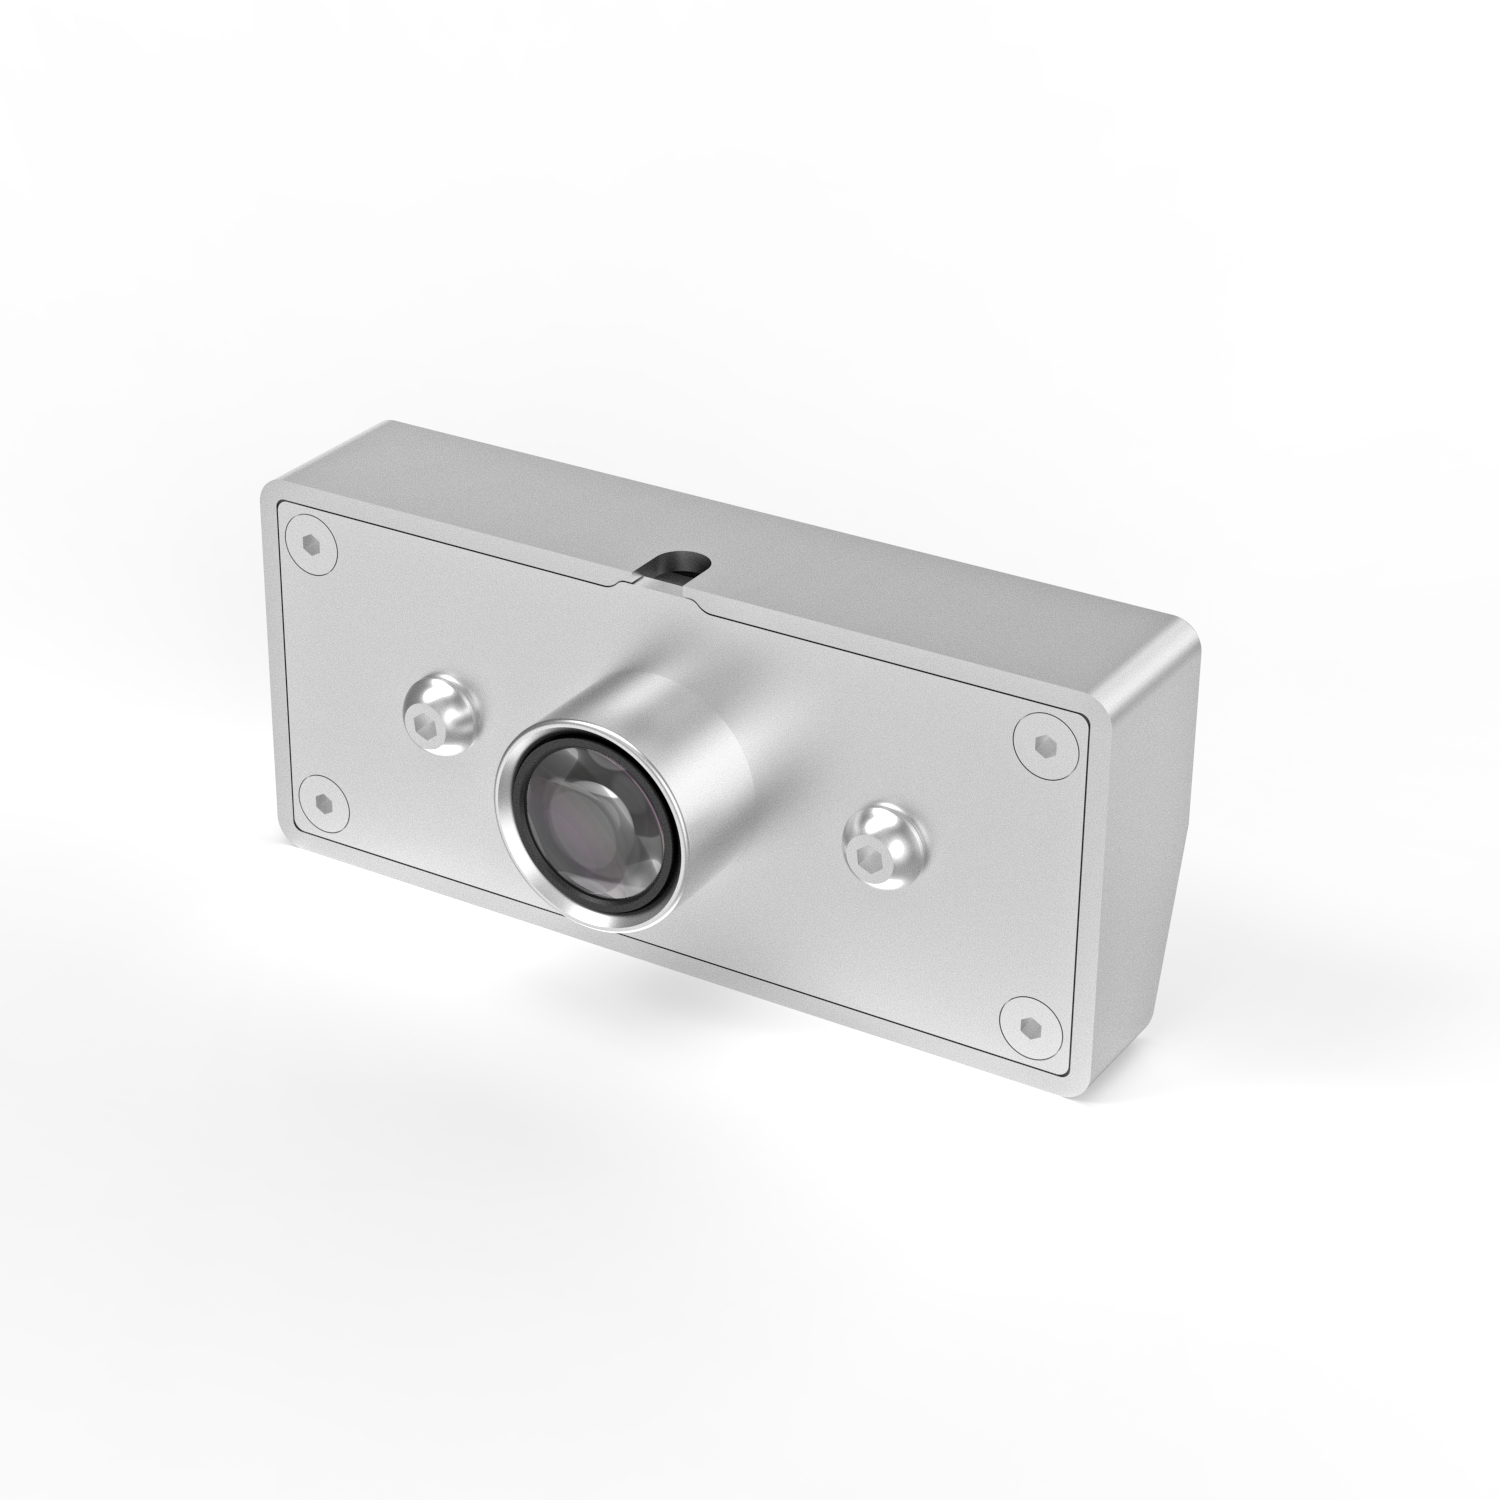
¶ TOOCAA Smart Camera
¶ Product Description
TOOCAA L2 Smart Camera helps you realize all your wonderful ideas with precise auxiliary positioning technology. TOOCAA Smart Camera for L2 achieves perfection with precision.
- **【Metal Texture】**The all-metal shell design is durable and luxurious. A combination of design and technology can create something that feels futuristic.
- **【Easy Calibration】**Simplify the calibration process, and select the best parameters with one click. Simple and easy to operate, greatly improving your work efficiency.
- 【Detailed to every pixel】 5 million ultra-high pixels ensure the generation of high-quality images, the 150DPI resolution can perfectly display every inconspicuous detail.
- **【Precise positioning】**Millimeter-level precision positioning, no blind spot recognition of a large area of 400 mm × 400 mm, supporting the design requirements of various materials.
- **【Ready to use unboxing】**The camera adopts a modular design, and uses high-precision screws to fix it to the laser-cutting machine. It can be used after the USB cable is connected to the device.
¶ Product Specification
| Module Size | 90mm × 40mm × 35mm |
| Number of Pixels | 5 Million Pixels (2592px × 1944px) |
| Resolution | 150 DPI |
| Max Dynamic Range | 85 dB |
| Focal Length | 30cm-infinity |
| Connection Interface | USB 2.0 |
| Compatible System | Win XP, Win 7 or Linux 2.6.20 and above |
| Compatible Software | LightBurn、TOOCAA Studio |
| Gross Weight | 250g |
| Packaging Size | 135mm × 55mm × 102mm |
¶ Camera Installation
¶ Step 1
Take out the camera, screw accessories, and carabiner accessories from the packaging box.

¶ Step 2
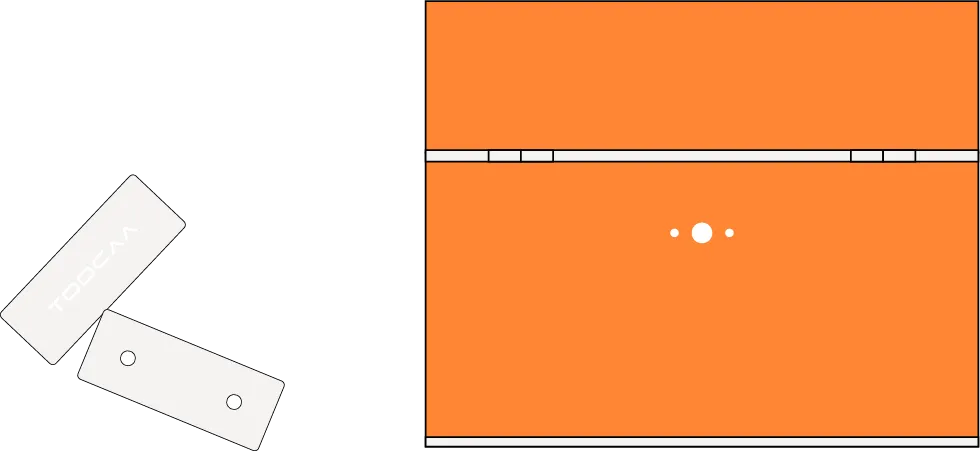
Remove the magnetic nameplate on the top of the laser cutting machine.
¶ tep 3
Use the screw fittings to secure the camera to the top of the laser cutter.
Note: Please remove the black protective cover on the camera after fixing it.

¶ Step 4
Organize and secure your camera's wiring with the carabiner accessory.
¶ Step 5
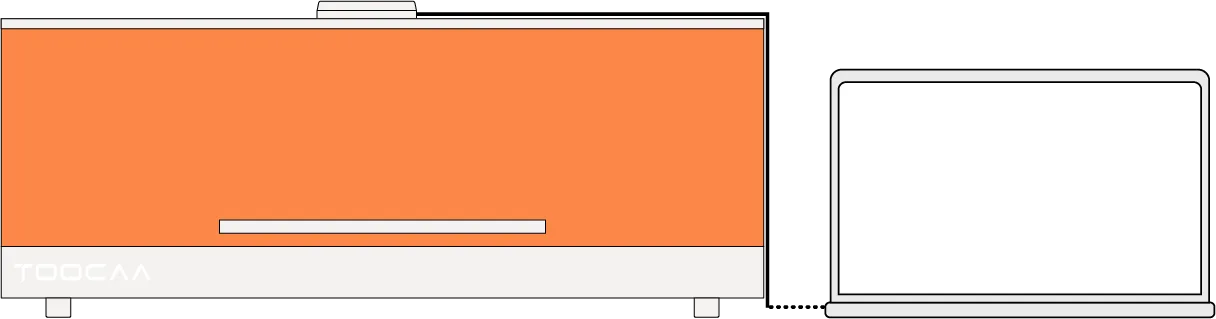
Connect the camera's USB cable to your computer, open LightBurn, and follow the instructions below to complete the connection. You can start using it normally.
Note: Each time before using the camera, you need to perform a device connection and a two-step (Camera lens calibration and Camera alignment calibration) camera calibration operation.
¶ TOOCAA Studio & TOOCAA Smart Camera Usage Tutorial
Start TOOCAA Studio.
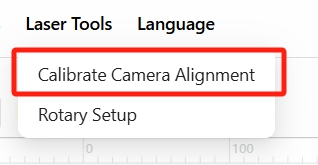
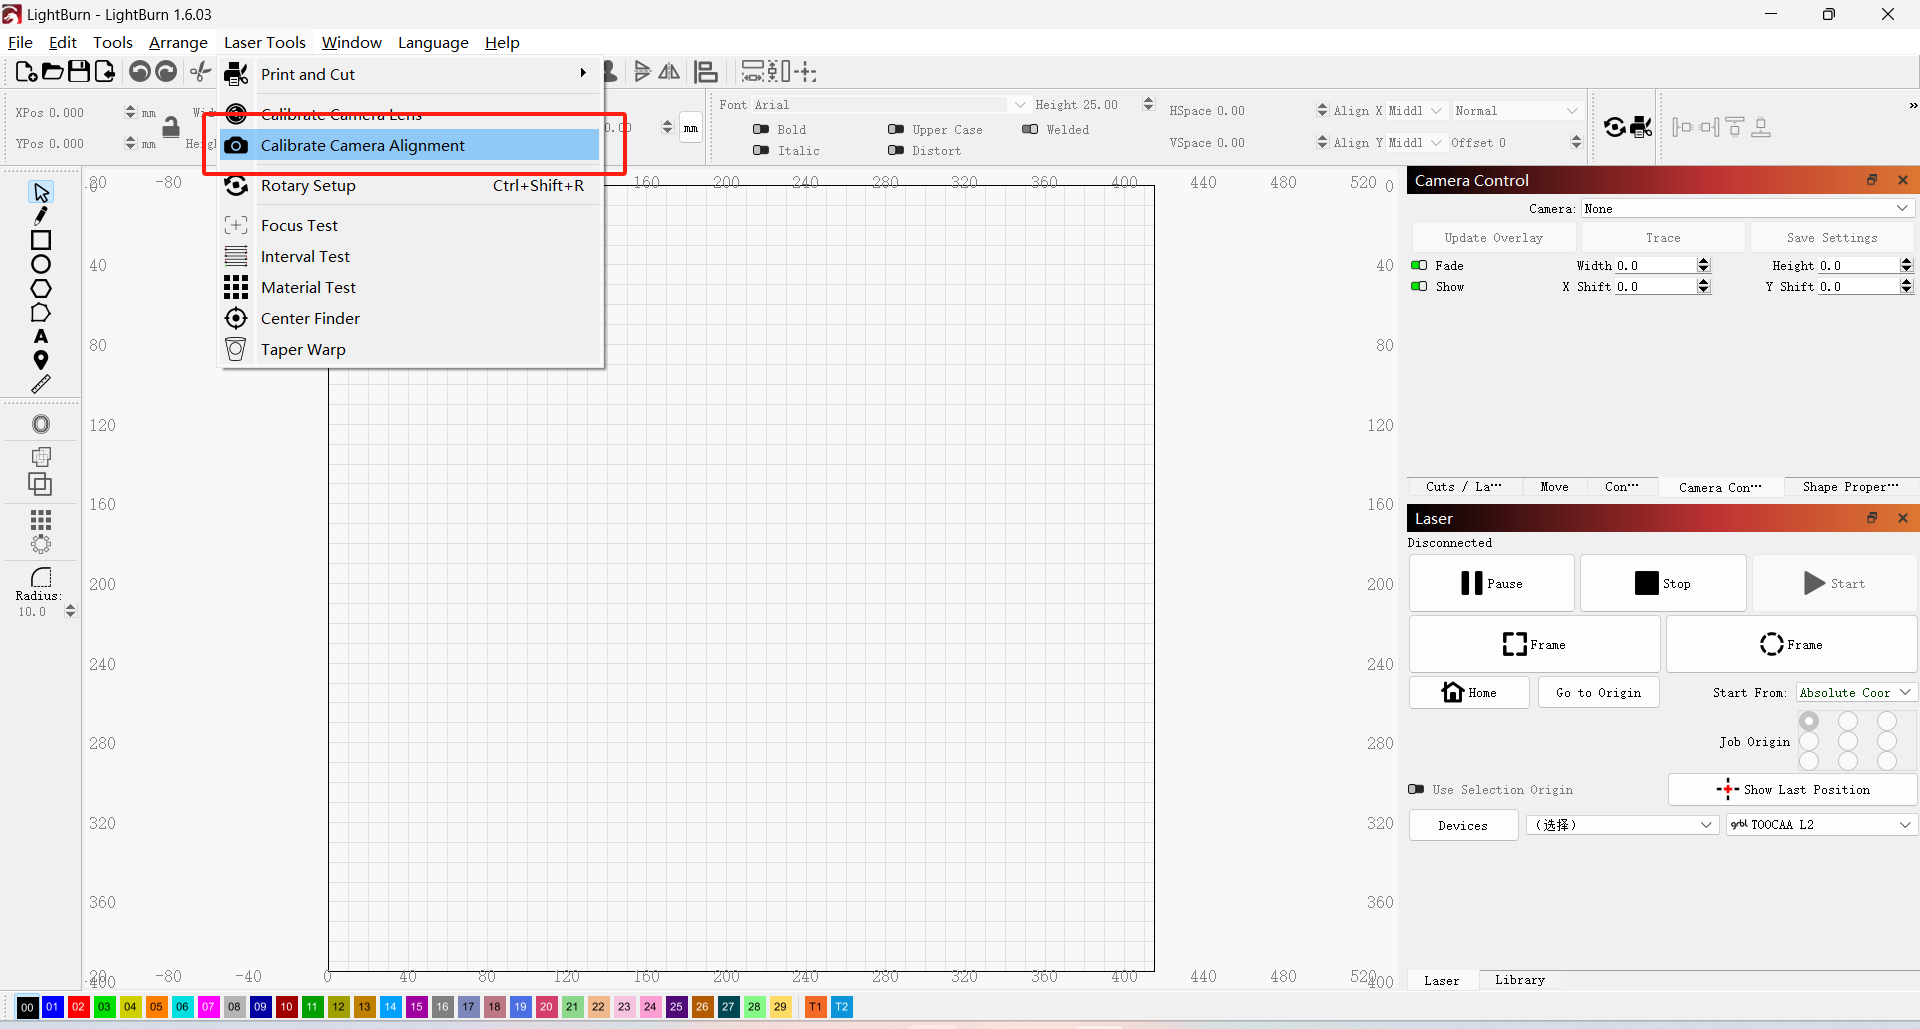
Click Laser Tools in the menu bar.

Select Calibrate Camera Alignment.
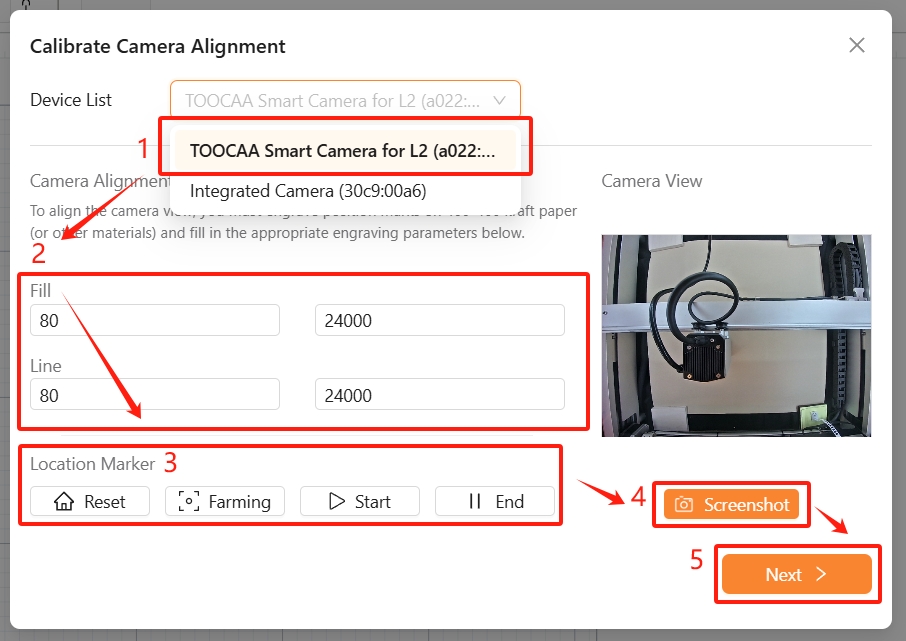
Select the Device List. (Default is TOOCAA Smart Camera for L2)
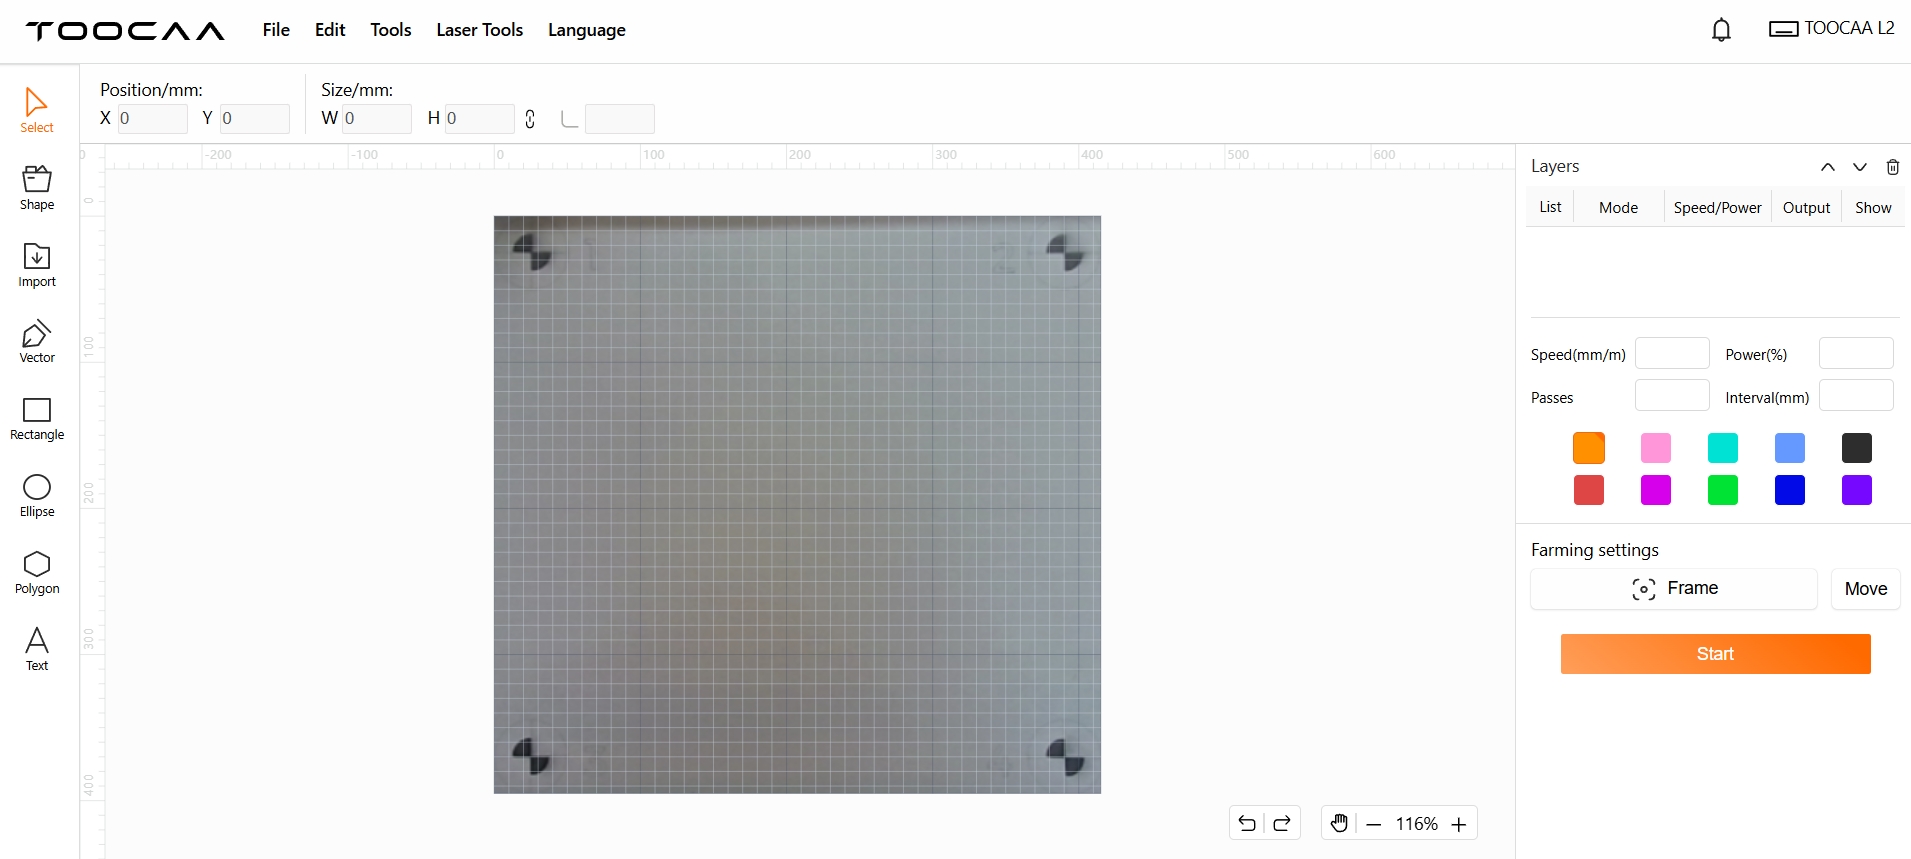
Prepare a 400*400 paper or other material for test image generation. Lay the material flat on the bottom of the machine and adjust the corresponding parameters according to the selected material thickness, After selecting the engraving parameters for the appropriate material, proceed with the Frame test. Then click Start to test the image. After the test image is engraved, click Next.
Note: The parameters shown in the figure are the parameters for engraving the kraft paper test image, which are for reference only. Please set the corresponding parameters according to the material and thickness of the actual test material!
After completing the case creation, click Screenshot, then click Next.
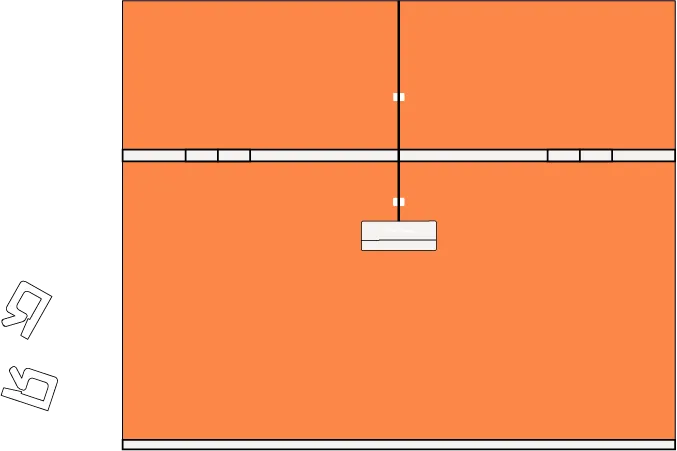
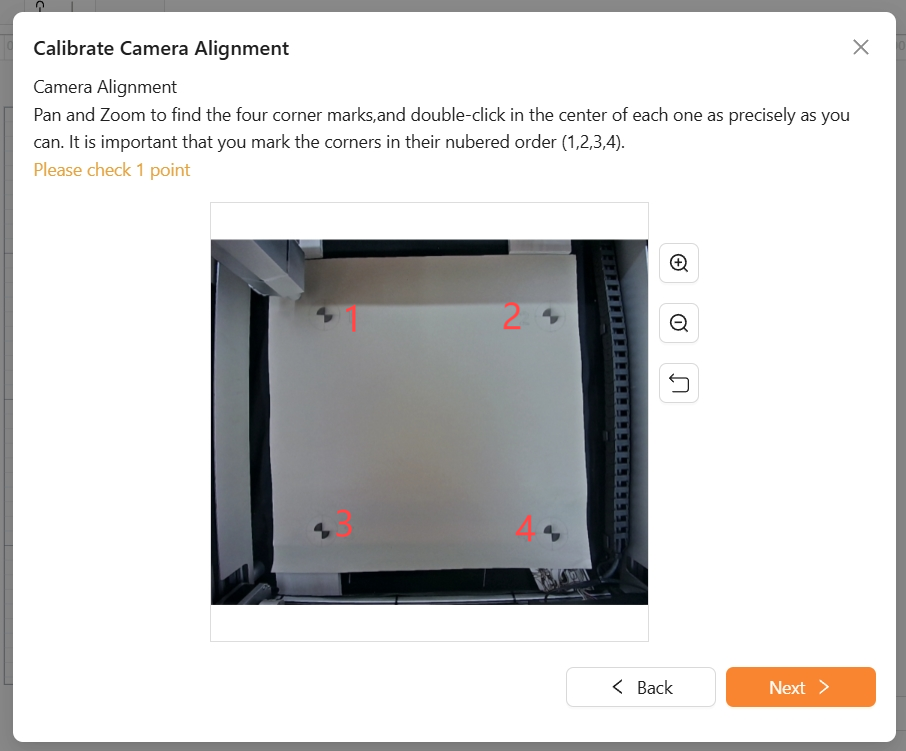
Use the mouse to mark and confirm the four marking points on the test image in the numerical order shown.
Notice:
1. Please make sure to click the mouse exactly at the center of the circle of the marked point.
2. The test image can be moved and zoomed in and out by using the mouse or the zoom buttons, to accurately click the center of the circle at four locations.
After the 4 locations are accurately marked one by one, click Finish. Then click Next.

Congratulations! You have completed all the settings of TOOCAA Smart Camera for L2 camera functions!
Note: If you need to update the overlay, please loop this step. (You can skip the test image generation step)
¶ LightBurn Camera connection tutorial
For the camera to accurately assist the laser cutting machine in positioning and operation, 3 step operations are required.
- Camera lens calibration
- Camera alignment calibration
- Camera application
Please read the following camera connection tutorial and connect the camera.
¶ Camera lens calibration
Q&A:The lens type of TOOCAA Smart Camera for L2 is a fisheye lens. To effectively use this type of fisheye lens, it is necessary to calibrate the lens to ensure that it does not distort when capturing images.
¶ Camera Model Selection
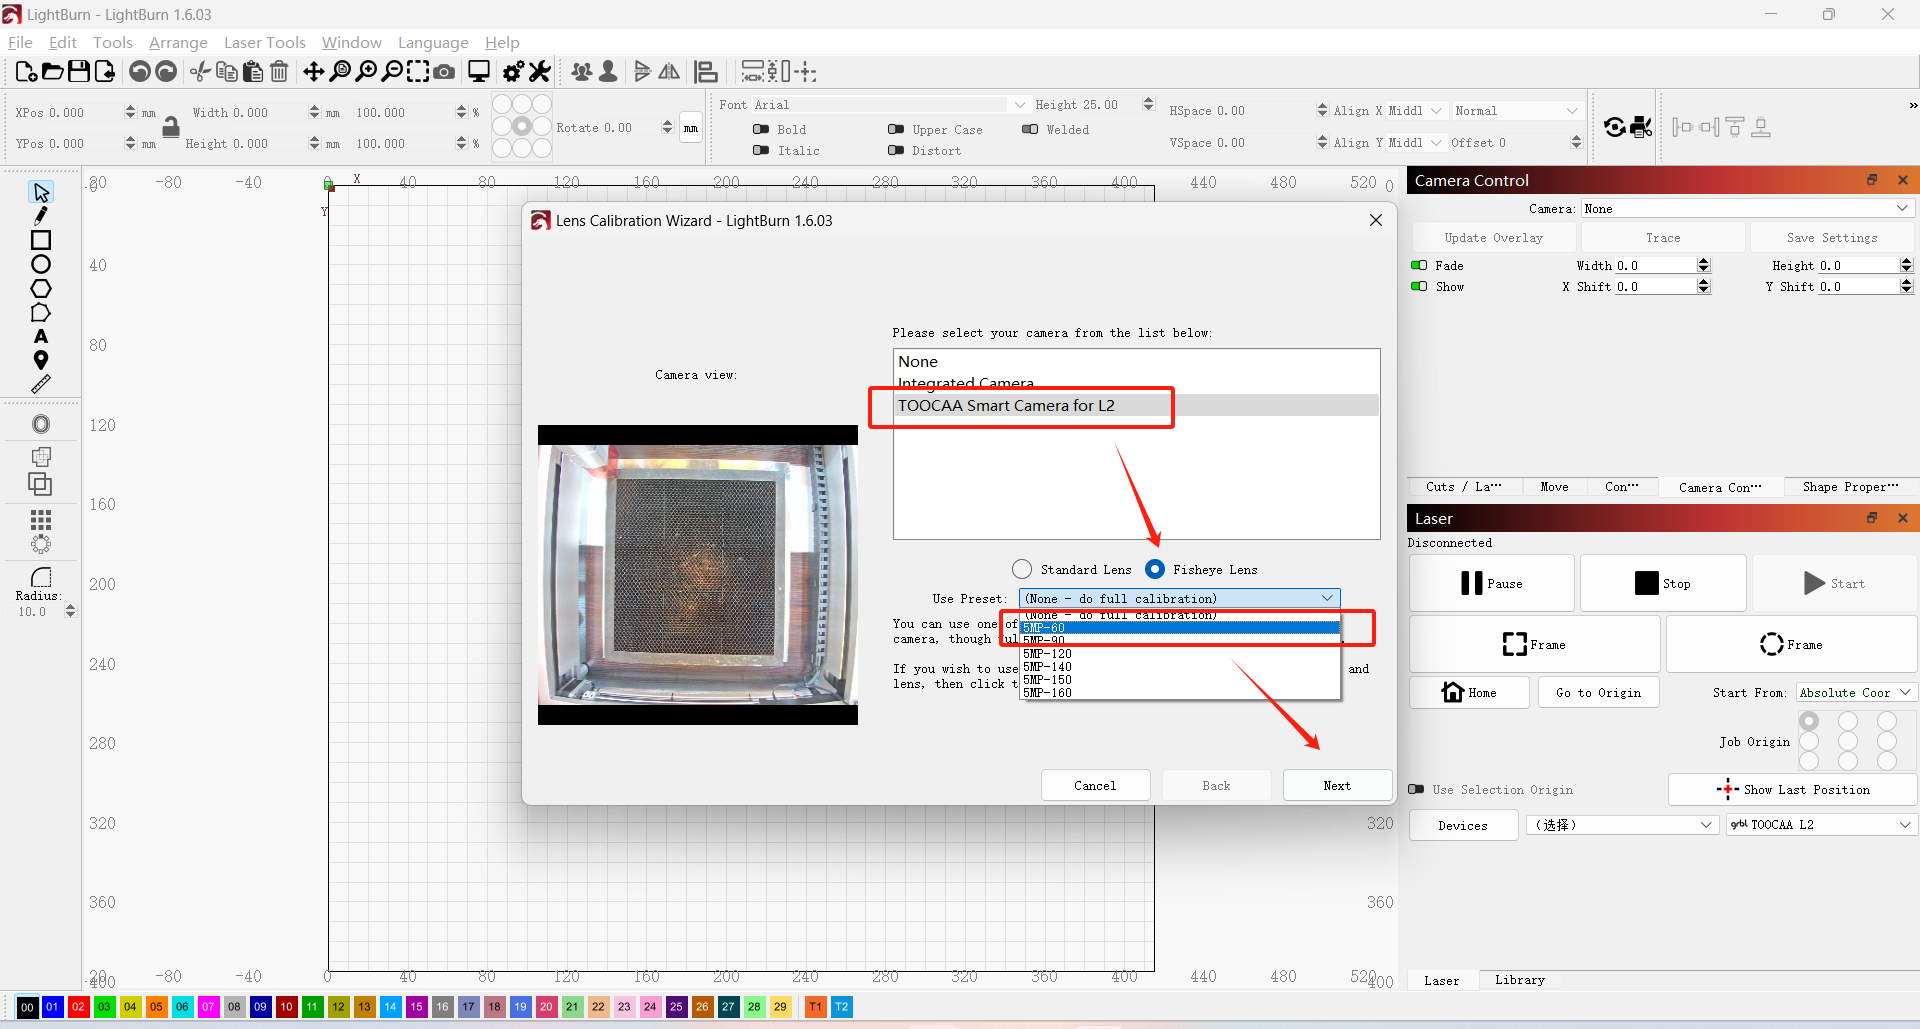
Connect the laser cutter and camera to your computer with a USB cable, start LightBurn, and click the Calibrate Camera Lens option.
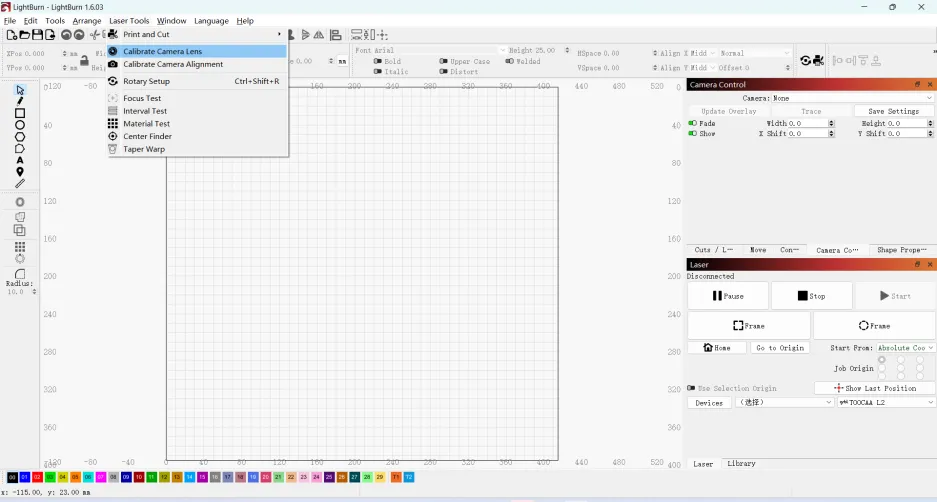
Select the camera model. Select** Fisheye Lens** and 5MP-60, and click Next.
Q&A: 5MP-60 means the camera has a resolution of 5 megapixels and can record video at 60 frames per second. Just select the corresponding parameters in LightBurn.
Click the Align Camera option to start camera alignment calibration.
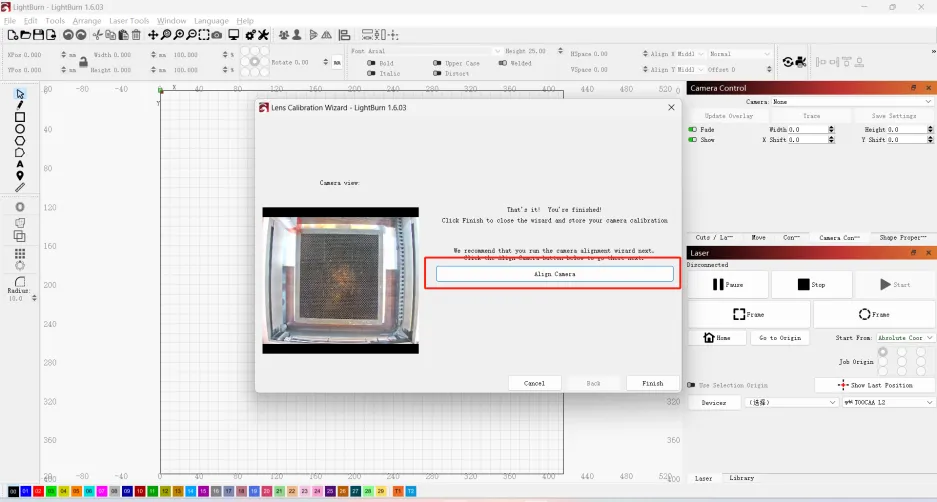
TIPS:If you click other options by mistake, you can start camera alignment calibration through LightBurn Tools→Camera Alignment Calibration.
¶ Camera alignment calibration
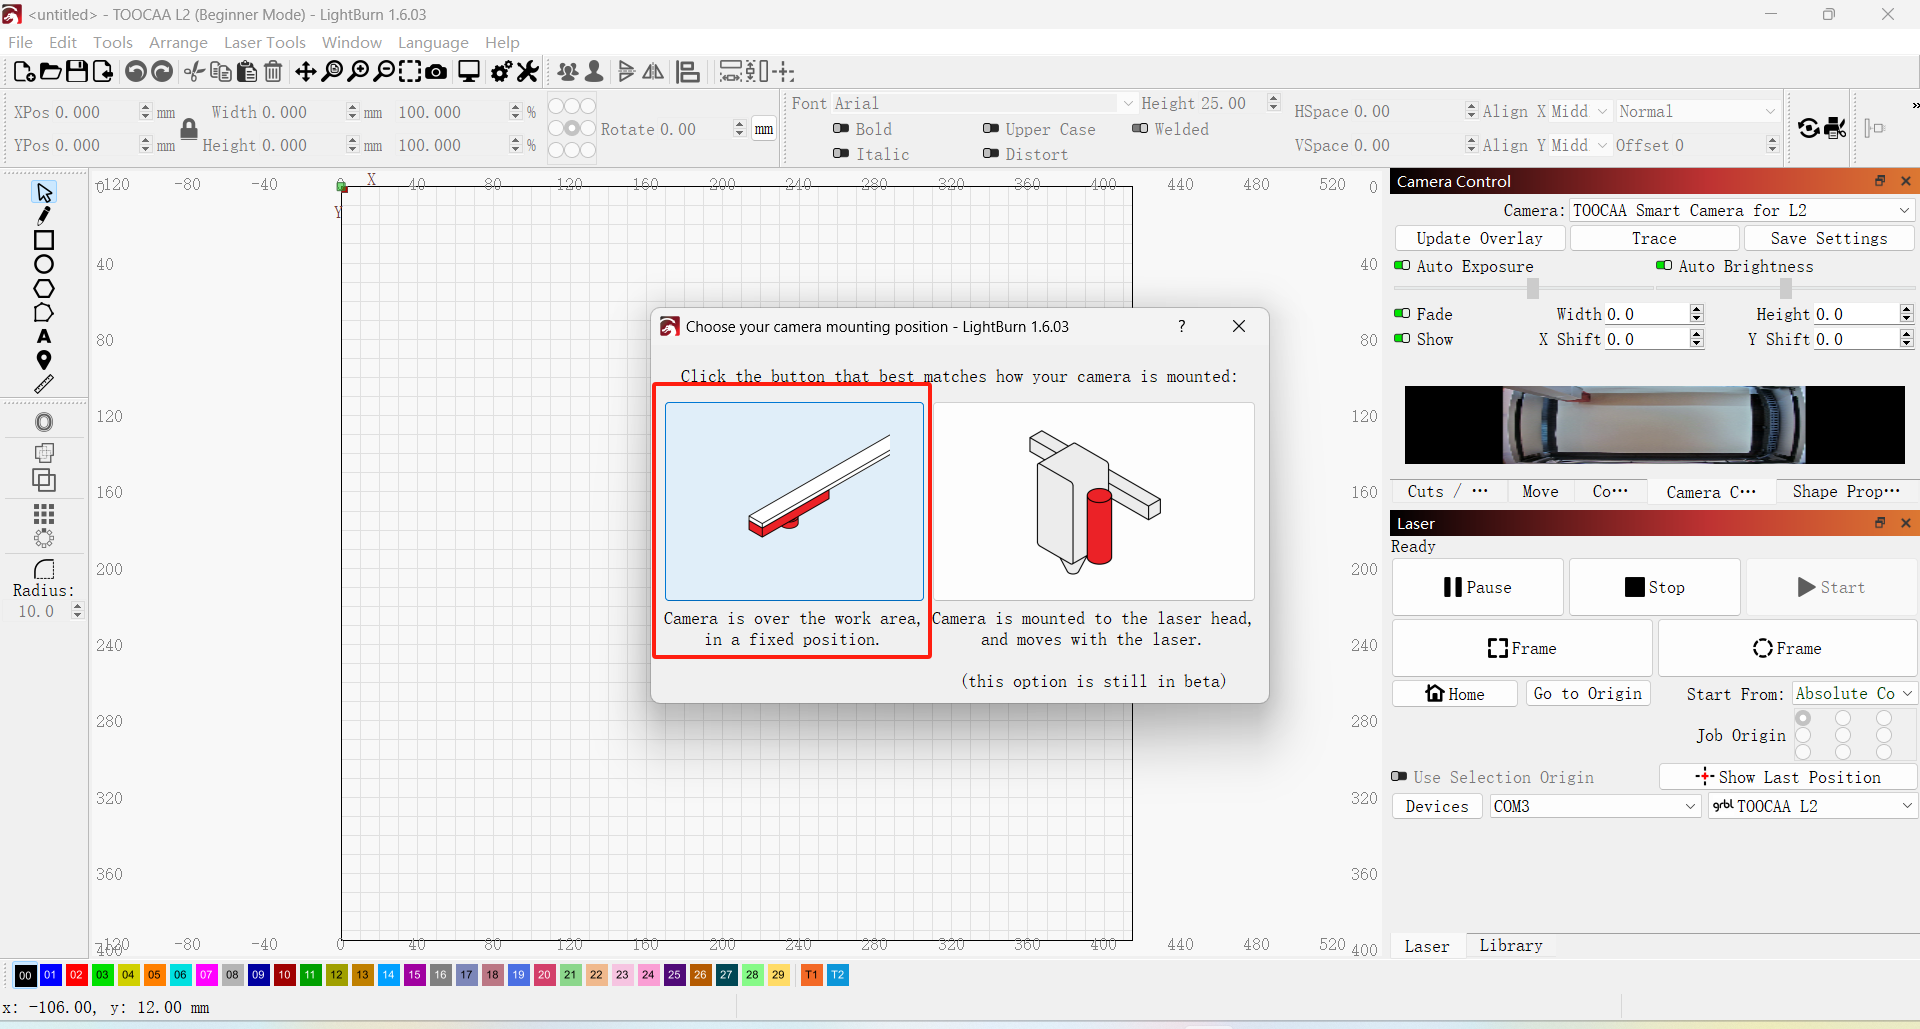
¶ Select the connection mode
In the Connection Mode window, select the mode where the camera is located on top of the laser cutter (option 1 on the left).
¶ Test image generation
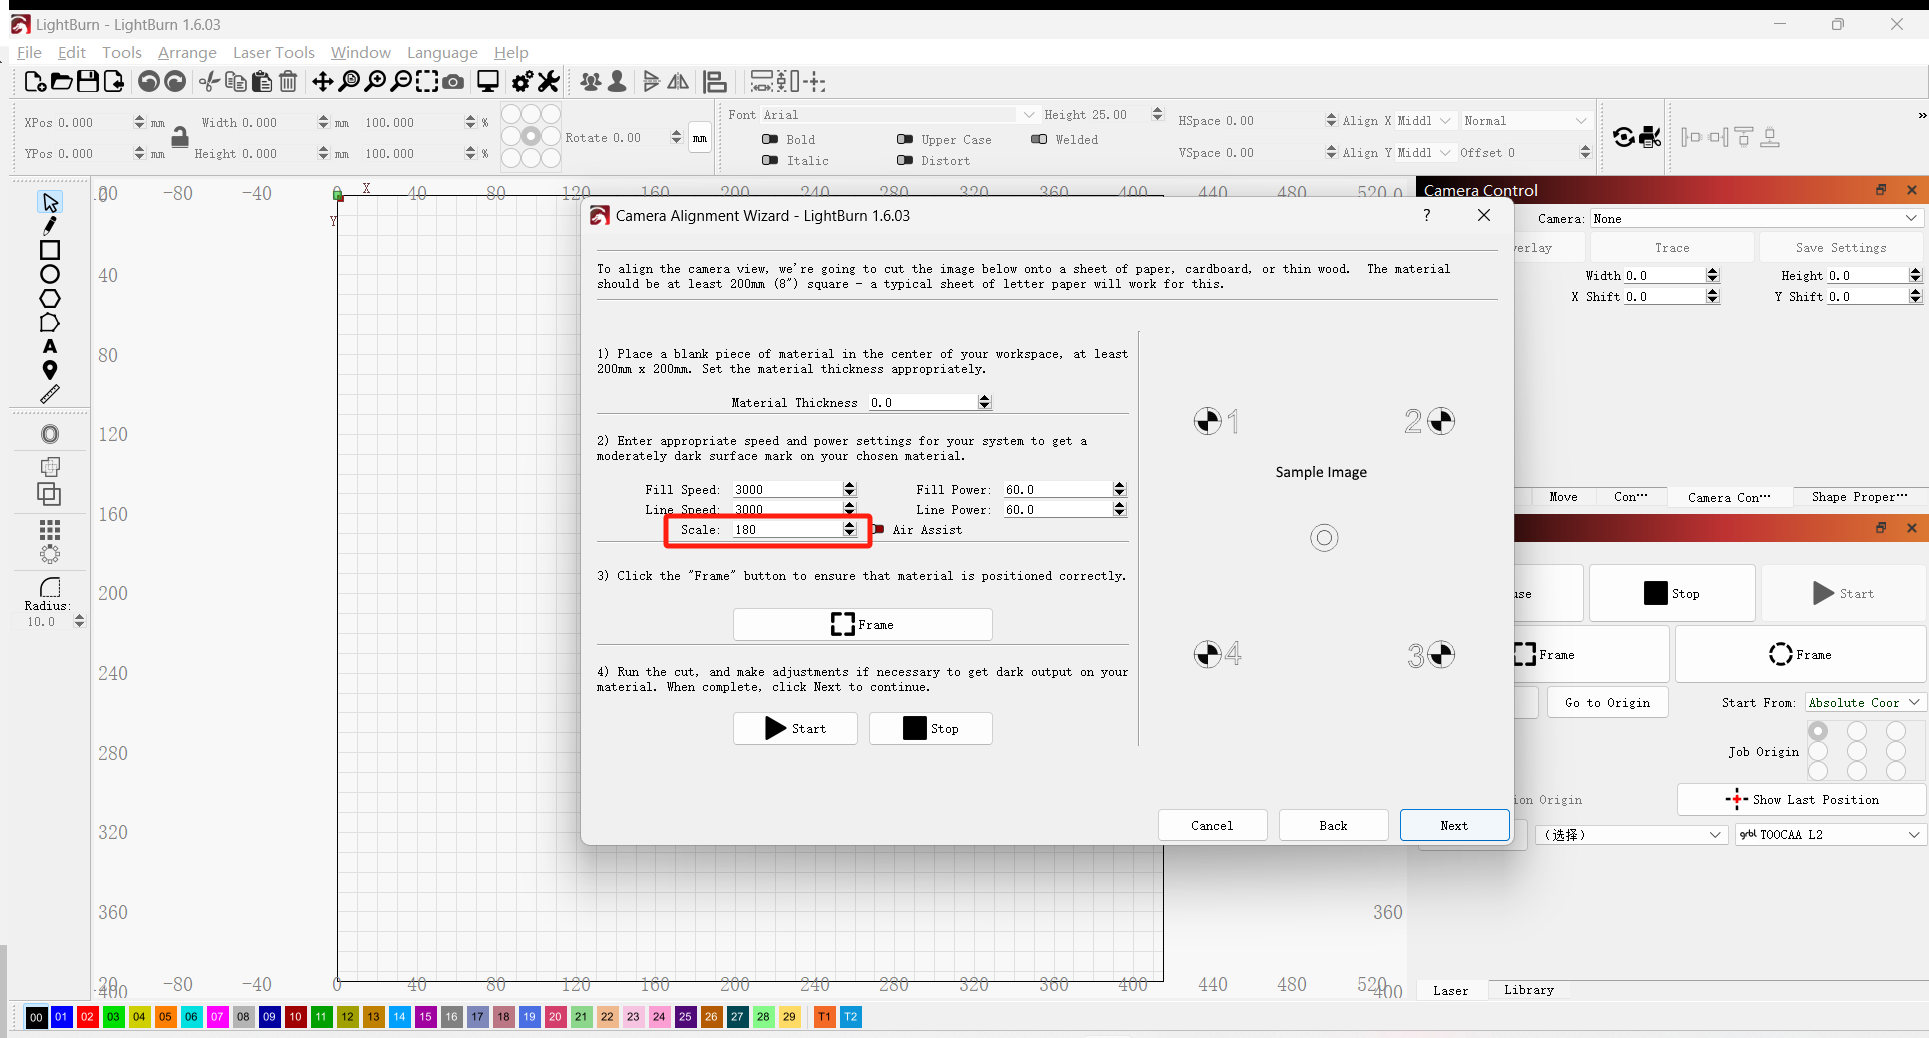
Prepare 400*400 paper or other material for test image generation. Lay the material flat on the bottom of the laser cutting machine, and adjust the corresponding parameters according to the selected material thickness. Select the engraving parameters of the appropriate material, click the Frame button to test, and then click to start engraving the test image. Click Next when the test image is engraved.
Note: The parameters shown in the figure are for reference only. Please set the corresponding parameters according to the material and thickness of the actual test material!
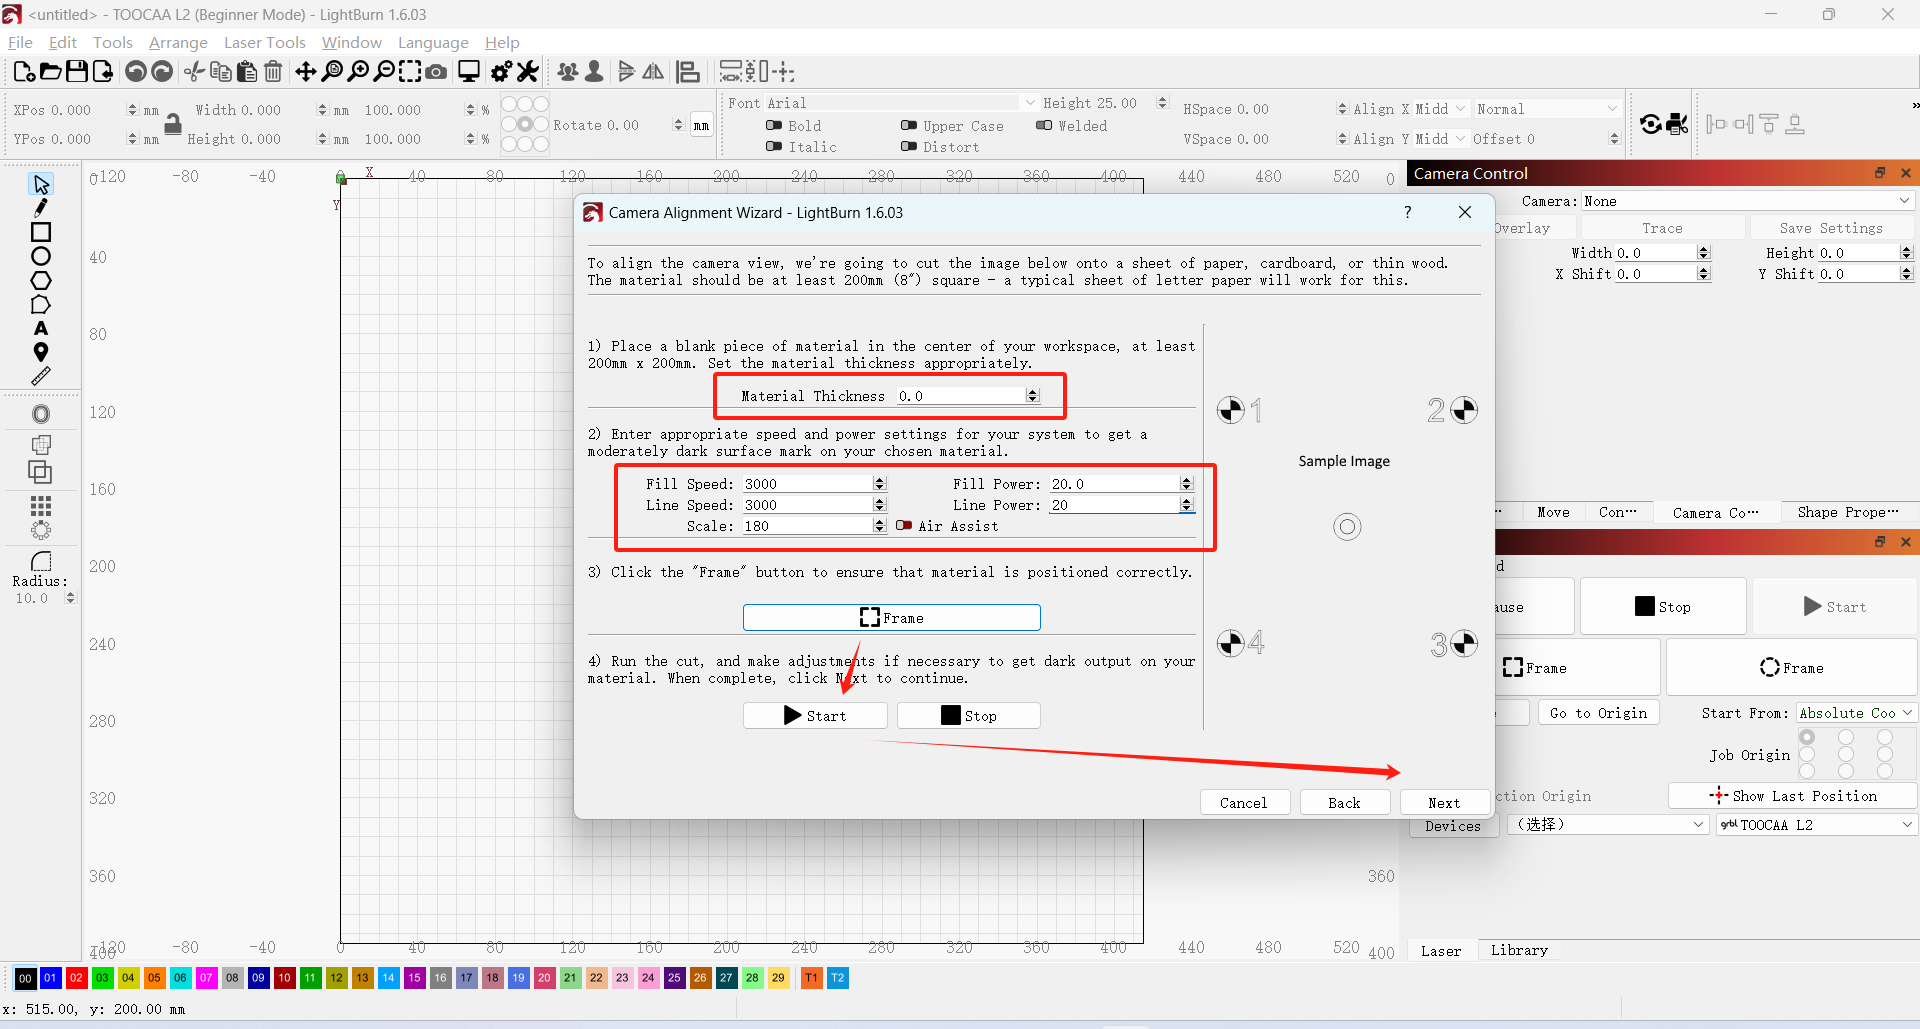
Note: If an alarm sounds, check whether the laser head has been reset. If the alarm still sounds after resetting, adjust it appropriately to reduce the proportion.
¶ Image location capture and marking
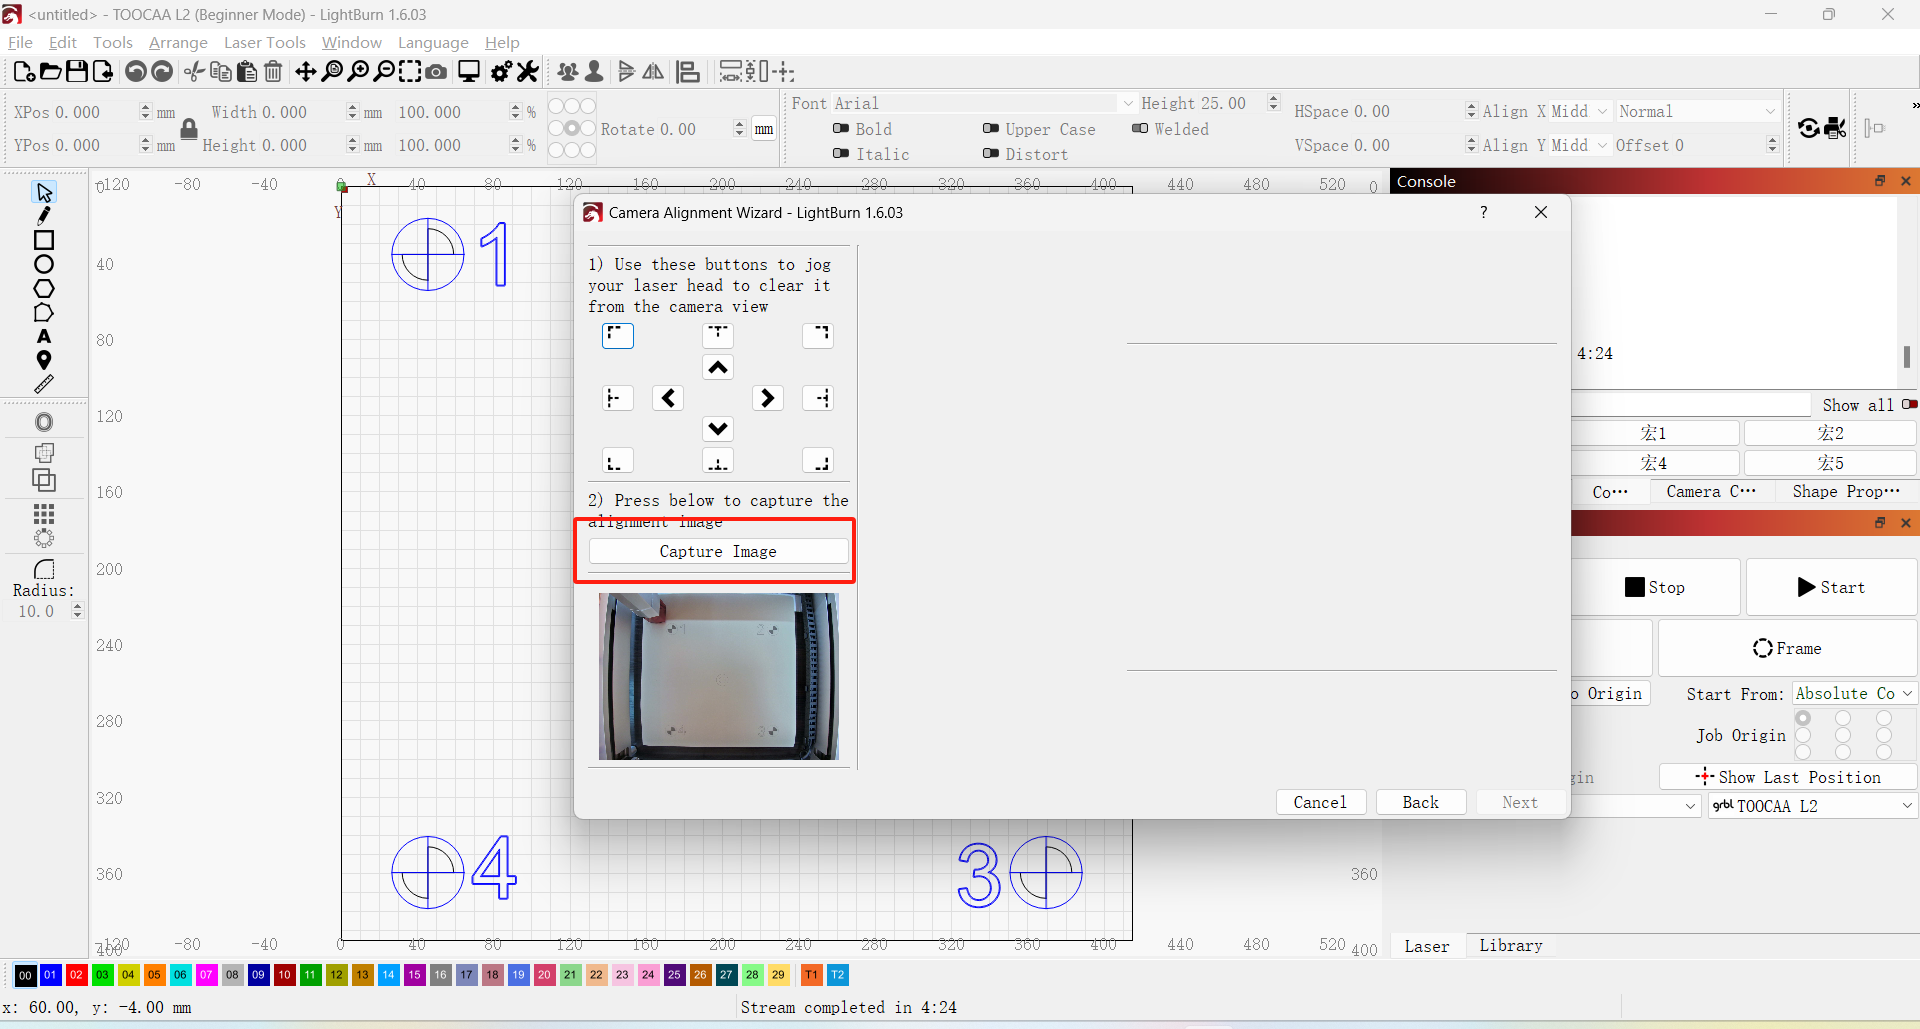
Capture the generated test image. Proceed to the next step after the capture is completed.
Note: The captured image should be the same as the preview perspective. If the image captured is a fisheye view, please return to the lens calibration step and re-calibrate the lens.
Use the mouse to mark and confirm the 4 positions on the test image in the order of numbers shown.
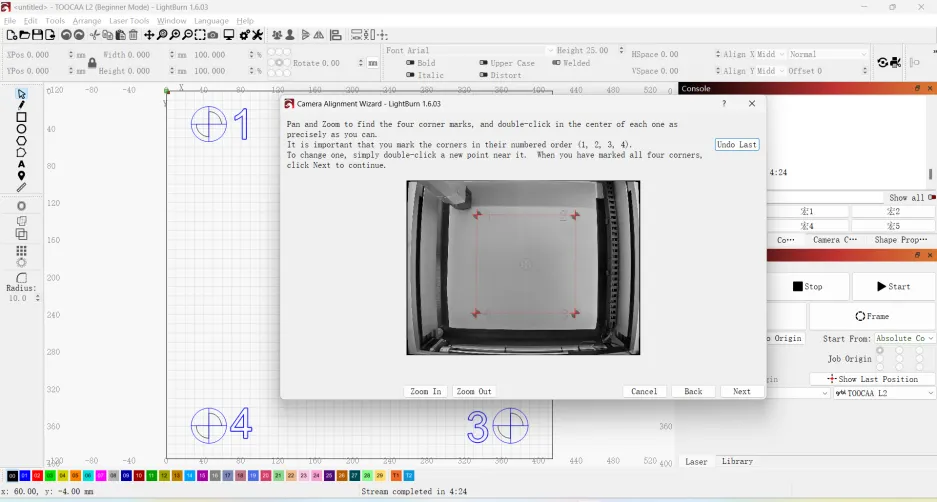
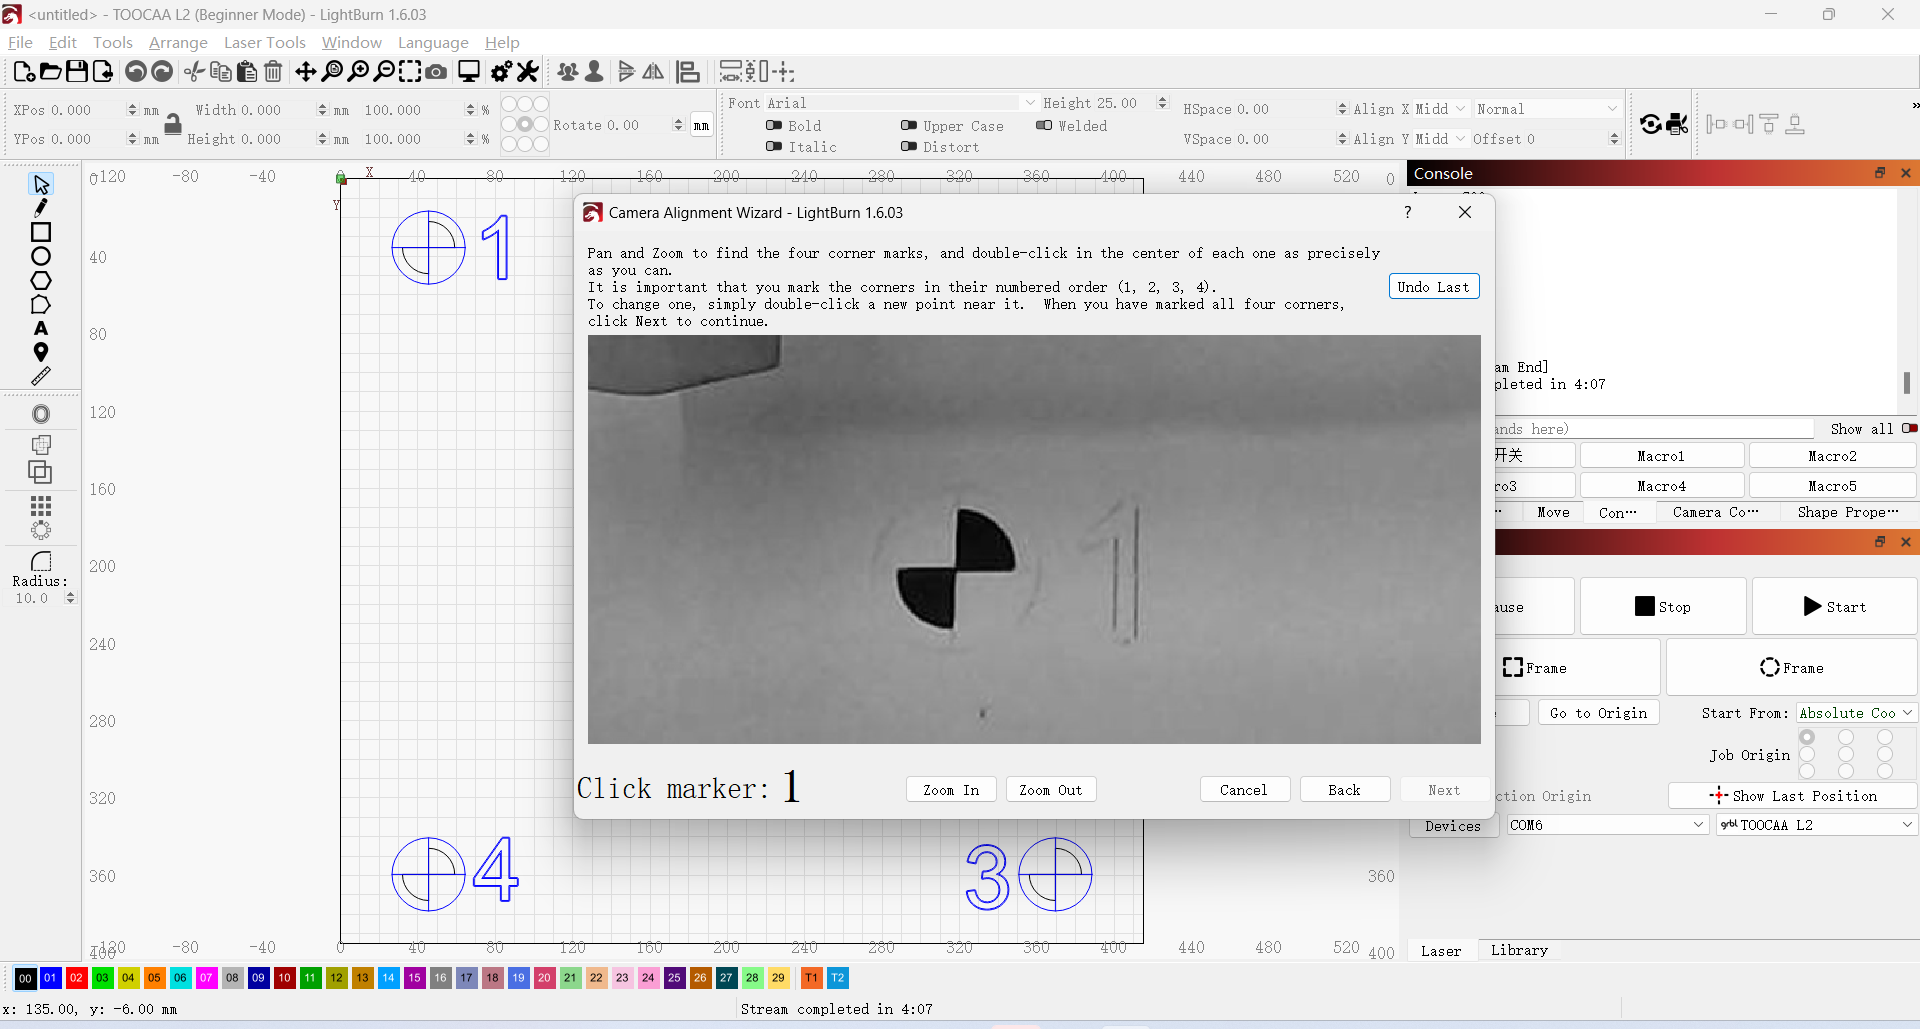
TIPS: You can move the mouse, zoom in and out to test the image, and then accurately click the circle center at 4 locations.
After the 4 locations are accurately marked one by one, click** Finish**.
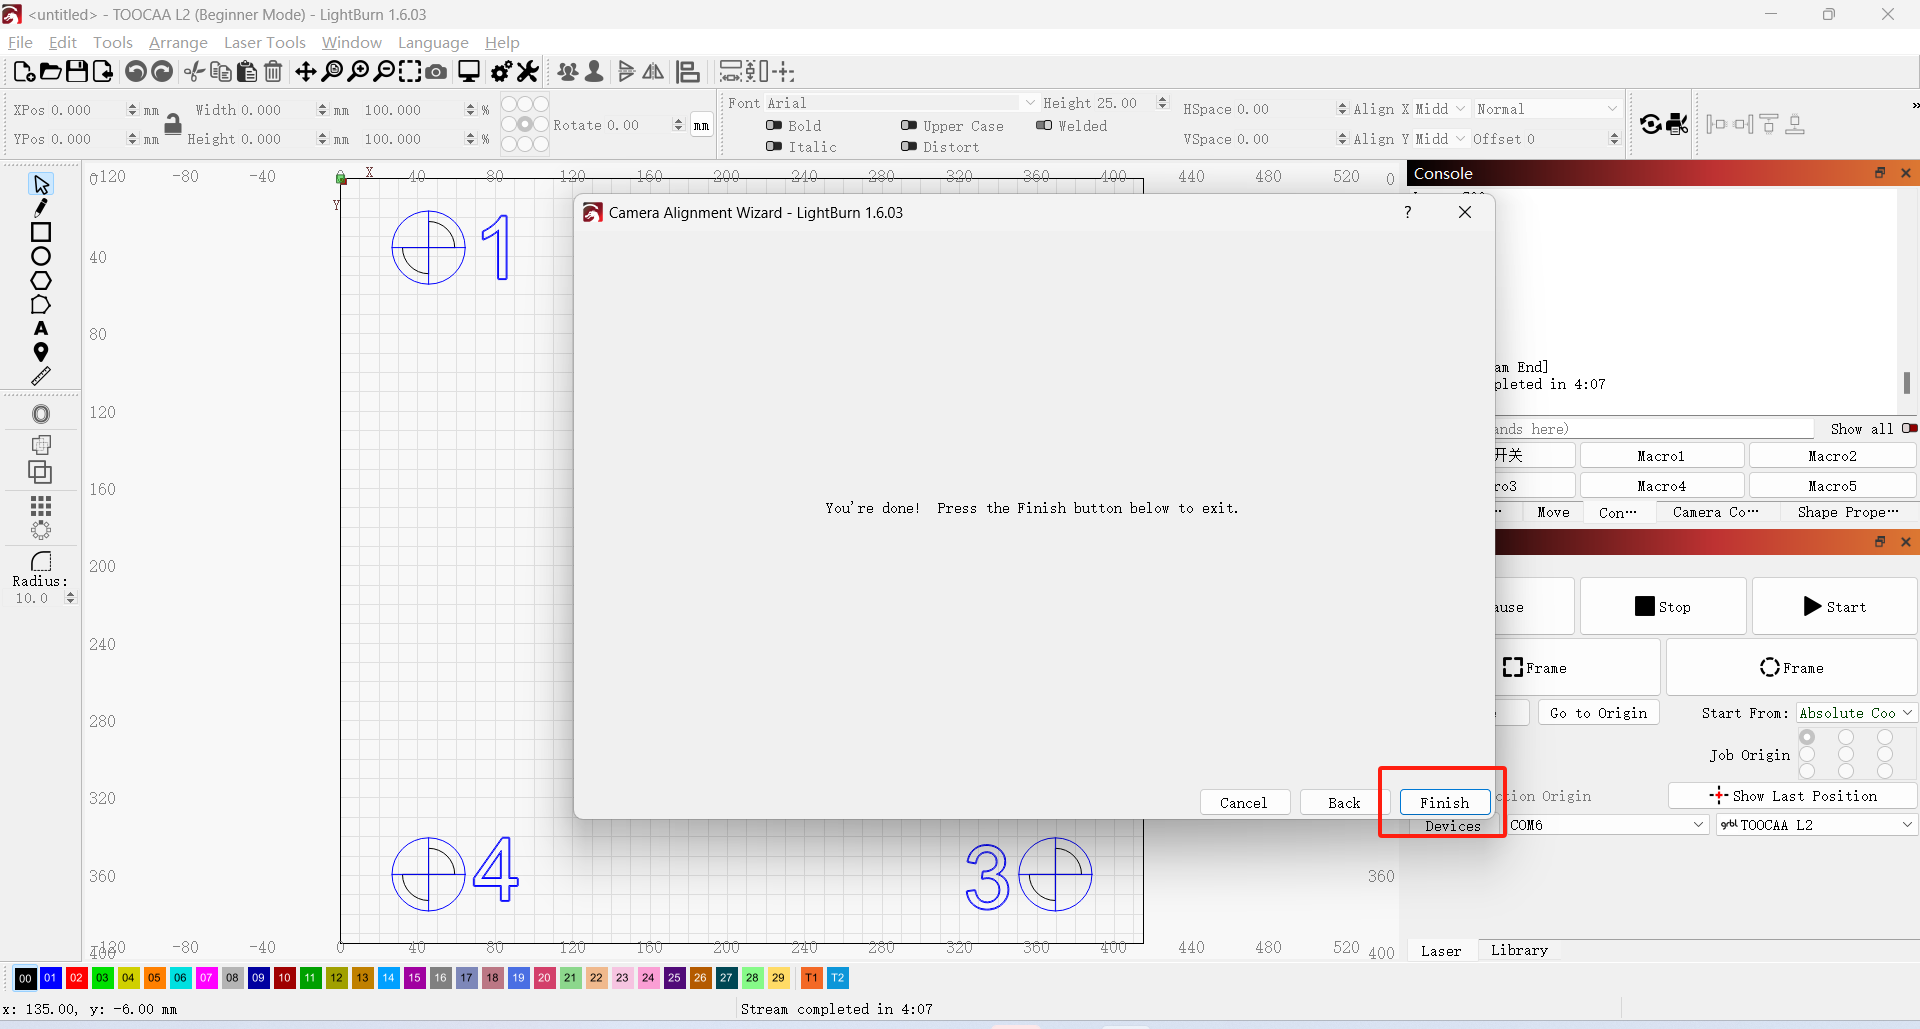
¶ Camera Application
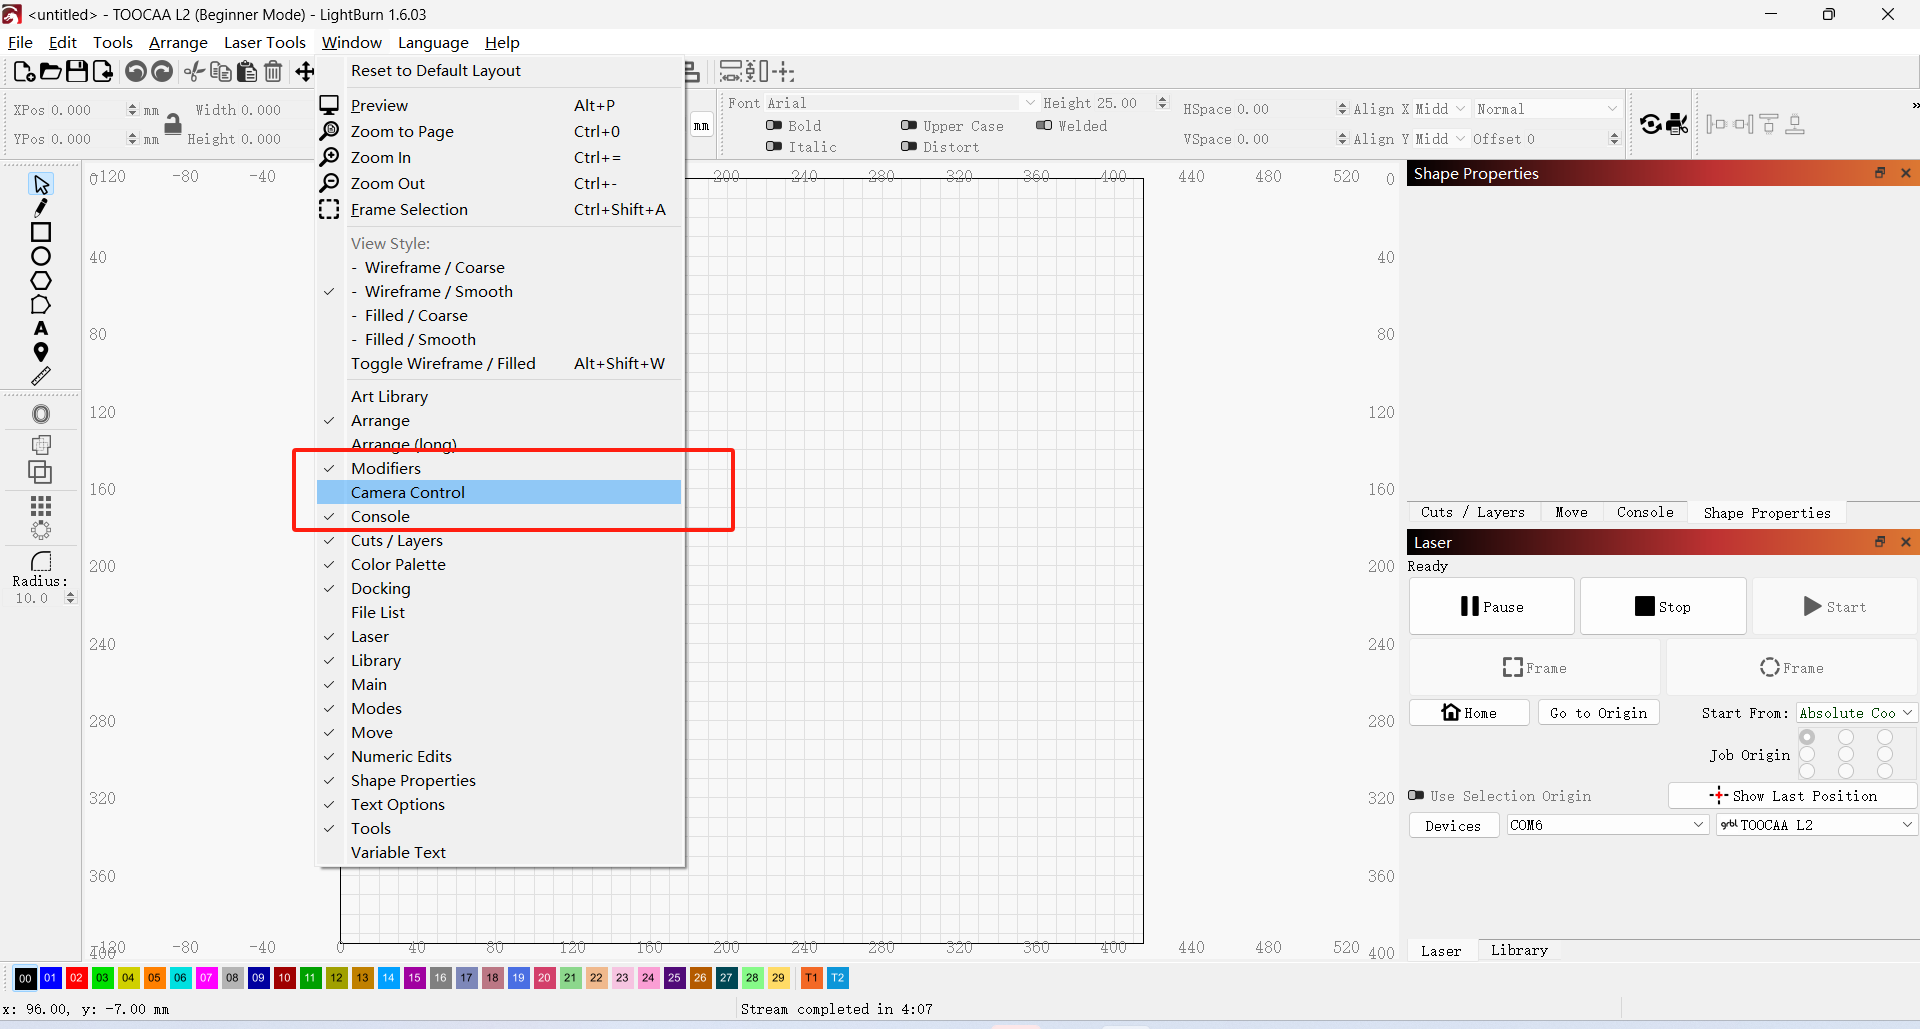
¶ Camera control window Overlay preview
Click Window→Camera Control to open the Camera Control window.
Click Update Overlay and your calibration is complete!
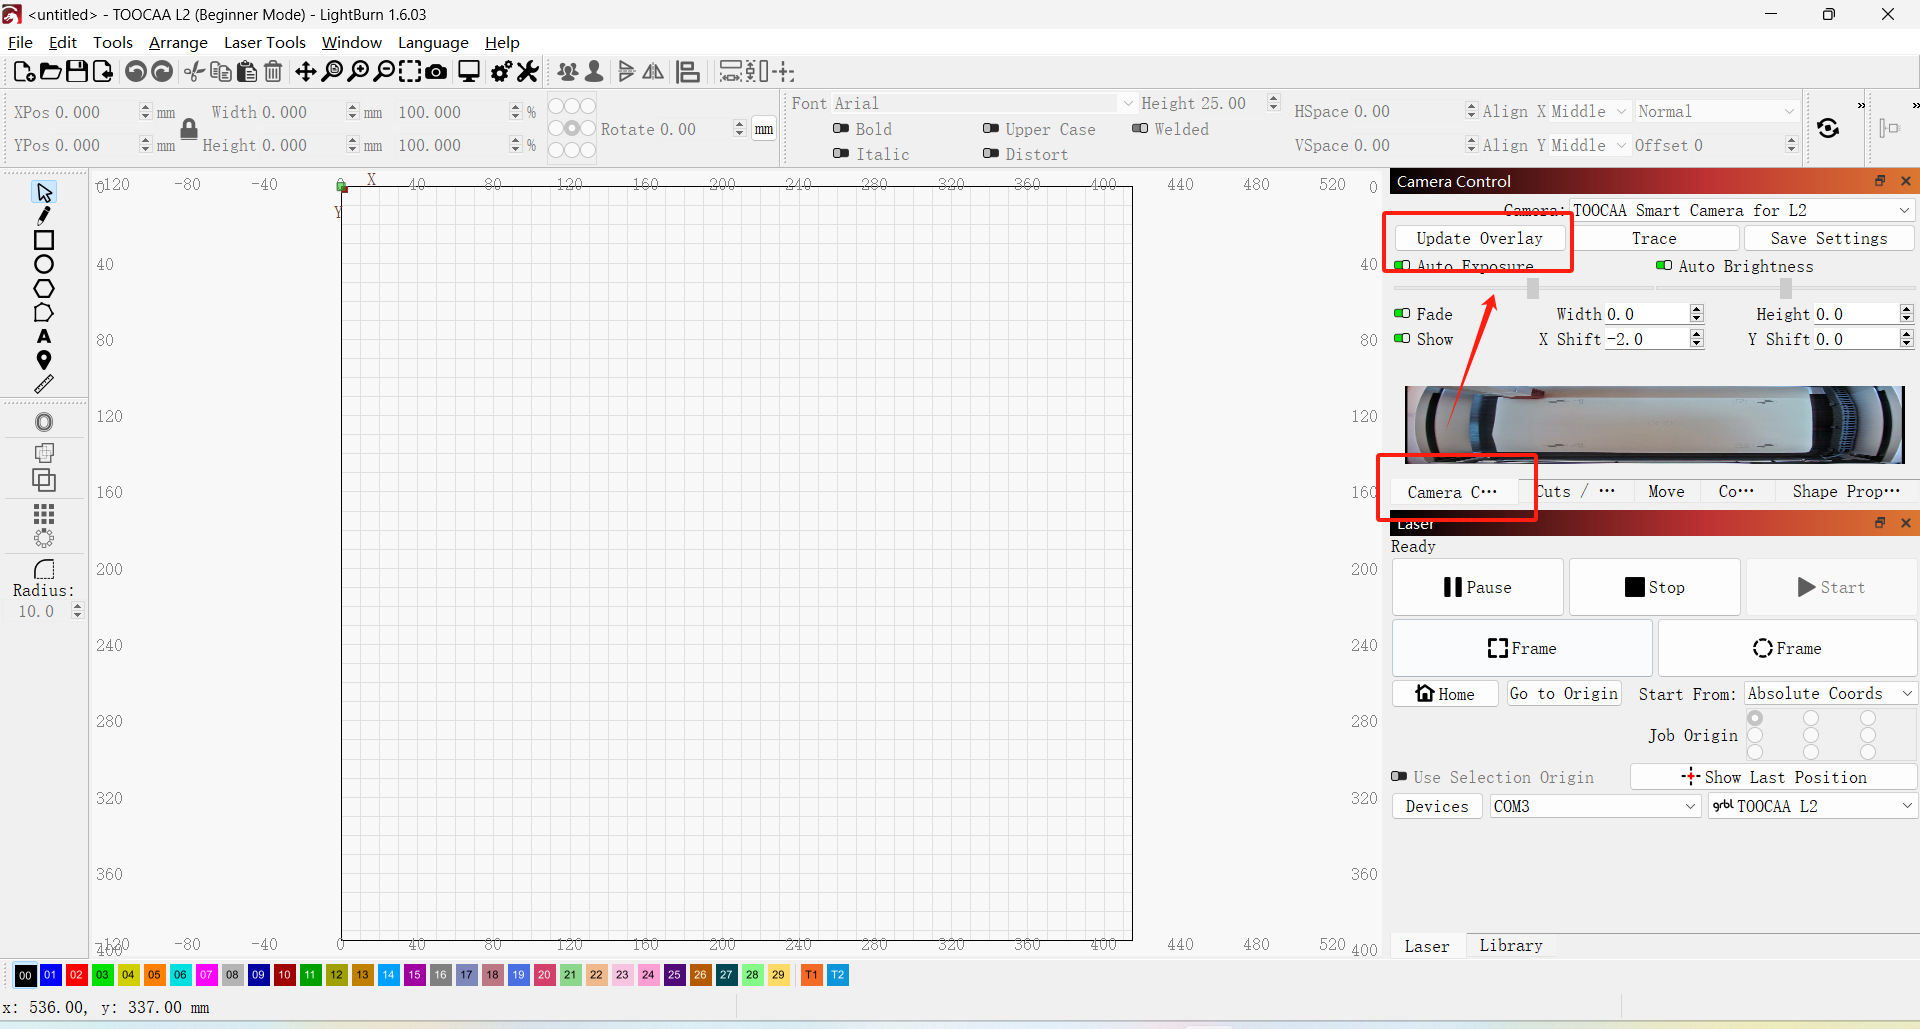
TIPS: After adjusting the position of the material to be cut inside the laser-cutting machine, there is no need to recalibrate the camera, click Update Overlay.
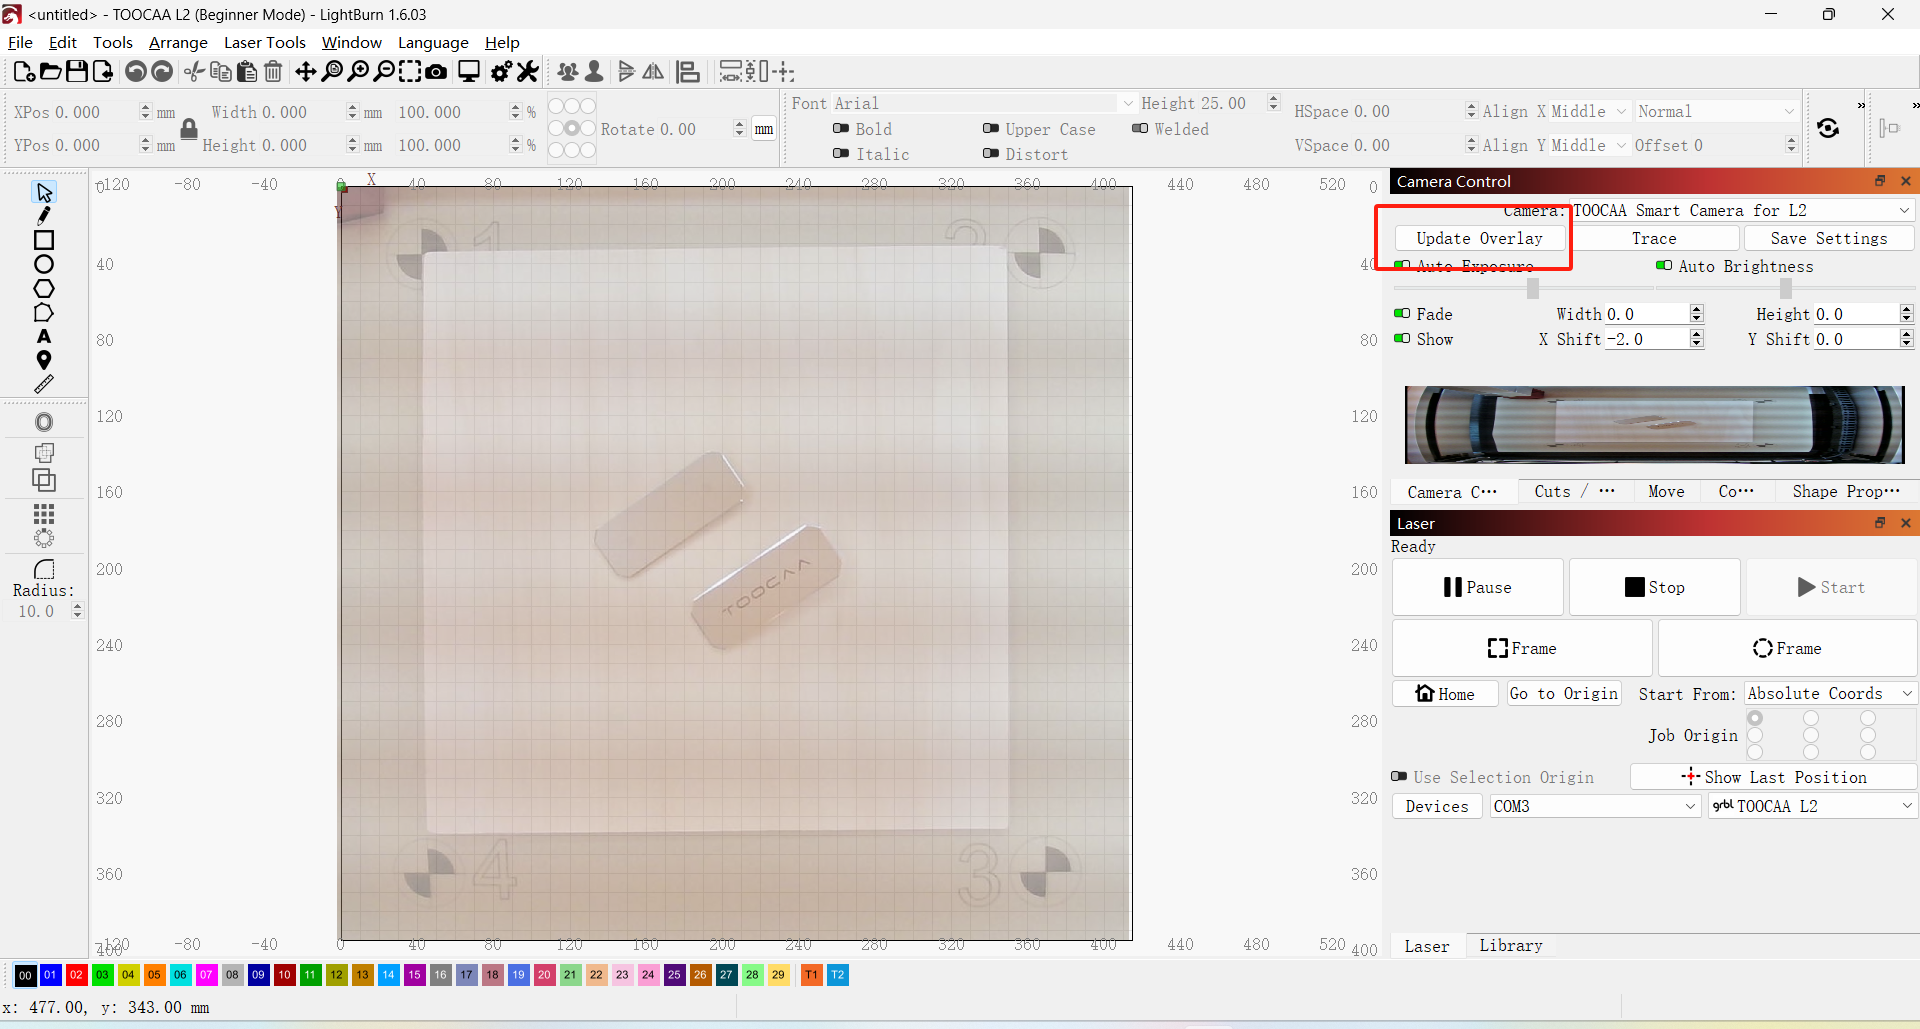
If the preview position is offset from the actual position, you can adjust the X and Y axes in the Camera Control Panel.
¶ Practical operation and application of camera
Place the cutting materials into the laser cutter and click "Update Overlay".
In the LightBurn overlay view, you can design the engraving and cutting of the material according to the target position.
Note: Each time before using the camera, you need to perform a device connection and a two-step (Camera lens calibration and Camera alignment calibration) camera calibration operation.
¶ TOOCAA Smoke Purifier
¶ Product Description
This smoke purifier removes smoke and harmful gases through a high-efficiency filtration system. It protects your health and the environment and creates a fresh working environment. It is easy to operate and reliable in performance, and can effectively reduce the content of particles, odors and harmful substances produced during laser engraving or cutting.
¶ Packing List
Please carefully check following parts. If there is any missed or damaged items, please contact customer service department or dealers.
| Name of Parts | Qty |
|---|---|
| Smoke Purifier | 1 Set |
| Power Cable | 1 Piece |
| Pipe | 1 Piece |
| Hoop | 1 Piece |
| Smoke Purifier User Guide | 1 Piece |
| Primary Efficiency Filtering Cotton | 5 Pieces |
| Medium Efficiency Filtering Cotton | 1 Piece |
| High Efficiency Filtering Cotton | 1 Piece |
¶ Product Specifications
| Input Voltage | AC220V / AC110V |
|---|---|
| Power | 210W |
| Fitering Effect | 0.3μm 99.97% |
| Noise | <55dB |
| System Flow | 330m³/h |
| Overll Dimension | 256 × 430 × 530mm |
| Weight | 15.9kg |
¶ Warnings
Before the operation, please carefully check the safety precautions as below to prevent fire and personal injury.
Before the operation, please carefully check the safety precautions as below to prevent fire and personal injury.
- This product is prohibited to be used under high temperature environment (above 50°C), inflammable, explosive or greasy environment.
- The ground cable must be connected before operation.
- The internal electric voltage of the product is as high as 310V, disassembly of the product for inspection or maintenance must be performed by professionals.
- Do not pick and place filter elements when products are in operation.
- Hands or other objects should not touch the rotating impeller.
¶ Tutorial
¶ Checking Before Operation
Before switching on the power for the first time, please ensure the following points to make sure it’s working safely.
- Whether the appearance is intact;
- The power switch is set to OFF position;
- Whether filter element is evenly placed;
- Whether the cover and box body is installed securely.
¶ The step of installing the smoke purifier
- Install the smoke purifier ventilation duct.
- Install the ventilation duct onto the TOOCAA L2.
¶ Troubleshooting
Make sure the power is switched off before inspecting or repairing!
**Problem 1: **The machine still works, but the air flow is very weak and suction power is greatly reduced.
Cause: Air Inlet is blocked or foreign body exists inside the duct. The filter becomes saturated and hence gets blocked and gives an alarm.
Solution: Turn off the power and open the top cover. Check if there is any foreign body blocked in the air inlet. Then check if the air vent is blocked or not. If the suction power of the empty-loaded machine is normal, it means the filter needs to be replaced.
Problem 2: The machine shuts down automatically after it is just started. Even if you restart the machine, the same problem happens again.
**Cause: **The air flow inside the machine is not smooth. The obstruction of the filter is very strong. As a result, the starting current of the fan becomes very high, hence the machine shuts down automatically for self protection.
**Solution: **Turn off the power and open the top cover. Check if there is any foreign body blocked in the air inlet. Then turn the speed-adjusting knob to the lowest level and restart the machine. The machine will be back to normal.
¶ Attention
- The power input of this product shall be used with in the specified nominal voltage scope (subject to power identification on the product body). It's strictly forbidden for the use with excessive high or low voltage, if the ambient voltage is unstable, please turn off the machine, unplug the power plug and use it again when the voltage gets normal.
- While using the machine, the ambient temperature range of the gas and the dust sucked into the air inlet should be: atmospheric temperature ~50°C, never use it when the temperature is higher or lower than this temperature scope.
- When using the machine, the humidity of the gas and the dust sucked into the air inlet should be between 40%-80%, if the humidity is excessively high, the filter element will become invalid rapidly and the internal circuit will be damaged; never use it when the humidity is higher than 80%.
- When the machine has primary cotton filter, properly install the primary cotton filter before operation, primary cotton filter can be classified as disposable consumable and never use it again after washing, please replace the primary cotton filter configured by the original manufacturer. Never use the machine without primary cotton filter or with poor primary cotton filter(poor or washed primary cotton filter over the market performs poorly and medium and high-efficiency filter element in the subsequent stages will be blocked up or become invalid quickly and cause greater losses).
- It's strictly forbidden to use this machine without a filter element, because the cooking fume or the dust particle sucked in the machine directly would cause damage to airblower and control system. Any fault caused by machine use under the aforesaid status shall be serviced at the user's own cost, therefor greater losses can be caused.
- It's not permitted to continue to use the machine when the filter element or the filter cotton is blocked up. This will greatly shorten the service life of the machine, even damage the machine, please clean and maintain the machine regularly and replace the it accordingly.
- In case your machine filter element is blocked up, the suction force is lowered or the filter element for foreign odor removal fails for foreign odor removal, it's not permitted to use this machine by reducing the machine's number of layers of the filter elements or without putting in primary filter element or cotton. Please replace it with the filter configured by the original manufacturer.
- It is strictly prohibited to open the inside of the machine privately formaintenance. We are not responsible for any damage caused by this behaviour and this is also not covered by warranty.
¶ Filter Replacement Kit for TOOCAA Smoke Purifier
¶ Get to know your Filter replacement kit for TOOCAA L2 smoke purifier
¶ Product Description
Filter replacement kit for TOOCAA L2 smoke purifier is an important component of the smoke purifier. It uses a combination of 1200 iodine value coconut shell activated carbon filter main filter, F8 glass fiber filter middle filter, and F5 efficiency pre-filter. It can effectively filter the smoke, dust, and odor generated during cutting and engraving, keeping fresh and clean air in your workspace.
Filter replacement kit for TOOCAA L2 smoke purifier is easy to use and has a compact design. It is suitable for various working environments, especially indoor scenes with limited ventilation conditions. It makes the creative process healthier and more comfortable. It is an ideal choice for you to enhance your engraving and cutting experience.
¶ Product Specifications
| Product name | Filter replacement kit for TOOCAA L2 smoke purifier |
|---|---|
| Packing Size | 395 × 212 × 265(mm) |
| Main Filter Size | 385 × 195 × 170(mm) |
| Middle Filter Size | 365 × 175 × 55(mm) |
| Pre Filter Size | 365 × 175 × 25(mm) |
| Product Weight | Gross weight 4.20kg |
| Type of Accessories | Main Filter × 1、Middle Filter × 1、Pre Filter × 1 |
| Replacement Cycle | 3-6 Month |
| Compatible Machines | TOOCAA Smoke Purifier |
¶ Important Notes
¶ Instructions for use
- Maintain ventilation: Although smoke purifiers can effectively filter smoke and odors, it is recommended that the work area be properly ventilated to ensure air quality when conditions permit.
- **Check the filter status regularly: **The filter will gradually become saturated after long-term use, affecting the purification effect. Please check regularly whether the filter needs to be replaced to ensure that the smoke purifier always operates efficiently.
- **Control the humidity of the environment: **The filtering effect of the filter pack will be affected in a humid environment. Please try to avoid using the smoke purifier in a place with high air humidity.
- Correct connection and installation: Before use, make sure the smoke purifier is correctly connected to the laser cutting machine to avoid air leakage to give full play to the purification effect of the filter.
¶ Filter replacement cycle and replacement method
Regular replacement of the filter pack helps extend the life of the TOOCAA smoke purifier and keeps the working environment clean and healthy.
Replacement cycle: The replacement frequency of the filter pack depends on the frequency of use and the air quality of the working environment. It is generally recommended to replace the main filter and the middle filter after 3-6 months of cumulative use, and the pre-filter after 7-14 days of cumulative use. If you notice that the filtration effect of the smoke purifier has decreased, the smoke smell has increased significantly, or the air volume has decreased, you may need to replace the filter in advance.
How to Replacement:
- Turn off the equipment: Make sure both the TOOCAA L2 laser cutter and the fume purifier are turned off and unplugged.
- Open the filter compartment cover: According to the instructions for the use of the smoke purifier, find the location of the filter compartment and open it.
- Remove the old filter: Carefully remove the old filter package and avoid shaking it to prevent dust from being dispersed.
- Install a new filter: Place the new filter package into the filter compartment according to the indicated direction, ensuring a good seal.
- Reset and test: Close the filter compartment cover, connect the power supply, turn on the device, and check whether the device is operating normally.
¶ TOOCAA Smoke Purifier Pre Filter(5PCS)
¶ Get to know your TOOCAA L2 smoke purifier pre filter(5PCS)
¶ Product Description
TOOCAA L2 smoke purifier pre-filter (5PCS) is an important component of a smoke purifier. It can effectively filter smoke, dust, and odor generated during cutting and engraving. Especially in indoor scenes with limited ventilation conditions, keep your workspace fresh and clean, making the creative process healthier and more comfortable. It is an ideal choice for you to enhance your engraving and cutting experience.
¶ Product Specifications
| Product name | TOOCAA Smoke Purifier Pre-filter(5PCS) |
|---|---|
| Packing Size | 380 × 220 × 110(mm) |
| Single-piece Smoke Purifier Pre-filter Size | 365 × 175 × 25(mm) |
| Product Weight | Gross Weight 0.55kg |
| Type of Accessories | Pre Filter × 5 |
| Replacement Cycle | 7-14 day |
| Compatible Machines | TOOCAA Smoke Purifier |
¶ Important Notes
¶ Instructions for use
- Maintain ventilation: Although smoke purifiers can effectively filter smoke and odors, it is recommended that the work area be properly ventilated to ensure air quality when conditions permit.
- **Check the filter status regularly: **The filter will gradually become saturated after long-term use, affecting the purification effect. Please check regularly whether the filter needs to be replaced to ensure that the smoke purifier always operates efficiently.
- **Control the humidity of the environment: **The filtering effect of the filter pack will be affected in a humid environment. Please try to avoid using the smoke purifier in a place with high air humidity.
- Correct connection and installation: Before use, make sure the smoke purifier is correctly connected to the laser cutting machine to avoid air leakage to give full play to the purification effect of the filter.
¶ Filter replacement cycle and replacement method
Regular replacement of the filter pack helps extend the life of the TOOCAA smoke purifier and keeps the working environment clean and healthy.
**Replacement cycle: **The replacement frequency of the filter pack depends on the frequency of use and the air quality of the working environment. It is generally recommended to replace the main filter and the middle filter after 3-6 months of cumulative use, and the pre-filter after 7-14 days of cumulative use. If you notice that the filtration effect of the smoke purifier has decreased, the smoke smell has increased significantly, or the air volume has decreased, you may need to replace the filter in advance.
How to Replacement:
- Turn off the equipment: Make sure both the TOOCAA L2 laser cutter and the fume purifier are turned off and unplugged.
- Open the filter compartment cover: According to the instructions for the use of the smoke purifier, find the location of the filter compartment and open it.
- Remove the old filter: Carefully remove the old filter package and avoid shaking it to prevent dust from being dispersed.
- Install a new filter: Place the new filter package into the filter compartment according to the indicated direction, ensuring a good seal.
- Reset and test: Close the filter compartment cover, connect the power supply, turn on the device, and check whether the device is operating normally.