¶ Laser Lens Cleaning and Replacement Guide
This guide applies to the Laser Lens on TOOCAA NOVA machines fitted with a 10W or 20W laser module. It covers Laser Lens inspection, cleaning and replacement, as well as removal and reinstallation of the laser module and Focus Module.
Inspect and clean the Laser Lens when a maintenance reminder appears or when you notice smoke residue, black spots, fingerprints or other contamination. Cleaning does not always require replacement. If contamination remains after cleaning, or if you find scratches, cracks, damage or burn marks, replace the Laser Lens as described in Step 6.
¶ Before Maintenance
- A tool that fits the laser module securing screws, such as the tool supplied with the machine.
- A clean, soft, lint-free cloth for the module exterior.
- Clean lens-cleaning cloths or lens tissue for the Laser Lens. Keep exterior-cleaning materials separate from lens-cleaning materials.
- If wet cleaning is needed, an optical lens cleaner compatible with the Laser Lens coating. Follow the cleaner instructions.
- A replacement Laser Lens compatible with the specific 10W or 20W laser module installed on your TOOCAA NOVA, if replacement is necessary.
- A clean, level work surface and a safe place for screws and removed parts.
Safety: Stop processing, switch off the machine and disconnect the power supply. Allow the laser module to cool completely before handling it. Keep the power disconnected throughout removal, cleaning, replacement and reinstallation. Do not power on or start processing while the laser module is removed, the Focus Module is not correctly seated, or the securing screws are not tightened.
¶ Maintenance Procedure
¶ 1. Disconnect Power and Remove the Two Securing Screws
- Make sure processing has stopped. Switch off the machine and disconnect the power supply. Once the laser module has cooled completely, open the lid.
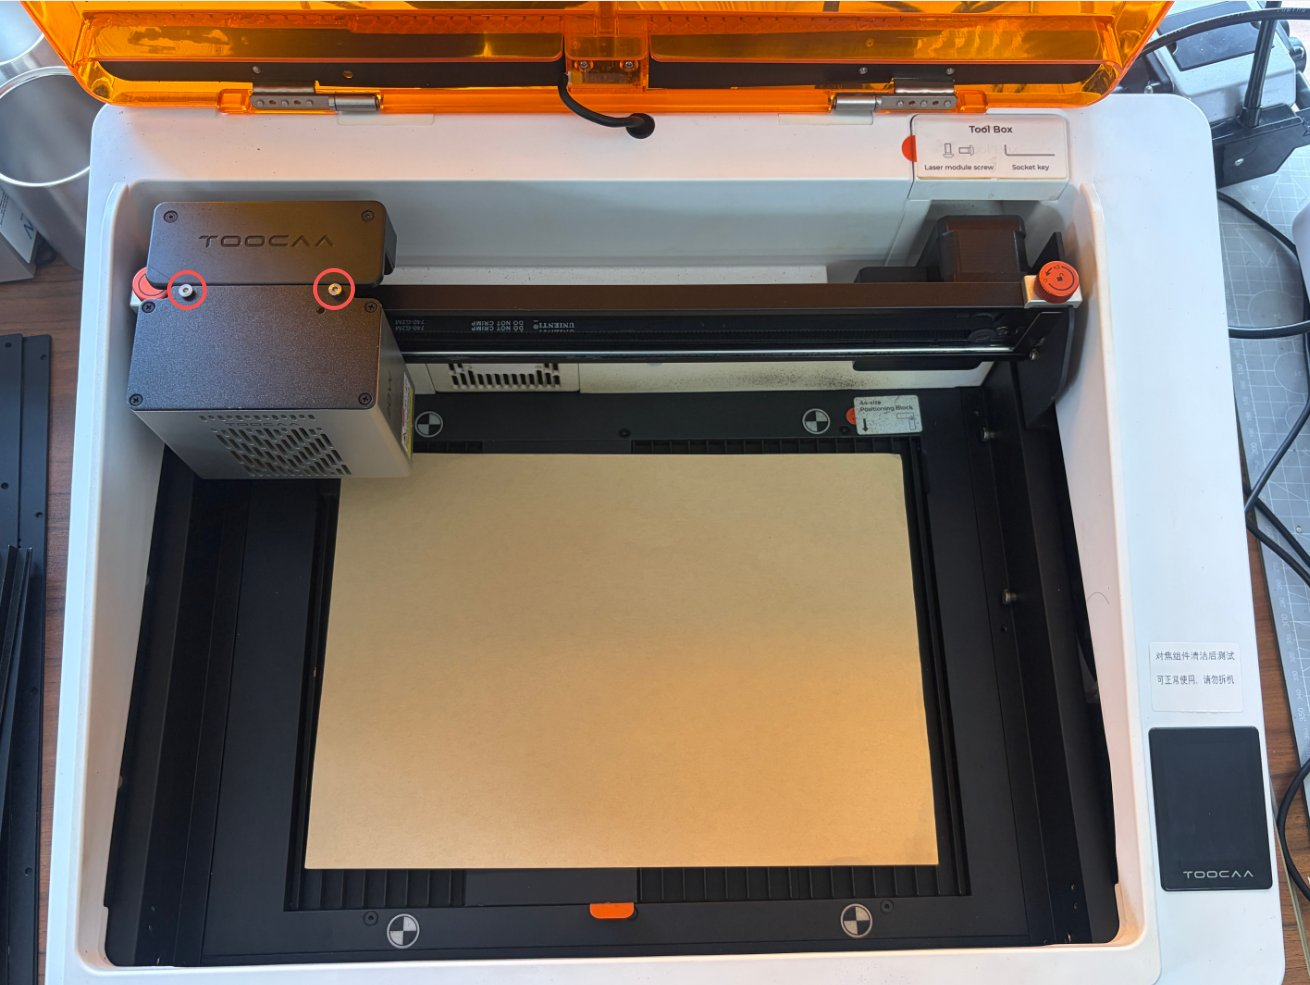
- Support the laser module with one hand. Use the supplied tool to remove the two securing screws marked by red circles, and keep them in a safe place. Continue supporting the module when removing the last screw.
¶ 2. Remove the Laser Module Horizontally
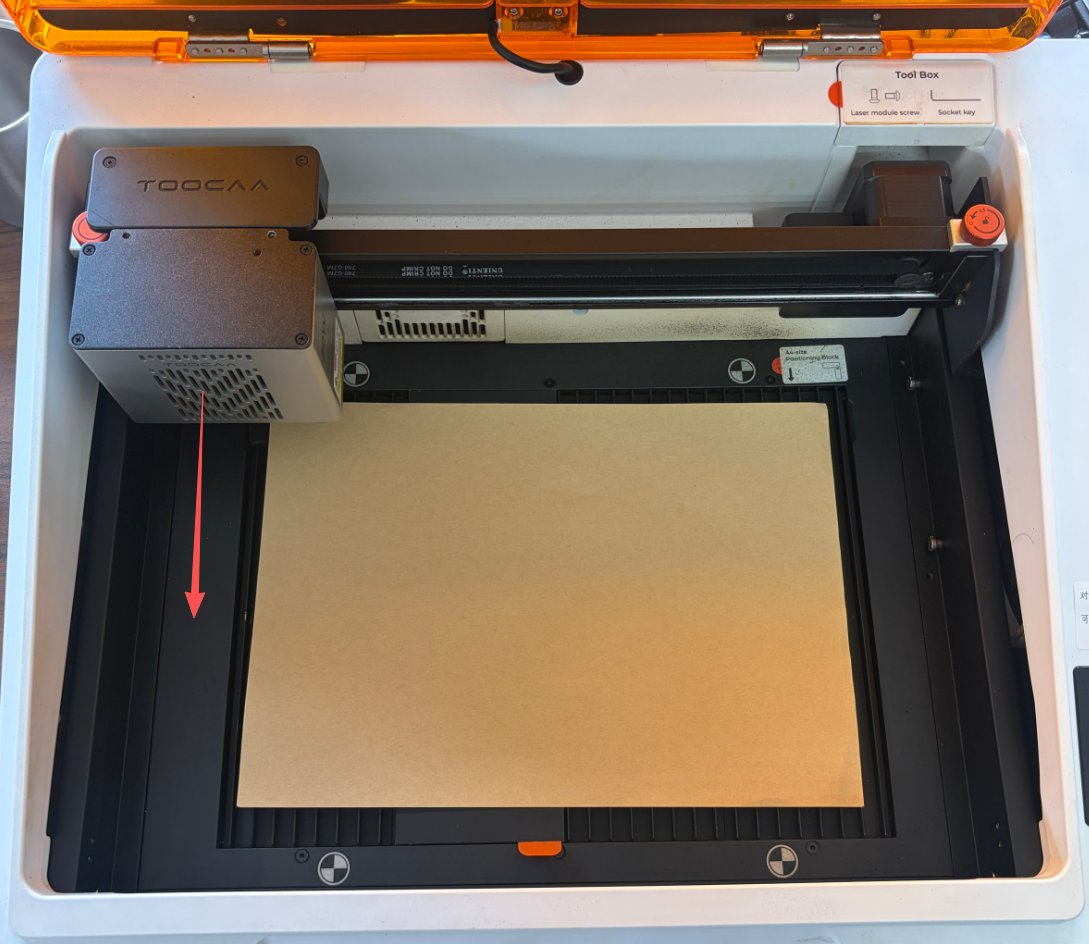
- Support the laser module and keep it level. Slide it out steadily in the direction indicated by the arrow.
- Avoid tilting, impacts or forceful pulling. If you feel significant resistance, check that both securing screws have been fully removed and that the mounting structure is not holding the module.
- Place the module on a clean, stable work surface and position it as shown in the following images. Keep the Laser Lens surface from touching the work surface.
¶ 3. Wipe the Laser Module Exterior
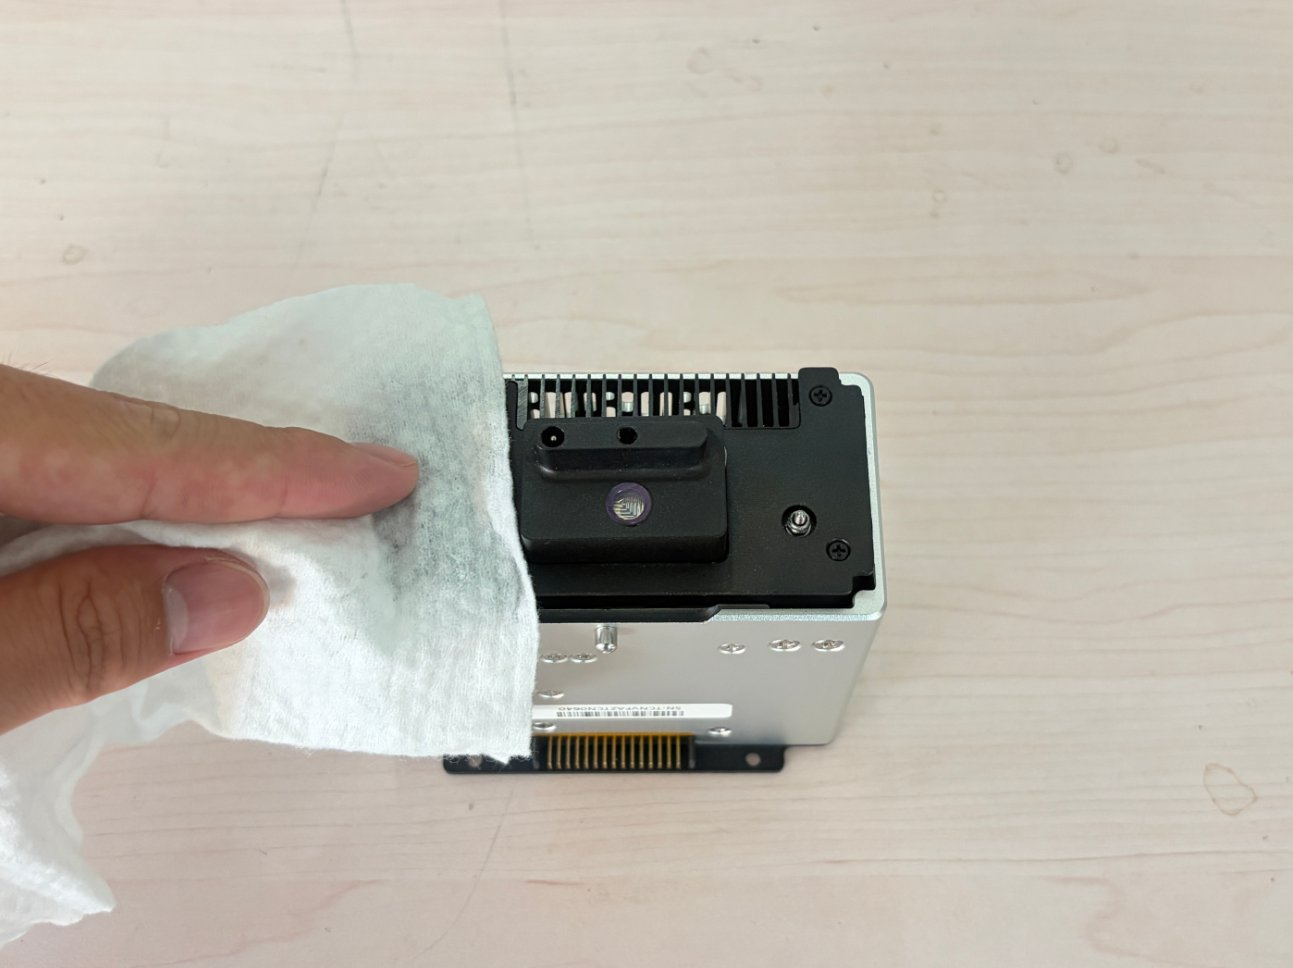
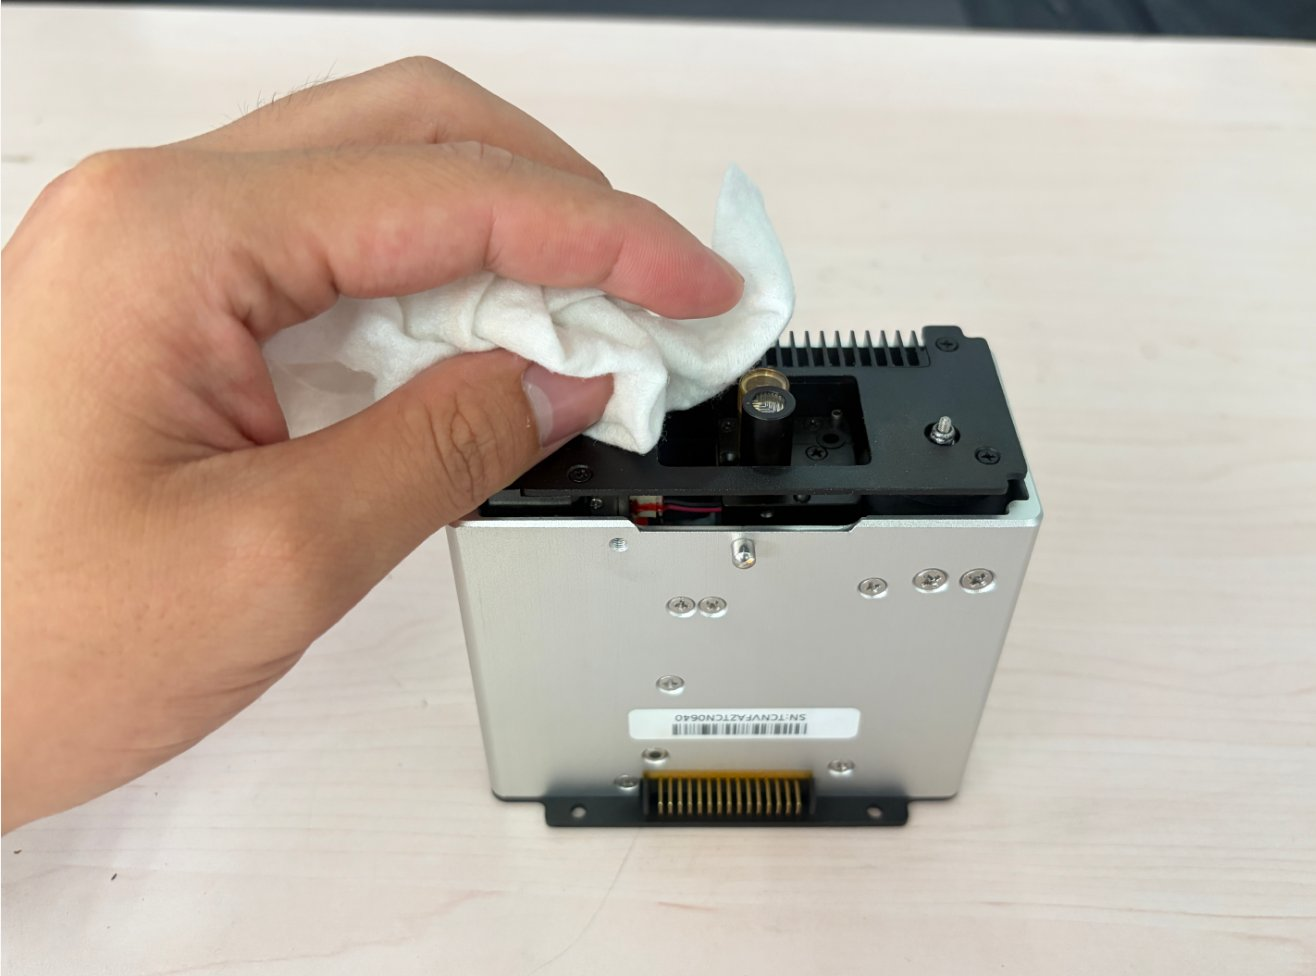
- Use a clean, soft, lint-free cloth to gently remove smoke residue and dirt from the module exterior.
- Keep particles out of the Laser Lens opening and connectors. Do not spray cleaning liquid directly onto the module.
- After cleaning the exterior, use fresh, dedicated lens-cleaning material for the Laser Lens.
¶ 4. Remove the Focus Module Vertically
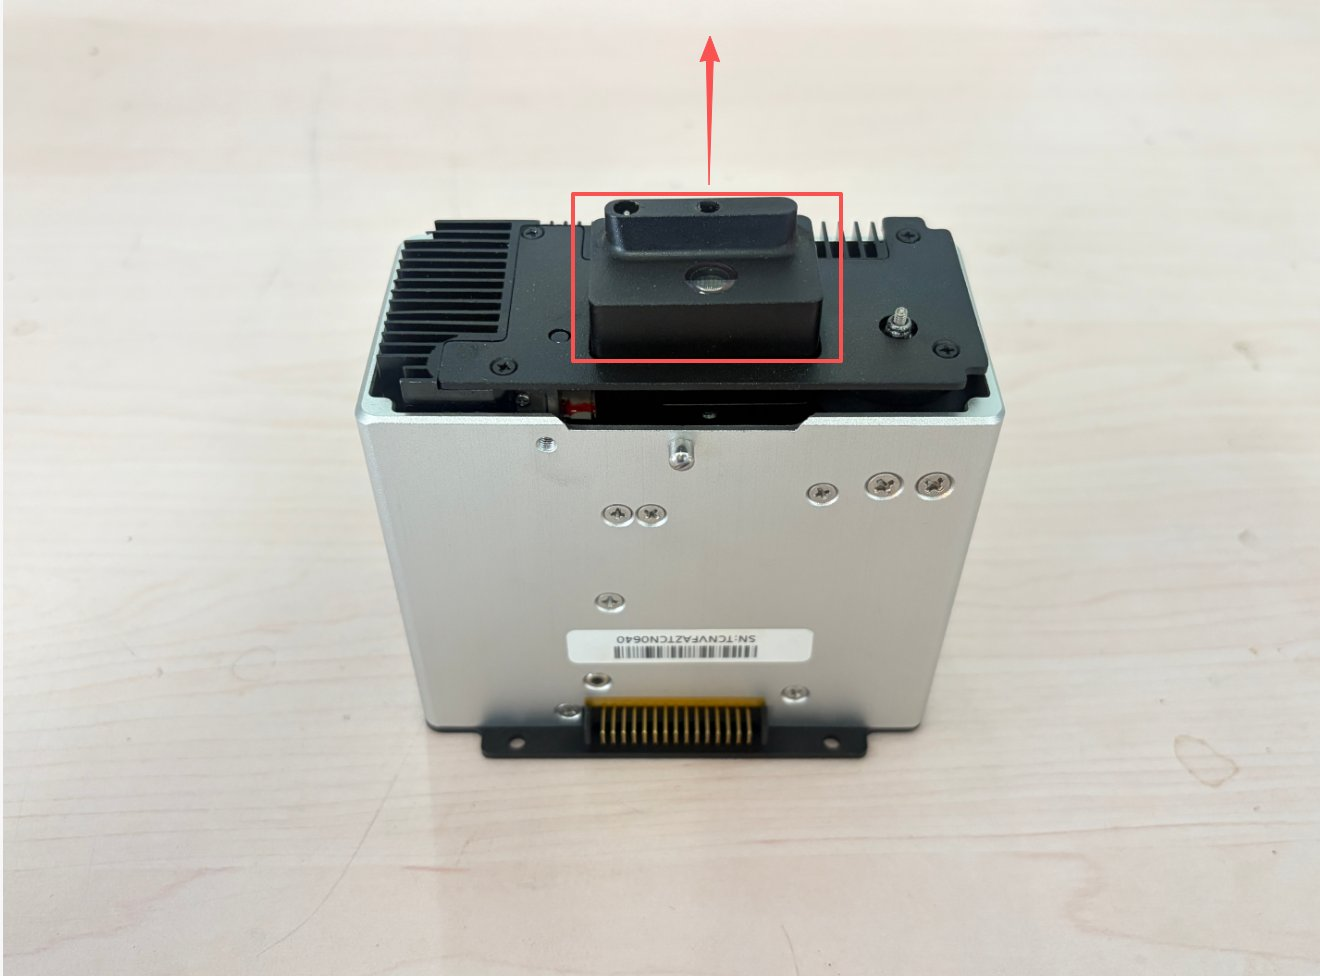
- Position the laser module as shown and hold the body of the Focus Module outlined in red.
- Pull the Focus Module straight up in the arrow direction to expose the Laser Lens. Move steadily and avoid levering it sideways or pulling on the probe.
- Place the removed Focus Module in a clean, secure location where the probe will not be pressed or bent.
¶ 5. Clean the Laser Lens
- Inspect the Laser Lens in good lighting and locate smoke residue, black spots and other contamination.
- Gently remove loose dust first. Then lightly wipe the Laser Lens with a clean lens-cleaning cloth or lens tissue. Change to a clean area of the material as needed to avoid rubbing trapped particles across the Laser Lens.
- If wet cleaning is required, lightly moisten the cleaning material according to the optical lens cleaner instructions, then gently wipe the Laser Lens. Do not spray or drip liquid directly into the module.
- Allow the Laser Lens and surrounding cleaned areas to dry completely before inspection. Do not touch the Laser Lens surface with your fingers or scrape contamination with sharp tools.
¶ 6. Inspect the Laser Lens and Replace It if Necessary
Once the Laser Lens is clean and dry, inspect its surface again:
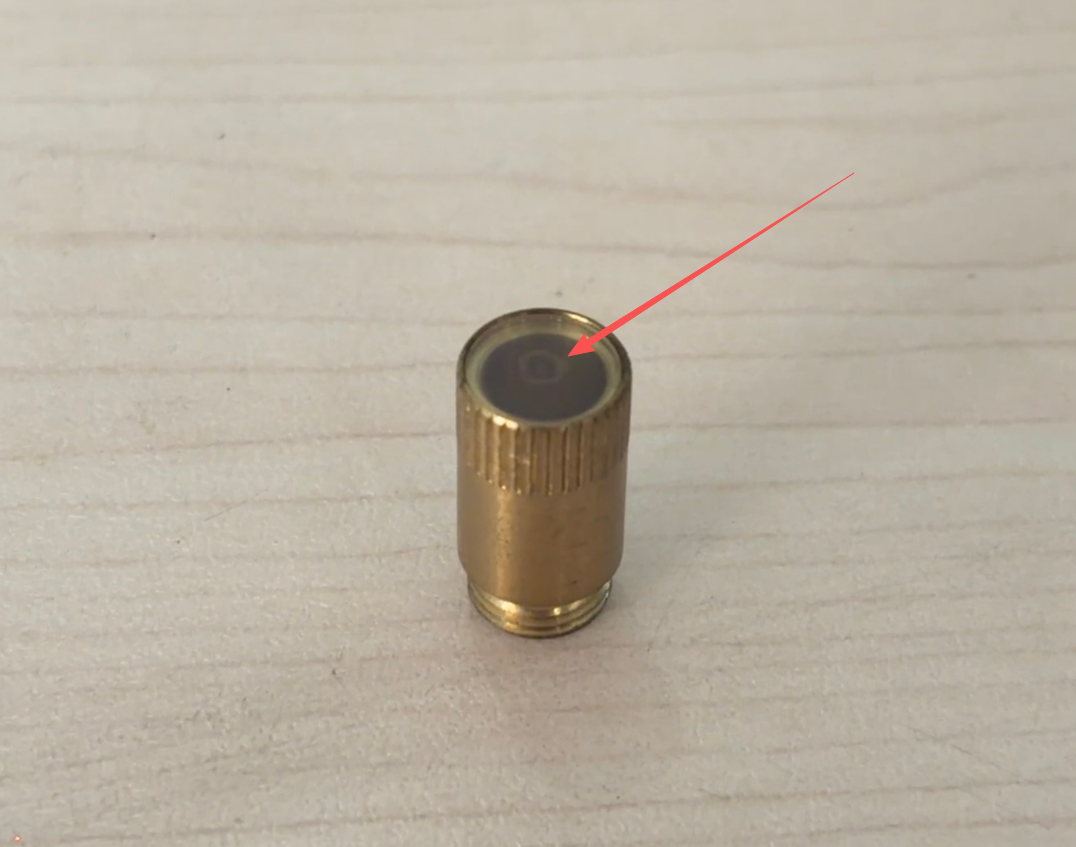
As shown below, replace the Laser Lens if marks, stains or contamination affecting light transmission remain after cleaning and drying. Do not repeatedly rub the surface with excessive force.
| Inspection Result | Action |
|---|---|
| Contamination has been removed, the Laser Lens is clear and no damage is visible | Replacement is not needed. Continue to Step 7. |
| Contamination cannot be removed, or scratches, cracks, damage or burn marks are visible | Stop repeated wiping and replace the Laser Lens with one of the same specification. |
If replacement is needed:
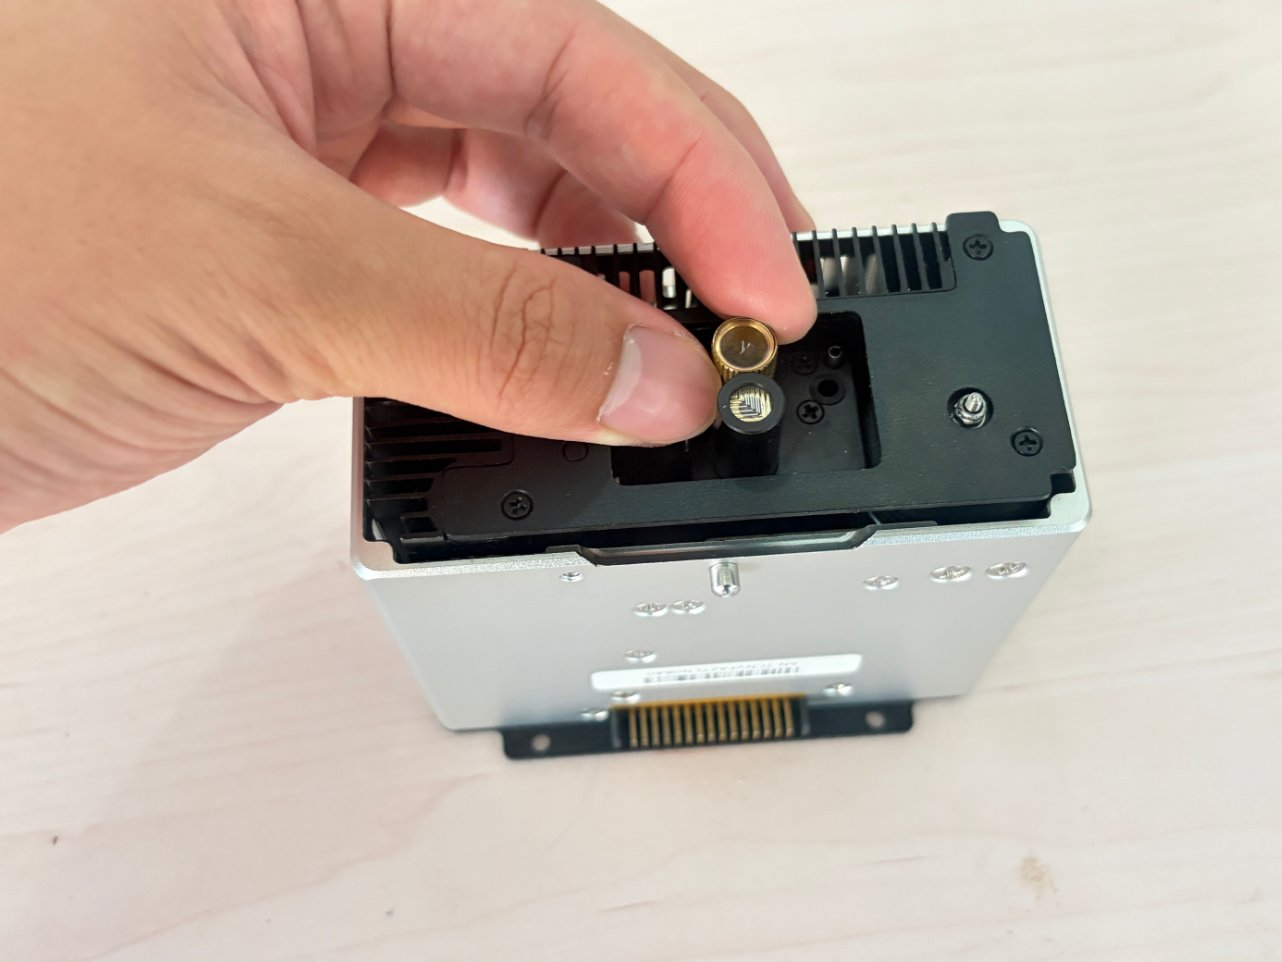
- Hold the metal outer ring of the Laser Lens assembly. Turn it counterclockwise when looking directly at the Laser Lens and carefully remove the assembly.
- Inspect the new Laser Lens to make sure it is clean and undamaged. Handle it by the metal outer ring without touching the Laser Lens surface.
- Align the new Laser Lens with the original mounting position and gently turn it clockwise until it is correctly seated and secure. If the threads are misaligned or you feel unusual resistance, stop and realign it. Do not force it into place.
- Check again that the Laser Lens is clean and that no cleaning fibers or other debris remain.
Do not start processing if the Laser Lens is missing, damaged or not correctly installed.
¶ 7. Reinstall the Focus Module
- Check that the Focus Module mounting area is free of dust, cleaning fibers and other debris.
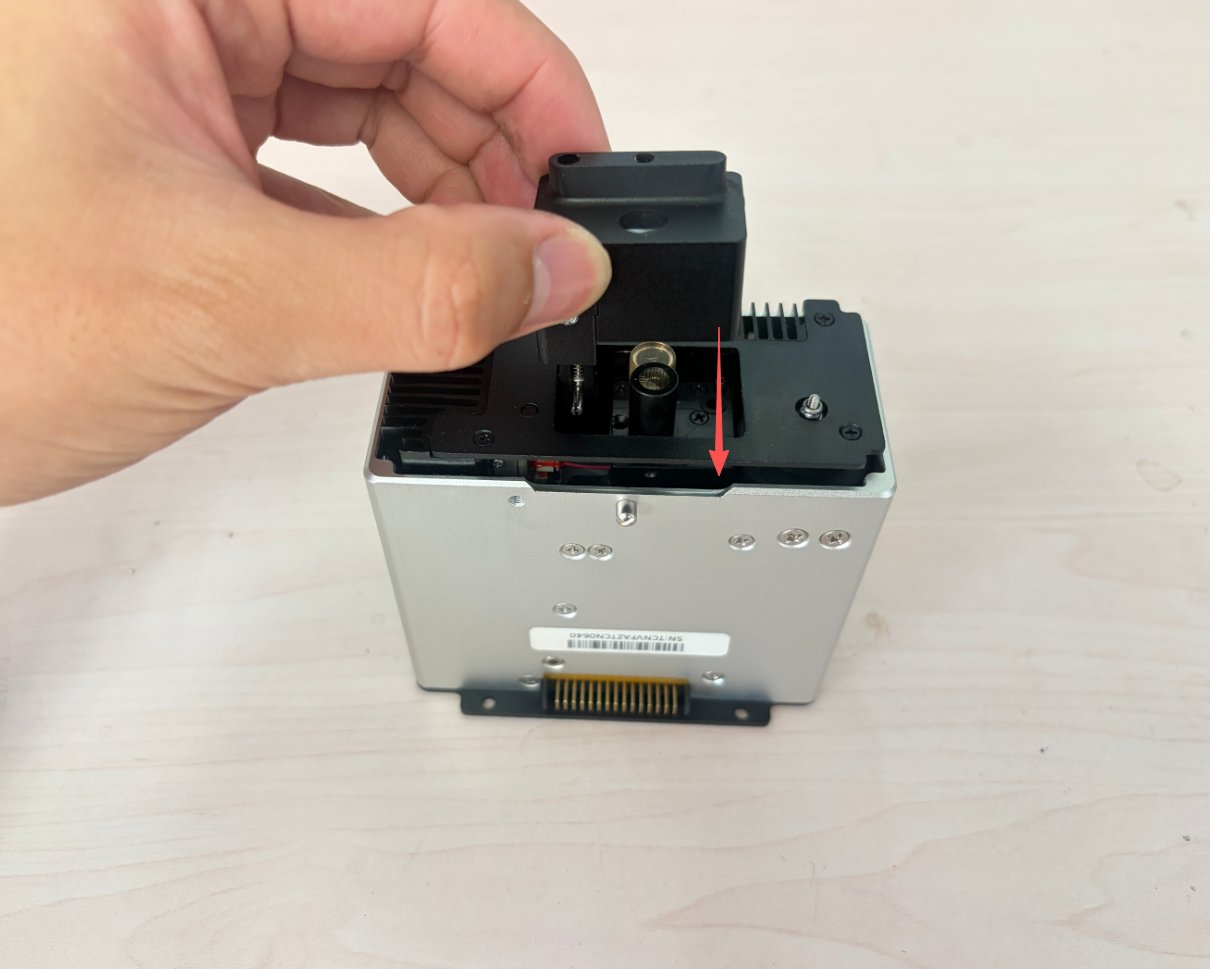
- Align the Focus Module with its original position and lower it straight down in the arrow direction. Hold the module body and avoid pressing or bending the probe.
- Make sure the module is fully seated, with no tilt, looseness or trapped debris.
¶ 8. Reinstall and Secure the Laser Module
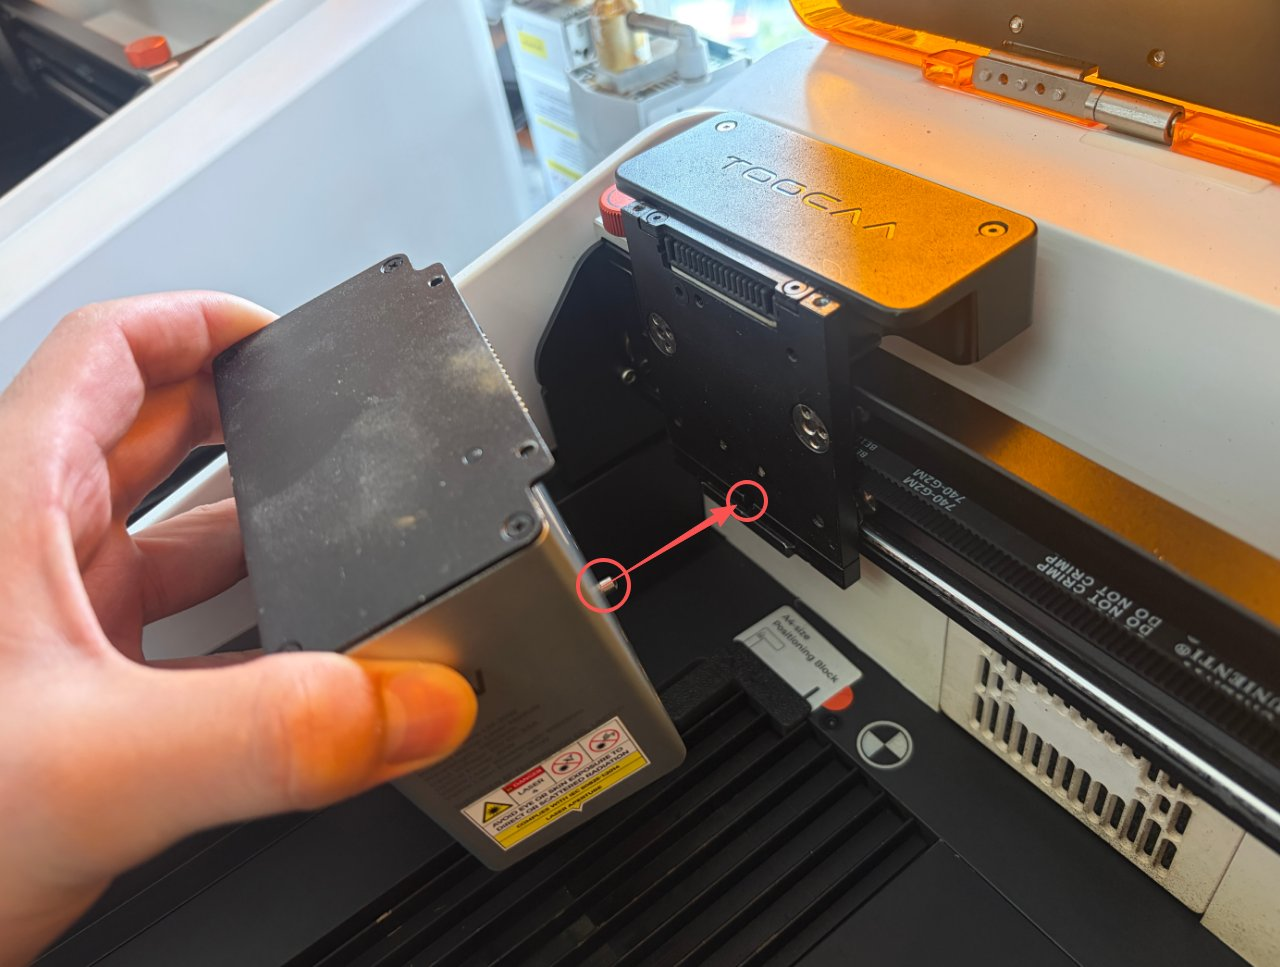
- Support the laser module. Align the locating features marked in the image with the original mounting position and reinstall the module steadily.
- Make sure the module is fully seated and that the connectors and mounting area are clear. If you feel significant resistance, withdraw the module and realign it.
- Reinstall and tighten the two securing screws removed in Step 1. Make sure the module is securely held and cannot wobble or slide down.
¶ After Maintenance
- The Laser Lens is clean, clear and dry, with no visible damage or remaining fibers.
- The Laser Lens and Focus Module are correctly seated, and both laser module securing screws are tightened.
- All tools, cleaning materials, removed parts and debris have been cleared from the work area.
After completing these checks, close the lid and reconnect the power supply. Follow the normal operating procedure and perform a small test on suitable test material. Check that module detection, focusing and processing results are normal.
If the module is not detected, focusing is abnormal, unusual noise occurs, or processing results remain clearly abnormal after cleaning or replacement, stop processing, switch off the machine and disconnect the power supply. Recheck the installation. Contact TOOCAA Support if the issue cannot be resolved.
Once cleaning or replacement is actually complete, you may reset the maintenance timer for this item on the maintenance page. Do not reset it before completing maintenance.